Three-Point Seat Belts With a Retractor
The stock seat belts were fine for the 70s, but here's a way to modernize them.
Unfortunately, it's not easy to do.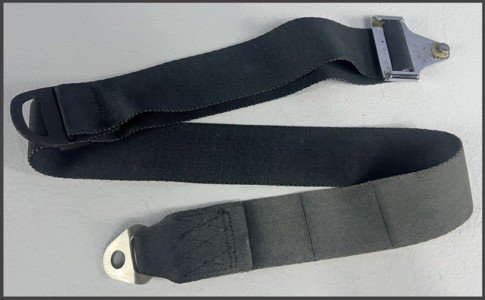 The stock seat belts for a 240z are awful.
First of all, they lacked a retractor, so when you unbuckled them the part with the clasp would fall down between the seat and the transmission hump. The shoulder strap needed to be manually "hung up" on a small clip at the top of the door, or you'd have to fumble for it when it was time to "buckle up".
Another problem was adjusting the length. The photo shows the shoulder strap. The corroded chrome piece at the top is where it clipped to the buckle for the lap belt. The length was adjusted there but was a pain in the butt, especially for a passenger who'd never done it before. The lap belt (not shown) had the same method.
There has to be a better way.
The stock seat belts for a 240z are awful.
First of all, they lacked a retractor, so when you unbuckled them the part with the clasp would fall down between the seat and the transmission hump. The shoulder strap needed to be manually "hung up" on a small clip at the top of the door, or you'd have to fumble for it when it was time to "buckle up".
Another problem was adjusting the length. The photo shows the shoulder strap. The corroded chrome piece at the top is where it clipped to the buckle for the lap belt. The length was adjusted there but was a pain in the butt, especially for a passenger who'd never done it before. The lap belt (not shown) had the same method.
There has to be a better way.
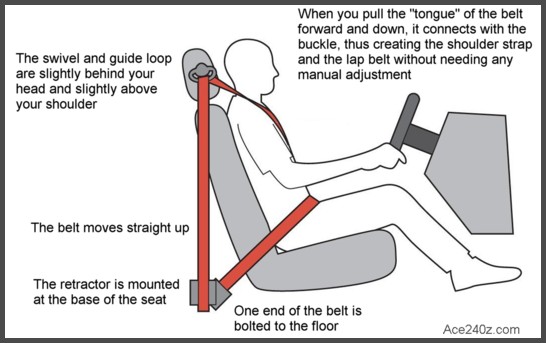 Here's a handy diagram showing how a modern seat belt is connected.
Sit in your car and see for yourself.
Buckle and unbuckle it a few times and look at how it works. Nobody pays attention to it because it's the standard arrangement for nearly every car. We're used to it.
The seat belt layout for a 240z does the same basic thing, but lacks the all-important retractor.
Here's a handy diagram showing how a modern seat belt is connected.
Sit in your car and see for yourself.
Buckle and unbuckle it a few times and look at how it works. Nobody pays attention to it because it's the standard arrangement for nearly every car. We're used to it.
The seat belt layout for a 240z does the same basic thing, but lacks the all-important retractor.
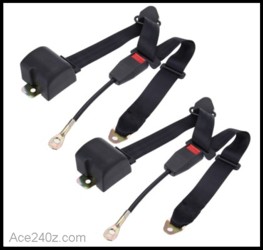 This is a "universal" 3-point seat belt kit. There are hundreds available on eBay at very reasonable prices. This one was just $30.
It comes with everything you need to replace your existing seat belts, or to upgrade an older car... such as a 240z.
Unfortunately, the 240z doesn't have a handy place to mount the retractor. Worse, the existing shoulder harness mount is way behind the occupant, and higher than your head, so if you attach the swivel loop there the tensioned belt crossing over your shoulder right at the base of the neck. That location, especially under tension from the retractor, is pretty uncomfortable.
I tried several different locations for the retractor, but nothing worked. Look again at the diagram above. The belt goes straight up to the loop, then gets pulled around your body. The loop swivels to keep the belt in the right place, but if the angle between the belt going up and the belt going forward is too large, the belt starts to tangle and bind.
That's another thing you can see for yourself in your car.
Because of that limitation, there are only a few places the retractor can go and none of them are pretty or easy.
This is a "universal" 3-point seat belt kit. There are hundreds available on eBay at very reasonable prices. This one was just $30.
It comes with everything you need to replace your existing seat belts, or to upgrade an older car... such as a 240z.
Unfortunately, the 240z doesn't have a handy place to mount the retractor. Worse, the existing shoulder harness mount is way behind the occupant, and higher than your head, so if you attach the swivel loop there the tensioned belt crossing over your shoulder right at the base of the neck. That location, especially under tension from the retractor, is pretty uncomfortable.
I tried several different locations for the retractor, but nothing worked. Look again at the diagram above. The belt goes straight up to the loop, then gets pulled around your body. The loop swivels to keep the belt in the right place, but if the angle between the belt going up and the belt going forward is too large, the belt starts to tangle and bind.
That's another thing you can see for yourself in your car.
Because of that limitation, there are only a few places the retractor can go and none of them are pretty or easy.
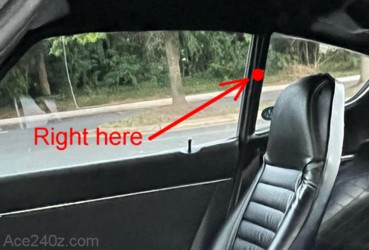 The ideal spot for the swivel loop would be halfway up the frame of the quarter window, as shown in this photo.
Unfortunately, it's not structurally strong enough. It's just a frame around the glass which is attached to the body with four little screws. You could knock it out with a good kick.
I'm a mechanical designer so I figured I could find a way to make that spot work.
The ideal spot for the swivel loop would be halfway up the frame of the quarter window, as shown in this photo.
Unfortunately, it's not structurally strong enough. It's just a frame around the glass which is attached to the body with four little screws. You could knock it out with a good kick.
I'm a mechanical designer so I figured I could find a way to make that spot work.
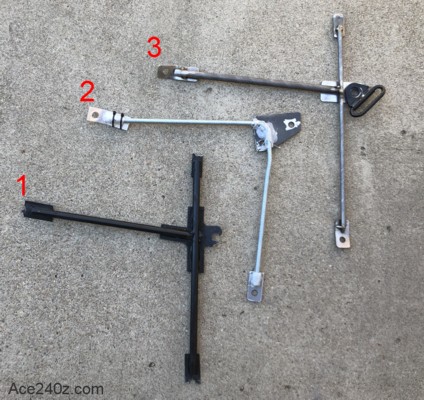 I took a photo of that area and brought it into my cad software and started drawing.
#1 was a cheap mockup made with cardboard and dowels held together with hot glue, which verified the loop would be at the right place.
#2 was an equally-crude version made from scrap all-thread, some tin and a lot of glue. It was barely strong enough to hold the belt and swiveling loop, but it confirmed the design was right.
#3 was a welded version that looked like crap, but it actually worked. Success!
Tt worked so well that I drove around with it for several days. It was great having a real seat belt.
Unfortunately, the ugliness could be seen thru the quarter window. Painting it didn't hide anything.
I took a photo of that area and brought it into my cad software and started drawing.
#1 was a cheap mockup made with cardboard and dowels held together with hot glue, which verified the loop would be at the right place.
#2 was an equally-crude version made from scrap all-thread, some tin and a lot of glue. It was barely strong enough to hold the belt and swiveling loop, but it confirmed the design was right.
#3 was a welded version that looked like crap, but it actually worked. Success!
Tt worked so well that I drove around with it for several days. It was great having a real seat belt.
Unfortunately, the ugliness could be seen thru the quarter window. Painting it didn't hide anything.
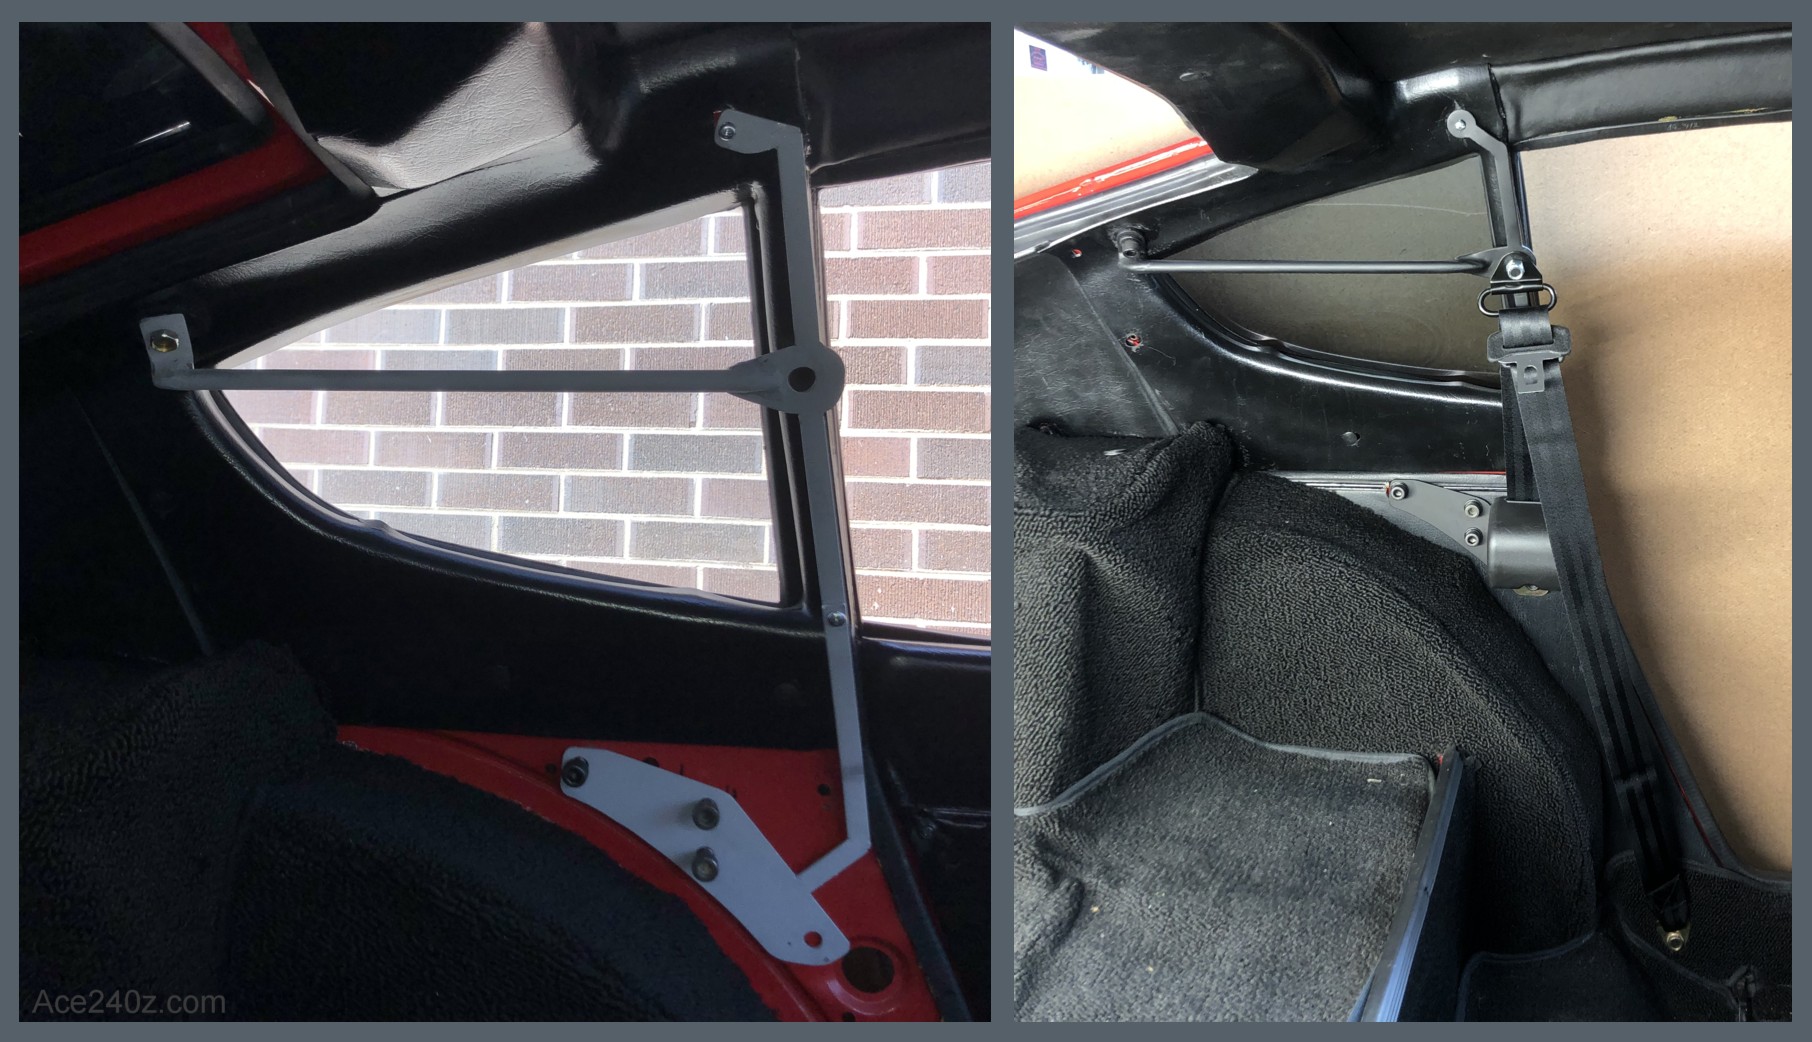 I made second, nicer version, which was better but not quite what I wanted, so I made a third one and it's exactly what I'd hope for. Click on it to see a larger version.
On the left it's painted grey to show the finished design. On the right it's painted black and fully assembled. Reach over your shoulder and there's the tongue. Pull it over your shoulder and down into the buckle and it feels just like any car, nice and comfortable. Release the buckle and it retracts perfectly.
The horizontal piece is a 1/2" diameter round bar, secured to the stock shoulder mount with a thick piece of flat steel. The vertical strips aren't structural - they merely keep the swivel mount from moving up or down. The retractor is attached with a 1/8" thick plate to the three threaded holes that already exist inside the body. It's very, very strong.
Aside from three small holes in the upholstered panel, there are no modifications made to the car itself.
With the rear window slightly tinted, the horizontal bar is barely visible from the outside. On the inside, any Z owner would know it's not stock but it blends in very well. Non-Z owners would be so busy looking at other things that they're never notice it.
It keeps the belt from digging into my neck. It holds the "tongue" in just the right place. The belt doesn't tangle. It's mostly invisible.
Perfect.
I made second, nicer version, which was better but not quite what I wanted, so I made a third one and it's exactly what I'd hope for. Click on it to see a larger version.
On the left it's painted grey to show the finished design. On the right it's painted black and fully assembled. Reach over your shoulder and there's the tongue. Pull it over your shoulder and down into the buckle and it feels just like any car, nice and comfortable. Release the buckle and it retracts perfectly.
The horizontal piece is a 1/2" diameter round bar, secured to the stock shoulder mount with a thick piece of flat steel. The vertical strips aren't structural - they merely keep the swivel mount from moving up or down. The retractor is attached with a 1/8" thick plate to the three threaded holes that already exist inside the body. It's very, very strong.
Aside from three small holes in the upholstered panel, there are no modifications made to the car itself.
With the rear window slightly tinted, the horizontal bar is barely visible from the outside. On the inside, any Z owner would know it's not stock but it blends in very well. Non-Z owners would be so busy looking at other things that they're never notice it.
It keeps the belt from digging into my neck. It holds the "tongue" in just the right place. The belt doesn't tangle. It's mostly invisible.
Perfect.
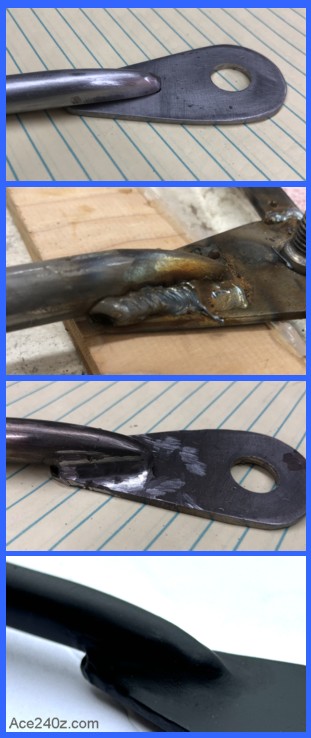 Here's how I made the part where the swivel loop attaches.
I started with 1-1/2" wide x 1/8" thick steel bar and cut and drilled it as needed to hold the swivel, then gave it a nice shape.
The 1/2" diameter round bar was ground into a taper at both ends for a smooth attachment.
Next was to weld those pieces together on both sides. I'm not a professional welder, but the beads were solid with plenty of penetration. The carbon and surface rust was sandblasted away.
I used an angle grinder to smooth the weld out. It looks better than the original bead but still needed work.
The final step was to smear body filler all around, then shape it with a file and some sandpaper, followed by a few coats of flat black. The result is something that almost appears to be manufactured.
This was repeated at the other end and I'm very pleased with the final product. It doesn't look like it was handmade in a suburban garage.
Here's how I made the part where the swivel loop attaches.
I started with 1-1/2" wide x 1/8" thick steel bar and cut and drilled it as needed to hold the swivel, then gave it a nice shape.
The 1/2" diameter round bar was ground into a taper at both ends for a smooth attachment.
Next was to weld those pieces together on both sides. I'm not a professional welder, but the beads were solid with plenty of penetration. The carbon and surface rust was sandblasted away.
I used an angle grinder to smooth the weld out. It looks better than the original bead but still needed work.
The final step was to smear body filler all around, then shape it with a file and some sandpaper, followed by a few coats of flat black. The result is something that almost appears to be manufactured.
This was repeated at the other end and I'm very pleased with the final product. It doesn't look like it was handmade in a suburban garage.
I estimate I spent well over 100 hours trying all of the different methods to mount the retractor, to create the drawings, to make the various prototypes, and then fabricate the final version. Each of the finished adapters took about 6 hours to make with all of the fitting and cutting and welding and painting that was involved. From start to finish, this was a long, long process - far longer than I'd ever imagined - but it worked and I ended up with something unique that can't be found online or in a store. I'm tempted to make a pdf file with templates for the various pieces and a parts list of the hardware and some simple instructions so that other people can do the same thing... but there's a liability issue. I'm confident enough with the design and my fabrication that I'm going to drive around with it and feel safe and secure, but if somebody makes one and it somehow fails and they end up injured or killed, I'd feel very, very badly about it, and would probably get sued, which is something I can't risk. Sorry.