240z Transmission Swap
Put a 5-speed transmission from a 280z into your 240z
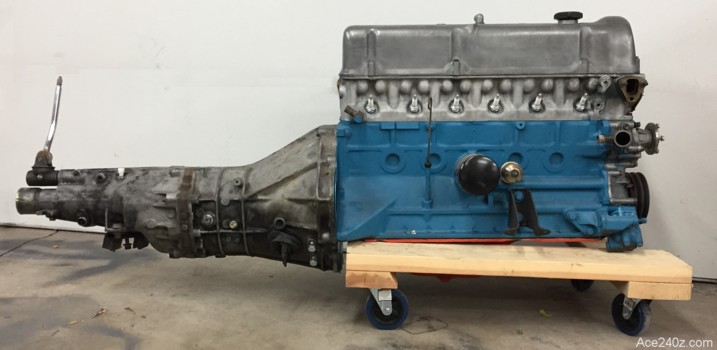 Any engine or manual transmission from a 240z, 260z and 280z can be easily swapped back and forth. They use the same mounting points and the same crossmember and the same driveshaft. The only modification is when putting a 5-speed transmission in a '70 or '71 because you have to trim about half an inch of metal at the front of the hole where the shifter pokes thru. It only takes a couple minutes.
The most difficult part of the process is finding the transmission itself. This is a pretty popular upgrade and nobody is making new transmissions, so the available supply is shrinking. When I did this for my first car in 1995, the transmission was a mere $50. Doing it again in 2022 cost $350 and required some searching. Unfortunately, it vibrates a little in 5th gear, so there's a rebuild destined in the future.
You might have to replace the collar which holds the release bearing because Datsun used a couple of different lengths. This isn't typically a problem but at the bottom of this page is an easy procedure for how to check if you have the right length or not. If you need a different size, call Junkyard Jenny - her number can be found on the Index page. She's the absolute best source for used parts and the only reseller I trust 100%.
The resale value of your existing 4-speed transmission is probably $25 because few people want one, so hang onto it just in case your used 5-speed has problems in the future. Having a back-up trans will enable you to keep driving while the other is being rebuilt.
Note: 280zx transmissions can be swapped but some need an adapter, which isn't covered here.
Any engine or manual transmission from a 240z, 260z and 280z can be easily swapped back and forth. They use the same mounting points and the same crossmember and the same driveshaft. The only modification is when putting a 5-speed transmission in a '70 or '71 because you have to trim about half an inch of metal at the front of the hole where the shifter pokes thru. It only takes a couple minutes.
The most difficult part of the process is finding the transmission itself. This is a pretty popular upgrade and nobody is making new transmissions, so the available supply is shrinking. When I did this for my first car in 1995, the transmission was a mere $50. Doing it again in 2022 cost $350 and required some searching. Unfortunately, it vibrates a little in 5th gear, so there's a rebuild destined in the future.
You might have to replace the collar which holds the release bearing because Datsun used a couple of different lengths. This isn't typically a problem but at the bottom of this page is an easy procedure for how to check if you have the right length or not. If you need a different size, call Junkyard Jenny - her number can be found on the Index page. She's the absolute best source for used parts and the only reseller I trust 100%.
The resale value of your existing 4-speed transmission is probably $25 because few people want one, so hang onto it just in case your used 5-speed has problems in the future. Having a back-up trans will enable you to keep driving while the other is being rebuilt.
Note: 280zx transmissions can be swapped but some need an adapter, which isn't covered here.
Before starting the swap, you'll need a few things: First is a new front & rear seal because this is the easiest opportunity to prevent any leaks. There is a rubber bushing where the rear of the transmisson connects to the car's crossmember. Take a look at your existing one. If it's torn or rotting, replace it now. Where the shifter connects to the transmission are a couple of plastic bushings and a little rubber boot which covers that area. They're they're pretty cheap. They can be replaced later but now it's easy to do. Where the release bearing arm pokes thru the side of the transmission is a little rubber boot. It probably needs to be replaced. Like the shifter bushings, this can be replaced later but doing it now will eliminate some grumbling in the future. And finally is new transmission fluid. The best seems to be Redline's MT-90. Optional is a new clutch (while everything is apart) but if your existing one works fine, don't sweat it. One thing to consider is swapping the release bearing fork and slave cylinder with the early type that uses an adjustable pushrod. It makes adjusting the clutch a snap. The fork and slave can be found from online Z stores - just make sure you get the one with the adjustable pushrod because most aftermarket parts houses show the later, non-adjustable version as a "fits all years" replacement.
Here's the procedure: Disconnect the battery. Remove the starter motor. Remove the shifter. Be careful to not drop or lose the little circlip the holds the pivot pin. Jack up the front of the car and support it with jack stands. Taking off the front wheels will allow more room to move around. Drain the transmission fluid. Remove the driveshaft. Remove the release bearing slave cylinder. You don't need to disconnect the hydraulic hose. Disconnect the speedometer cable. There is a little pinion gear at the end. Refer to the procedure for that at the bottom of this page. Disconnect the reverse/backup lights switch. Remove the two small bolts & nuts at the bottom where the transmission and engine connect. Use a floor jack to support the transmission. Remove the rear bushing and crossmember. Remove the five bolts which hold the transmission to the engine. With the help of a friend, slowly wiggle the transmission away from the engine and carefully lower it to the floor. On the new transmission, remove the filler plug. It might take some effort, so make sure it comes out before installing the transmission. That's it. Reverse the procedure to install the new one. It'll take some wiggling to get the new one into place. When everything is finished, make sure you fill the transmission with new fluid!
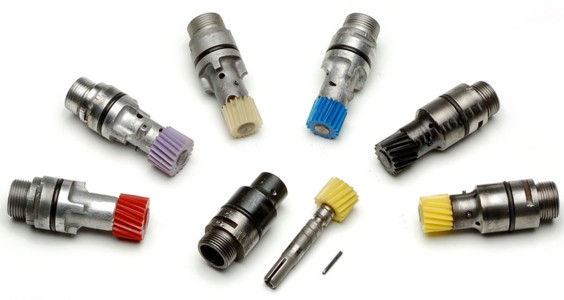
 As mentioned at the top, the only issue with the swap might be the collar that holds the release bearing. If your new transmission didn't come with one, or if you're changing to a different type of clutch, you might need a different collar because your existing one might not be the right length.
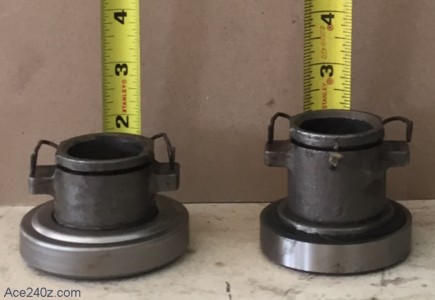
Nissan made a few different sizes - this picture shows the two most common collars. The difference is pretty clear. If you use one that's too short, the clutch won't disengage because the bearing won't reach it. If you use one that's too short, the clutch can't engage because the release bearing can't move back.
Here's how to see if yours is the right length before installing the transmission.
As mentioned at the top, the only issue with the swap might be the collar that holds the release bearing. If your new transmission didn't come with one, or if you're changing to a different type of clutch, you might need a different collar because your existing one might not be the right length.
Nissan made a few different sizes - this picture shows the two most common collars. The difference is pretty clear. If you use one that's too short, the clutch won't disengage because the bearing won't reach it. If you use one that's too short, the clutch can't engage because the release bearing can't move back.
Here's how to see if yours is the right length before installing the transmission.
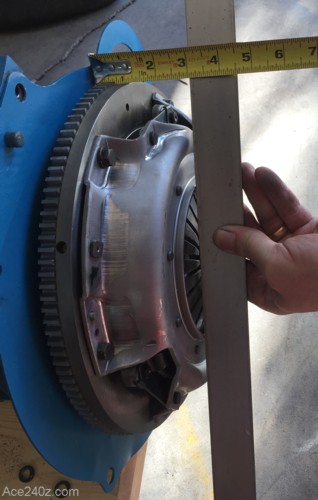 Start with the clutch. It doesn't matter if it's a stock or racing clutch because it's the height of the mechanism that determines which collar to use.
Take a straightedge and place it on top of the clutch. Measure from that point to the mounting flange of the engine. This will tell you how far the clutch extends into the transmission's bell housing.
Start with the clutch. It doesn't matter if it's a stock or racing clutch because it's the height of the mechanism that determines which collar to use.
Take a straightedge and place it on top of the clutch. Measure from that point to the mounting flange of the engine. This will tell you how far the clutch extends into the transmission's bell housing.
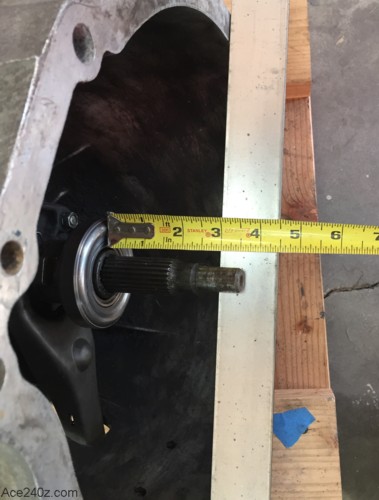 Attach a collar to the throw-out arm, then use the straightedge to measure from the mounting flange of the transmission to the face of the release bearing.
As you can see the dimensions match, which means I've got the right collar and the clutch will work perfectly.
Attach a collar to the throw-out arm, then use the straightedge to measure from the mounting flange of the transmission to the face of the release bearing.
As you can see the dimensions match, which means I've got the right collar and the clutch will work perfectly.
 This part is very important:
When you change the transmission, you have to change the little pinion gear that connects to the speedometer cable. If you don't, your speedometer won't be accurate.
When I swapped the transmission in my '72 years ago I ended up getting a ticket for doing 85 mph when the speedometer said 75 (in a 65 mph zone). The cost of that ticket, plus the increase in my insurance, was a painful lesson.
It's easy. All you need to do is remove the pinion in your existing transmission and install it in the new one. This page on the Classic Z Cars website shows how it's done.
This part is very important:
When you change the transmission, you have to change the little pinion gear that connects to the speedometer cable. If you don't, your speedometer won't be accurate.
When I swapped the transmission in my '72 years ago I ended up getting a ticket for doing 85 mph when the speedometer said 75 (in a 65 mph zone). The cost of that ticket, plus the increase in my insurance, was a painful lesson.
It's easy. All you need to do is remove the pinion in your existing transmission and install it in the new one. This page on the Classic Z Cars website shows how it's done.