240z Roll Bar
A roll bar is a must for racing. Are you going to race... or do you just want something that looks good?
I wanted a roll bar from the very beginning. They give any car a "sporty" look. Instead of being welded to the body, mine is removeable in case I get tired of looking at it, or want to eliminate a little weight. It doesn't meet the requirements for competition, but since I won't be racing, that doesn't matter. I'll enjoy a few open-lap days at the local track (High Plains Raceway) but a roll bar isn't required. To me, a bigger risk is a distracted soccer mom yelling at the kids while texting her friends.
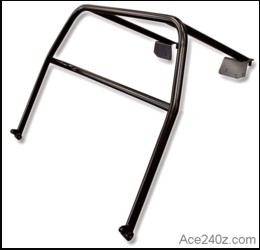 I started with a generic roll bar kit. It came with a 1-1/2" diameter mandrel-drawn chromoly steel hoop, some smaller diameter tubing for the rear braces and crossbar, and a few pieces of steel plate for the mounts. Pretty basic stuff.
As advertised, it required "professional fabrication", which meant I had to do a lot of work.
I started with a generic roll bar kit. It came with a 1-1/2" diameter mandrel-drawn chromoly steel hoop, some smaller diameter tubing for the rear braces and crossbar, and a few pieces of steel plate for the mounts. Pretty basic stuff.
As advertised, it required "professional fabrication", which meant I had to do a lot of work.
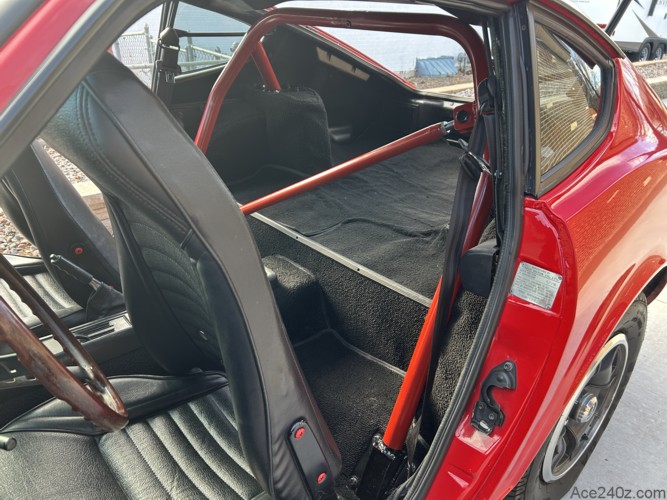 Here's the final product, painted and installed. I bought some foam padding to go around the tubing, but decided not to use it because I like having the red stand out against the black interior.
It weighs about 42 pounds, which isn't bad when you consider how much it can protect me in a bad accident.
It took more time and effort to make than I'd hoped, but it's exactly what I wanted.
Here's the final product, painted and installed. I bought some foam padding to go around the tubing, but decided not to use it because I like having the red stand out against the black interior.
It weighs about 42 pounds, which isn't bad when you consider how much it can protect me in a bad accident.
It took more time and effort to make than I'd hoped, but it's exactly what I wanted.
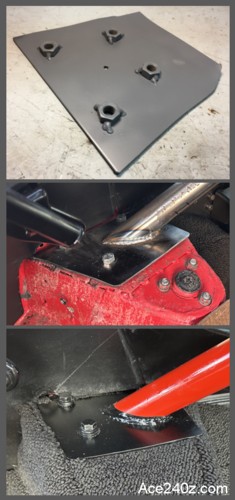
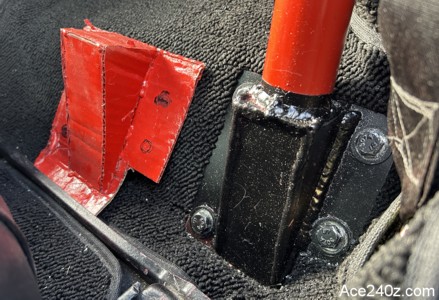 The first thing was the base for the hoop itself. After a little sketching, I made a mock-up from corrugated cardboard. It fit pretty well, so I used it as a template to create the actual mounts with 12 ga. steel.
My friend Max did the welding and the end result was perfect. I drilled holes in the floor and used grade-8 hardware with a big backing plate to hold it in place.
Here's the finished base and the mock-up next to it.
The first thing was the base for the hoop itself. After a little sketching, I made a mock-up from corrugated cardboard. It fit pretty well, so I used it as a template to create the actual mounts with 12 ga. steel.
My friend Max did the welding and the end result was perfect. I drilled holes in the floor and used grade-8 hardware with a big backing plate to hold it in place.
Here's the finished base and the mock-up next to it.
 When I did the initial restoration, I made some plates to go on top of the strut towers. I welded nuts underneath for the roll bar braces to attach, then welded everything together with some reinforcements on the sides. It's ugly but stout.
The carpet covers the plates completely. I cut little holes for the bolts to go thru. If I want to remove the roll bar, the carpet won't have to be replaced - all I need to do is stuff some little pieces of carpet fluff to fill the holes.
I think it turned out pretty good.
When I did the initial restoration, I made some plates to go on top of the strut towers. I welded nuts underneath for the roll bar braces to attach, then welded everything together with some reinforcements on the sides. It's ugly but stout.
The carpet covers the plates completely. I cut little holes for the bolts to go thru. If I want to remove the roll bar, the carpet won't have to be replaced - all I need to do is stuff some little pieces of carpet fluff to fill the holes.
I think it turned out pretty good.
 The crossbar has heim joints at each end, with left-hand threads on one and right-hand on the other.
I can tighten it so that it doesn't rattle, or loosen it for easy removal.
The crossbar has heim joints at each end, with left-hand threads on one and right-hand on the other.
I can tighten it so that it doesn't rattle, or loosen it for easy removal.
It all looks simple but probably took 50-60 hours to fab and install, and close to $600 for the basic kit and other parts, but I have no regrets. Custom work doesn't come easy.