240z Custom Spark Plug Wire Routing
Running the spark plug wires in front of the valve cover looks far better than stock
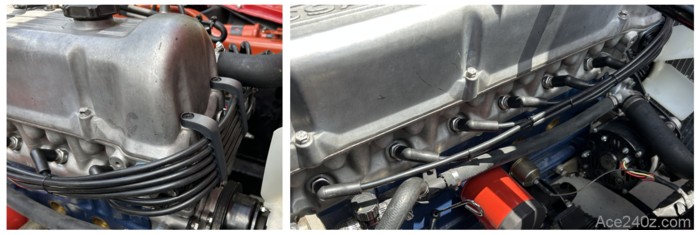 Datsun took the cheap & easy route when it came time to run the wires from the distributor to the spark plugs - they went right over the valve cover.
Sure, they used little looms to hold the wires off the cover and direct them to the right places, but I've always thought it looked messy. I tried a few different ways to improve it, but still didn't like the results.
Some people have re-routed the wires in front of the head and beneath the radiator hose, then around to the plugs for a neat and clean appearance. Some took it even further and made little looms to hold the wires in a parallel configuration, which looks even better.
After years of envy, I decided to give it a try. Here's how it's done.
Datsun took the cheap & easy route when it came time to run the wires from the distributor to the spark plugs - they went right over the valve cover.
Sure, they used little looms to hold the wires off the cover and direct them to the right places, but I've always thought it looked messy. I tried a few different ways to improve it, but still didn't like the results.
Some people have re-routed the wires in front of the head and beneath the radiator hose, then around to the plugs for a neat and clean appearance. Some took it even further and made little looms to hold the wires in a parallel configuration, which looks even better.
After years of envy, I decided to give it a try. Here's how it's done.
 S30 Works makes a nice set of wire looms/brackets, 3D printed with a nylon/carbon fiber mix. They're great and you can buy them here. They also sell pre-made wire sets but I made my own. You can, too.
Ton's Performance has all of the wire, terminals and boots you'll need. There's a list down at the bottom with part numbers and quantities. I wanted 8mm wire without any printing and a solid copper core and they're the only ones who carry it. You might want something a little fancier, so look around their site.
The stripper/crimper can be bought at Amazon or eBay. I bought a fairly decent one for $20.
In 2026, the price (including the tool) was approximately $140, and it only took a couple of hours.
S30 Works makes a nice set of wire looms/brackets, 3D printed with a nylon/carbon fiber mix. They're great and you can buy them here. They also sell pre-made wire sets but I made my own. You can, too.
Ton's Performance has all of the wire, terminals and boots you'll need. There's a list down at the bottom with part numbers and quantities. I wanted 8mm wire without any printing and a solid copper core and they're the only ones who carry it. You might want something a little fancier, so look around their site.
The stripper/crimper can be bought at Amazon or eBay. I bought a fairly decent one for $20.
In 2026, the price (including the tool) was approximately $140, and it only took a couple of hours.
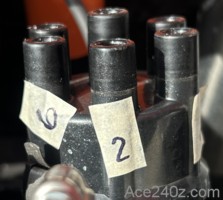 Start by following each wire from the plug to the distributor cap. Use a piece of tape at each location to mark which plug it goes to.
Remove all of the existing wires, including the one to the coil. Remove the plastic looms that hold the wires off the valve cover. Put all of it on a shelf somewhere in case you ever want to go back to the stock appearance.
Start by following each wire from the plug to the distributor cap. Use a piece of tape at each location to mark which plug it goes to.
Remove all of the existing wires, including the one to the coil. Remove the plastic looms that hold the wires off the valve cover. Put all of it on a shelf somewhere in case you ever want to go back to the stock appearance.
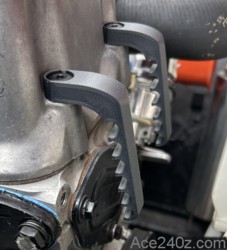 At the front of the valve cover, remove the two bolts that attach it to the head. Using the supplied button-head screws, attach the wire looms but don’t tighten them yet.
I used some Testors flat black plastic model paint on the screws because I've tried to eliminate as much "shiny stuff" as possible on my car. Testors is great because it goes on easily, dries fast, and is amazingly durable.
At the front of the valve cover, remove the two bolts that attach it to the head. Using the supplied button-head screws, attach the wire looms but don’t tighten them yet.
I used some Testors flat black plastic model paint on the screws because I've tried to eliminate as much "shiny stuff" as possible on my car. Testors is great because it goes on easily, dries fast, and is amazingly durable.
 Here's how it's done:
Start at the distributor.
Before doing anything, put the boot over the wire because when the connector is crimped, it's impossible get the boot over it. Trust me - I tried.
Use a generous amount of a lubricant such as WD40 when putting the boot over the wire. It's a tight fit and getting the wires thru it requires a fair amount of effort. Bending the boot into a (somewhat) straight shape makes it easier, but with WD40 all over it, keeping a grip is tough. The distributor boots are far easier than the spark plug boots.
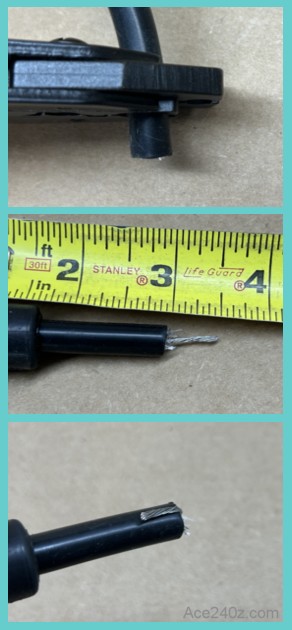
Use the stripper part of the tool to remove about 1/2" of insulation, trim off the "hair" around the conductor (scissors work fine), then bend the conductor back over the insulation.
Insert the terminal into the crimper and hold it securely.
Push the wire into the terminal with the bare conductor underneath the solid part of the terminal and give it a tight squeeze. If you're using a ratcheting tool, it'll release when the crimp is right. I found that putting one end of the crimper on the workbench gave me more leverage.
Once it's in place, give it a good tug to make sure the connection is solid. If it falls off, don't worry - you'll get it right the next time.
Here's how it's done:
Start at the distributor.
Before doing anything, put the boot over the wire because when the connector is crimped, it's impossible get the boot over it. Trust me - I tried.
Use a generous amount of a lubricant such as WD40 when putting the boot over the wire. It's a tight fit and getting the wires thru it requires a fair amount of effort. Bending the boot into a (somewhat) straight shape makes it easier, but with WD40 all over it, keeping a grip is tough. The distributor boots are far easier than the spark plug boots.
Use the stripper part of the tool to remove about 1/2" of insulation, trim off the "hair" around the conductor (scissors work fine), then bend the conductor back over the insulation.
Insert the terminal into the crimper and hold it securely.
Push the wire into the terminal with the bare conductor underneath the solid part of the terminal and give it a tight squeeze. If you're using a ratcheting tool, it'll release when the crimp is right. I found that putting one end of the crimper on the workbench gave me more leverage.
Once it's in place, give it a good tug to make sure the connection is solid. If it falls off, don't worry - you'll get it right the next time.
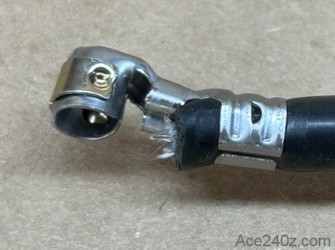
At the distributor, I found it was easier to push the bare connector into place, then slide the boot over it. Run the wire in front of the valve cover and push it into the loom. Leave some slack because when all the wires are done you can use a zip tie to make a neat bundle between the distributor and the valve cover. When you make the turn around the valve cover toward the plugs, leave a little more slack to keep the wire from making contact with the block. If you have the stock fuel pump, you need to decide if the wire are going over or under it. For me, it was an easy choice because I replaced the mechanical pump with an electrical version above the tank. If you're interested in doing that, there's a procedure elsewhere on the site. Put one of the spark plug terminals onto the plug itself - connecting it can be a little fiddly. Hold the end of the wire up to it. How tight do you want the wire to be? Some people leave a little sag. I went for a tighter look. When you've decided how tight you want the wire, mark that spot with a piece of tape. Disconnect the wire at the distributor.
 Back at the workbench, cut the wire about 1/2" from where you marked the length with tape.
Put the boot over the wire!
Strip the insulation, trim the hair, bend the wire, and crimp tightly. The one shown here has the wire pushed slightly too far past the crimp and bent the connection part for the plug itself. This got cut off and I did another, which is a good example of why there are extra terminals in the parts list.
Put the wire back into the distributor and into the loom, guide it around the head, then click it onto the end of the plug. Remember it can be fiddly.
How does it look? If it's too tight, make another - there are extra terminals and wire. If it's too loose, don't worry because you can hide the extra wire at the base of the distributor.
If you're happy with the appearance, slide the boot over the spark plug terminal, followed by the distributor terminal. Still looks good? Plenty of slack?
Continue with the rest of the wires, putting the boots on before crimping the connectors.
For the wire between the distributor and the coil, decide how long you want it. Directly between them or with a litte extra length? I made mine long enough to "hide" it beneath the air cleaner.
Back at the workbench, cut the wire about 1/2" from where you marked the length with tape.
Put the boot over the wire!
Strip the insulation, trim the hair, bend the wire, and crimp tightly. The one shown here has the wire pushed slightly too far past the crimp and bent the connection part for the plug itself. This got cut off and I did another, which is a good example of why there are extra terminals in the parts list.
Put the wire back into the distributor and into the loom, guide it around the head, then click it onto the end of the plug. Remember it can be fiddly.
How does it look? If it's too tight, make another - there are extra terminals and wire. If it's too loose, don't worry because you can hide the extra wire at the base of the distributor.
If you're happy with the appearance, slide the boot over the spark plug terminal, followed by the distributor terminal. Still looks good? Plenty of slack?
Continue with the rest of the wires, putting the boots on before crimping the connectors.
For the wire between the distributor and the coil, decide how long you want it. Directly between them or with a litte extra length? I made mine long enough to "hide" it beneath the air cleaner.
Pull the screws for the looms out and give them a couple drops of Loctite because there's no room for lockwashers with the looms, and now you can tighten them completely. Do your best to make the wires as straight as possible because that's where most people are going to look. With all of the wires in place, use some zip-ties to bundle them together as neatly as possible. Where the zip-ties connect, make sure that part is behind the plug wires before you trim the excess. It's the little things that make a big difference. With everything else nice and neat, bundle the wires beneath the distributor with another zip-tie (or two) and remove the pieces of tape. Now connect the wire to the coil. That's it. Reward yourself with a chilled beverage and admire your handiwork.
 A final thing to consider is what to do with the part of the valve cover where the stock wire looms were fastened.
I experimented with a broken valve cover and cut off one of the cast parts, only to discover they're hollow on the inside and looked worse than leaving it alone.
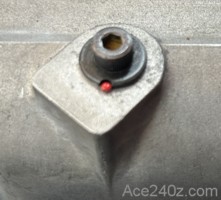
My "solution" was a little misdirection. I used Allen-head cap screws and small washers to cover the hole, then took it a little further. On the casting is a little "pin" that was used to prevent the stock wire loom from turning.
I painted the pin red, then cut a little notch on the washer. The idea was to make it look like the cap screw was there for some unknown reason. Z owners aren't fooled, but anyone else looking at it will never notice.
Little things make a big difference.
A final thing to consider is what to do with the part of the valve cover where the stock wire looms were fastened.
I experimented with a broken valve cover and cut off one of the cast parts, only to discover they're hollow on the inside and looked worse than leaving it alone.
My "solution" was a little misdirection. I used Allen-head cap screws and small washers to cover the hole, then took it a little further. On the casting is a little "pin" that was used to prevent the stock wire loom from turning.
I painted the pin red, then cut a little notch on the washer. The idea was to make it look like the cap screw was there for some unknown reason. Z owners aren't fooled, but anyone else looking at it will never notice.
Little things make a big difference.
Here's the parts list for Ton's Performance. I added more wire and terminals than are really needed because mistakes will be made.
- (8) 90-degree spark plug end boots SB-90-8MM
- (16) 90-degree spark plug terminals MSD34615-1
- (4) 90-degree distributor/coil end boots SB-90DIS
- (6) 90-degree distributor coil/wire terminals ST-BRASS90
- (30’) 8mm silicone wire TONS-BLACKWC-NL