240z Glove Box Hinge
The stock hinge was a cheap piece of plastic that splits apart when it gets old
Like many economy cars in the 70s, the glove box hinge was made from a piece of flexible plastic. Think about it - how often do you open your glove box? Maybe a couple of times a year? The plastic hinge was cheap, easy to manufacture and it got the job done... but 50 years later most of them have broken and fallen apart. When I bought my '71, the door was sitting on the floor. Unfortunately, nobody makes a plastic replacement but options exist. Take a look.
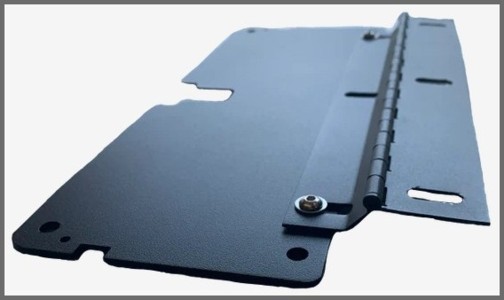
The Skillard Glove Box Hinge
 Skillard makes a great replacement. Here's their description:
Finally a solution to your cracked and broken plastic OEM glove box hinge. This setup comes with a new CNC cut and formed aluminum hinge as well as an aluminum door backer to mount it to. The hinge holes are slotted to fine tune door alignment. New mounting hardware is included.
It's a beautiful, well-designed assembly... and costs $145 (with shipping) on their website.
I didn't need the door backer. You might not, either. Why pay for something you don't need?
The '57 Chevy Bel Air Hinge
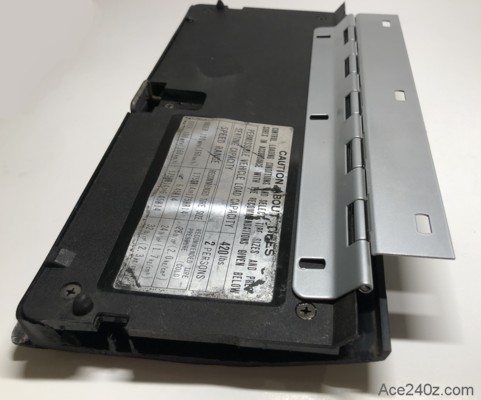
 This is a glove box hinge for a '57 Chevy Bel Air. Note how the hinge is shaped and the way it's slotted to fine tune the alignment. It's virtually identical to the Skillard piece, but without the door backer.
Look at how nicely the leaf fits against what's left of the original one. The hinge pin is nearly in the same place as the factory version. It's almost as if the Chevrolet engineers in the mid-50s said "Hey, let's make our hinge work for a car that won't be built for another 14 years."
I bought it on Amazon for $36 with free shipping. Add some screws and washers for a total of $40.
Compared to the Skillard version, that's 73% less.
As I asked at the top, how often do you open your glove box? Are you ready to spend $105 extra for something that rarely gets used and is only seen for a few seconds?
Here's a link to the 55 56 Chevy Glove Box Door Hinge
Here's how to make it work For tools, you'll need a drill and two bits, and a Phillips-head screwdriver. For parts you'll need 3 wood screws and some washers. Start by removing what's left of the hinge inside the glovebox. Use the center screw and a washer to temporarily hold the new hinge in place. Use a Sharpie™ (or similar) to mark the location of the other two screws on the hinge. On my '71 they weren't the same distance apart. One was slightly past the edge of the hinge but using a large washer held that end down. Remove the hinge. Drill 3/16" diameter holes on the hinge (the same size as the width of the slots), then attach the hinge to the glovebox using the orginal screws. Hold the glovebox door against the hinge. Make sure the little support arm (that keeps the door from falling too far down) is in place. Mark where the hinge slots are located on the back panel. Because the panel is black, I put a piece of masking tape across it to make the marks easier to see. Drill three 1/32" diameter holes on the plastic back panel. Use #6 x 1/2" wood screws and washers to connect the door to the hinge. It can be helpful to use one of the screws to make the "threads" inside the plastic holes before attaching the panel to the hinge. Slide the door around until everything lines up, then tighten the screws.
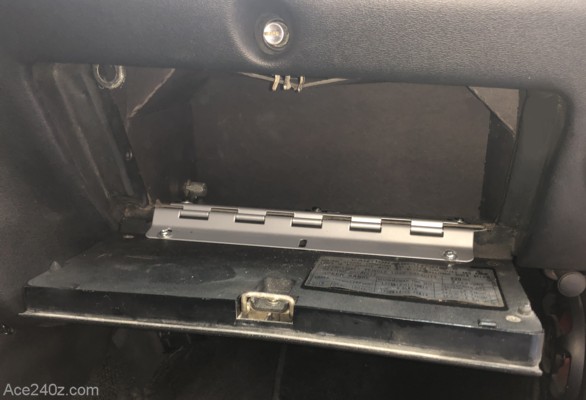
 Here's how it looks on the inside. The holes and the slots needed some work with a file but it didn't take very long.
It turned out I didn't need the support arm, which is fine. The latch mechanism needed a little adjusting but works perfectly.
Now I'll pull it back out and give it some flat black to help it hide.
 It took a little tweaking and adjusting but it looks as good as when it came from the factory.
I spent about two hours buying the parts, drilling the holes and doing the assembly, all of which saved me over $100. I think that's a damn good bargain.