240z Upgrades
A lot has changed since Datsun unleashed the 240z and some really great upgrades can be done by an average guy with ordinary tools.In the process of restoring my '71, I came across quite a few upgrades. Many thanks to all the people who pointed them out. With the exception of the power steering kit, all of these are things I did for my own car. In the process of doing them I took photos and made notes and added them to this page to help people like you have an easier time. Some of the upgrades, such as the wiper motor, needed some research and experimentation to get it right but it never would have happened if other people hadn't come up with the basic idea. The exception to these upgrades is the popular Toyota 4x4 caliper swap because it can actually reduce your braking ability. See below for the details. If you have an upgrade that I've missed, please send it to me and I'll add it here.
Honda Civic Heater Blower
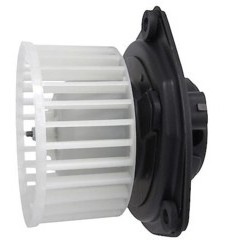 This is the easiest upgrade you'll ever do. It only takes about 15 minutes.
The stock blower motor on your Z is old and obsolete. Chances are it's slow and noisy and maybe even squeaks, so replace it with one for an '88-'91 Honda Civic. It's a perfect fit.
In 2023 I found a brand-new motor with the plastic fan already attached for just $38 and free shipping. A local salvage yard wanted $20 but I'd have to pull it myself. The worst option was an online retailer (240z.life) that wants $119 plus shipping and the fan isn't included. Hmmm.
Here's how it's done:
Cut the two wires to the stock motor. Remove three bolts that hold the motor in the housing. Take the motor out and put the new motor into place - the hole pattern is exactly the same. Splice the wires (after making sure the motor spins in the right direction) and you're done! You can probably sell the old one on eBay and make your upgrade even cheaper.
This is the easiest upgrade you'll ever do. It only takes about 15 minutes.
The stock blower motor on your Z is old and obsolete. Chances are it's slow and noisy and maybe even squeaks, so replace it with one for an '88-'91 Honda Civic. It's a perfect fit.
In 2023 I found a brand-new motor with the plastic fan already attached for just $38 and free shipping. A local salvage yard wanted $20 but I'd have to pull it myself. The worst option was an online retailer (240z.life) that wants $119 plus shipping and the fan isn't included. Hmmm.
Here's how it's done:
Cut the two wires to the stock motor. Remove three bolts that hold the motor in the housing. Take the motor out and put the new motor into place - the hole pattern is exactly the same. Splice the wires (after making sure the motor spins in the right direction) and you're done! You can probably sell the old one on eBay and make your upgrade even cheaper.
280zx Alternator
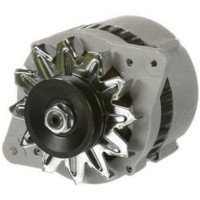 This is another easy upgrade. The stock 240z alternator is rated for 40 amps, which was adequate in the 70s for the ignition, wipers, heater and an 8-track stereo. Today, you can get 60 amps from a 280zx alternator, and it even comes with an internal voltage regulator, meaning you can throw that ugly stock one away. I found a new/refurbished one (with a warranty) for just $46.
WoodWorkerB did a great writeup of how it's done (better than I can do), so a link to his webpage is here.
This is another easy upgrade. The stock 240z alternator is rated for 40 amps, which was adequate in the 70s for the ignition, wipers, heater and an 8-track stereo. Today, you can get 60 amps from a 280zx alternator, and it even comes with an internal voltage regulator, meaning you can throw that ugly stock one away. I found a new/refurbished one (with a warranty) for just $46.
WoodWorkerB did a great writeup of how it's done (better than I can do), so a link to his webpage is here.
Honda Civic Wiper Motor
 A Honda Civic wiper motor makes a huge difference - it moves faster on "slow" than the stock motor does on "high". It can be done in less that two hours and the only tools you'll need for the modification is a drill and a hacksaw. I found a super-cheap used motor on eBay for just $20 with shipping (seriously) and a 12v relay for another $5. I also restored the entire mechanism to like-new condition (add two more hours) for another $50.
The easy procedure is on my Do It Yourself page.
A Honda Civic wiper motor makes a huge difference - it moves faster on "slow" than the stock motor does on "high". It can be done in less that two hours and the only tools you'll need for the modification is a drill and a hacksaw. I found a super-cheap used motor on eBay for just $20 with shipping (seriously) and a 12v relay for another $5. I also restored the entire mechanism to like-new condition (add two more hours) for another $50.
The easy procedure is on my Do It Yourself page.
LED Guage Bulbs
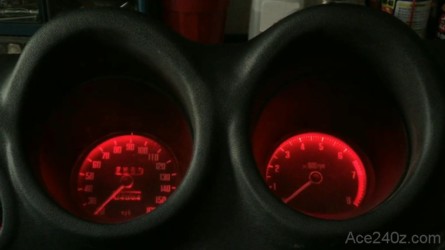 Replacing the stock incandescent bulbs with modern LEDs is will really brighten up your gauges but be wary of cheap ones. I did some comparison testing and look here to see what I found.
Glovebox Door Hinge
 It's likely the plastic hinge on your glovebox door is broken (or ready to break). Here's how to replace yours for 73% less than a pricey online option.
Sound Deadening
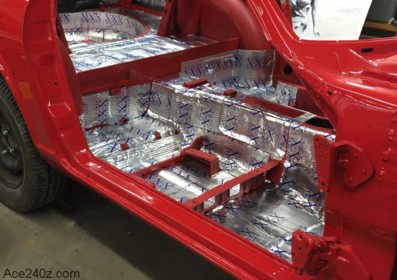 This is something where you'll never know how much you want it until you actually have it.
Take an empty aluminum can and put a few hex nuts inside. Hold it with your fingertips and rattle it around and listen to how it sounds. Now wrap your hand tightly around the can and rattle it again - it's much quieter. The inside of a Z is basically the same as a can so a good layer of sound deadening makes a huge difference.
The stuff is a thin layer of rubber with an adhesive coating. I used FatMat because the top is vinyl instead of aluminum foil like Dynamat (which can cut your hands) and the price was more affordable.
Installation is pretty easy. Cut the material as needed to fit various places, peel off the paper backing, then lay it in place and use a roller (which they include) to make it stick tightly. Once it's down, it's tough to peel back up. I put it everywhere possible, including under the headliner and two layers inside the doors.
It made a big difference.
This is something where you'll never know how much you want it until you actually have it.
Take an empty aluminum can and put a few hex nuts inside. Hold it with your fingertips and rattle it around and listen to how it sounds. Now wrap your hand tightly around the can and rattle it again - it's much quieter. The inside of a Z is basically the same as a can so a good layer of sound deadening makes a huge difference.
The stuff is a thin layer of rubber with an adhesive coating. I used FatMat because the top is vinyl instead of aluminum foil like Dynamat (which can cut your hands) and the price was more affordable.
Installation is pretty easy. Cut the material as needed to fit various places, peel off the paper backing, then lay it in place and use a roller (which they include) to make it stick tightly. Once it's down, it's tough to peel back up. I put it everywhere possible, including under the headliner and two layers inside the doors.
It made a big difference.
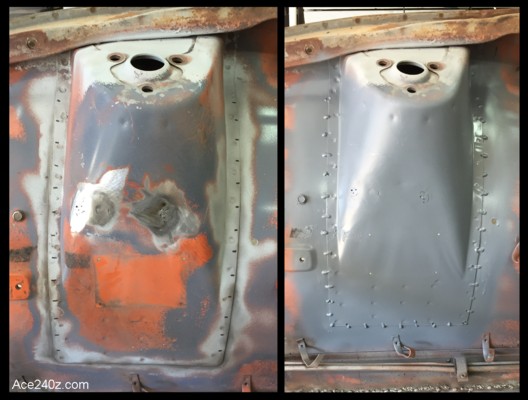
Undercoating
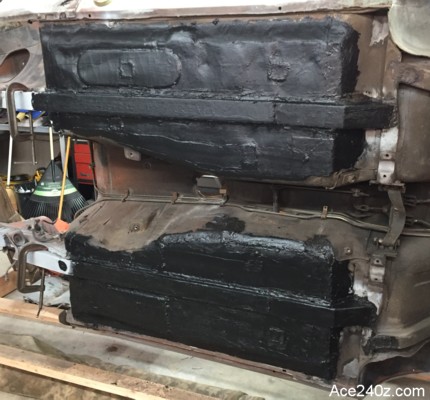 Undercoating is typically used to prevent the underside of your car from rusting, but if it's thick enough it does a pretty good job of sound deadening.
I had my car tipped on it's side for a while to do some rust repairs and add reinforcements, and while it was there I came up with an incredible undercoat. There are companies that make "seam sealer", which is used for car builders and bodywork shops to "seal" various seams to keep water out. It comes in the same kind of tubes used for kitchen and bathroom caulking. I bought a pack of six on eBay and it cost less than a couple cans of the spray-on stuff.
I squeezed out big globs and used a bondo spreader to smear it all over the exposed metal. What you see here was three tubes worth. I used another two for the remaining areas. It's thick.
It was easy to do with the body propped up like this, but it can be done on your driveway with the car jacked up as high as possible and supported with a good set of stands. Use a wire brush or an angle grinder with a wire wheel to take off as much dirt and rust as you can. Sure, it's gonna be dirty as hell, but in the end it's a lot easier than deal with a rusted-out floor. Wear eye protection and a good dust mask. Use a power washer or garden hose with a spray head to clean off, then let it dry completely.
While my car was on it's side, I welded little squares of metal over the "drain holes". With my previous Z, the rubber plugs rotted and fell out, and if I was driving on a rainy day the carpet would get wet, then would smell funky when it dried. If you close at the photo, you can just make them out. Think about doing that yourself.
When you smear on the sealer, press as hard as possible for the best adhesion. Wear rubber gloves because the stuff doesn't come off skin easily. Use the cheapest caulking gun you can find because it'll get covered with the sealer and end up in the trash. Be generous and give it a thick coat. When you're done, let it cure overnight, preferably outside because it's pretty stinky.
If you ever sell the car, telling the buyer about this ought to be worth a few more bucks.
Undercoating is typically used to prevent the underside of your car from rusting, but if it's thick enough it does a pretty good job of sound deadening.
I had my car tipped on it's side for a while to do some rust repairs and add reinforcements, and while it was there I came up with an incredible undercoat. There are companies that make "seam sealer", which is used for car builders and bodywork shops to "seal" various seams to keep water out. It comes in the same kind of tubes used for kitchen and bathroom caulking. I bought a pack of six on eBay and it cost less than a couple cans of the spray-on stuff.
I squeezed out big globs and used a bondo spreader to smear it all over the exposed metal. What you see here was three tubes worth. I used another two for the remaining areas. It's thick.
It was easy to do with the body propped up like this, but it can be done on your driveway with the car jacked up as high as possible and supported with a good set of stands. Use a wire brush or an angle grinder with a wire wheel to take off as much dirt and rust as you can. Sure, it's gonna be dirty as hell, but in the end it's a lot easier than deal with a rusted-out floor. Wear eye protection and a good dust mask. Use a power washer or garden hose with a spray head to clean off, then let it dry completely.
While my car was on it's side, I welded little squares of metal over the "drain holes". With my previous Z, the rubber plugs rotted and fell out, and if I was driving on a rainy day the carpet would get wet, then would smell funky when it dried. If you close at the photo, you can just make them out. Think about doing that yourself.
When you smear on the sealer, press as hard as possible for the best adhesion. Wear rubber gloves because the stuff doesn't come off skin easily. Use the cheapest caulking gun you can find because it'll get covered with the sealer and end up in the trash. Be generous and give it a thick coat. When you're done, let it cure overnight, preferably outside because it's pretty stinky.
If you ever sell the car, telling the buyer about this ought to be worth a few more bucks.
Header
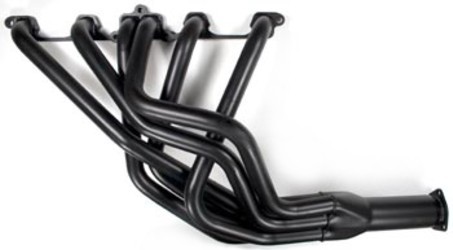 A good aftermarket header will increase your horsepower but don't be led astray by wild claims. Keith Thomas did a step-by-step test of various combinations of headers and pipes and mufflers on a dyno to show what you can (and can't) expect. and check it out here
Installation will take a few hours but can be done by the average guy with some basic tools. The carbs and intake manifolds have to come off for access. Make sure you buy a new gasket - reusing the old is is a great way to create a leak. Soak the mounting nuts with some PB-Blaster or WD-40 the night before. It'll make a big difference.
The exhaust and intake manifolds share the mounting studs in vatious ways, and getting the washers and nuts between the pieces can be frustrating. Here's a tip. When you get the header in place, put the nuts on the shared studs very losely, only one turn at the most. Then you can slip the manfifolds down and over the studs and you're good to go. They're a total pain to tighten, but at least the hardest part is done.
Take a look at the rest of the exhaust before starting. Is it in good shape or badly rusted? Are there dents and/or holes? Is the muffler falling apart? If so, you might want to consider buying a complete system. There are some good kits online for less than your local shop would charge. Give it some thought.
A good aftermarket header will increase your horsepower but don't be led astray by wild claims. Keith Thomas did a step-by-step test of various combinations of headers and pipes and mufflers on a dyno to show what you can (and can't) expect. and check it out here
Installation will take a few hours but can be done by the average guy with some basic tools. The carbs and intake manifolds have to come off for access. Make sure you buy a new gasket - reusing the old is is a great way to create a leak. Soak the mounting nuts with some PB-Blaster or WD-40 the night before. It'll make a big difference.
The exhaust and intake manifolds share the mounting studs in vatious ways, and getting the washers and nuts between the pieces can be frustrating. Here's a tip. When you get the header in place, put the nuts on the shared studs very losely, only one turn at the most. Then you can slip the manfifolds down and over the studs and you're good to go. They're a total pain to tighten, but at least the hardest part is done.
Take a look at the rest of the exhaust before starting. Is it in good shape or badly rusted? Are there dents and/or holes? Is the muffler falling apart? If so, you might want to consider buying a complete system. There are some good kits online for less than your local shop would charge. Give it some thought.
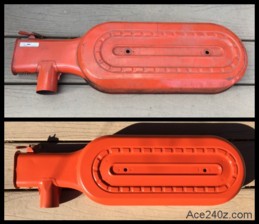
Heat Tape
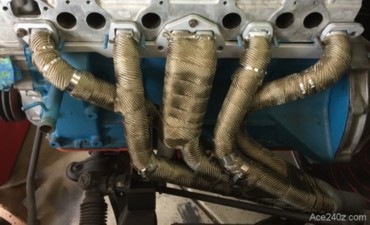 You can reduce the temperature in your engine compartment (which will add a slight increase in horsepower) by wrapping your header with heat tape. It's pretty easy to do.
You'll get the best results if the header is off the car but you can stilll do it while it's place - just remove the carbs and heat shield. Get the pipes as clean as possible with a wire brush (or sandblaster) to remove any rust or dirt. Start at the top and slowly wind your way down, overlapping about one-third of the tape with each turn. Use stainless steel "zip-ties" to hold the wrap in place where needed. I ended up using a few hose clamps because I was a little clumsy.
There's a lot of debate whether heat tape is good or not. Some people have told me it'll cause the headers to rust or void the manufacturer's warranty. Here's an article with reps from Hooker Headers, Moroso Performance Parts and Design Engineering and they're all in favor of heat tape.
You can reduce the temperature in your engine compartment (which will add a slight increase in horsepower) by wrapping your header with heat tape. It's pretty easy to do.
You'll get the best results if the header is off the car but you can stilll do it while it's place - just remove the carbs and heat shield. Get the pipes as clean as possible with a wire brush (or sandblaster) to remove any rust or dirt. Start at the top and slowly wind your way down, overlapping about one-third of the tape with each turn. Use stainless steel "zip-ties" to hold the wrap in place where needed. I ended up using a few hose clamps because I was a little clumsy.
There's a lot of debate whether heat tape is good or not. Some people have told me it'll cause the headers to rust or void the manufacturer's warranty. Here's an article with reps from Hooker Headers, Moroso Performance Parts and Design Engineering and they're all in favor of heat tape.
Rebuilt Distributor
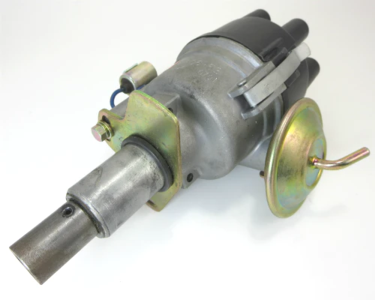 An old, worn-out distributor will reduce horsepower and lower your fuel mileage. Replacing the points and setting the timing probably won't help. You can replace it but why not rebuild it instead?
This isn't one of the "cheapest" upgrades (it cost me about $250 in 2023) but it's very easy.
Remove the cap, unplug the wire from the coil and the rubber hose from the manifold. Loosen the clamp at the bottom and it slides right out.
Installing the replacement is just as easy. You'll need to set the timing but that only takes a couple of minutes with a timing light.
Take a look here to see how a distributor works and where to get yours rebuilt.
An old, worn-out distributor will reduce horsepower and lower your fuel mileage. Replacing the points and setting the timing probably won't help. You can replace it but why not rebuild it instead?
This isn't one of the "cheapest" upgrades (it cost me about $250 in 2023) but it's very easy.
Remove the cap, unplug the wire from the coil and the rubber hose from the manifold. Loosen the clamp at the bottom and it slides right out.
Installing the replacement is just as easy. You'll need to set the timing but that only takes a couple of minutes with a timing light.
Take a look here to see how a distributor works and where to get yours rebuilt.
Pertronix Electronic Ignition Conversion
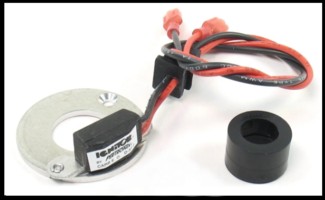 The Pertronix Ignitor is a popular way to turn your distributor into an electronic version and do away with points. It's fairly inexpensive and pretty easy to install but it might not be ideal for your particular car.
Click here to see what a distributor professional has to say.
The Pertronix Ignitor is a popular way to turn your distributor into an electronic version and do away with points. It's fairly inexpensive and pretty easy to install but it might not be ideal for your particular car.
Click here to see what a distributor professional has to say.
Strut Brace
 Years of driving can take a toll on a unibody chassis. The pinch welds can only do so much and eventually things start to flex.
A strut brace is a bolt-on stiffener that keeps the strut towers from moving back and forth. It's something you don't realize how much you need until you have one.
The downside is having to remove it when you need to take off the valve cover. There are some braces that use heim joints at each end and the pin holding them in place can be pulled easily, but from an engineering viewpoint those type braces have a flaw - they prevent the towers from moving closer or further to each other, but do nothing when the towers are moving in the same direction. I bought one where each end is solidly mounted and should add some additional rigidity. At the center is a threaded adjuster that allows you to put more pressure against the towers or pull them closer together.
Years of driving can take a toll on a unibody chassis. The pinch welds can only do so much and eventually things start to flex.
A strut brace is a bolt-on stiffener that keeps the strut towers from moving back and forth. It's something you don't realize how much you need until you have one.
The downside is having to remove it when you need to take off the valve cover. There are some braces that use heim joints at each end and the pin holding them in place can be pulled easily, but from an engineering viewpoint those type braces have a flaw - they prevent the towers from moving closer or further to each other, but do nothing when the towers are moving in the same direction. I bought one where each end is solidly mounted and should add some additional rigidity. At the center is a threaded adjuster that allows you to put more pressure against the towers or pull them closer together.
Stitch Welds
 This is an option that goes along with the strut brace. As mentioned above, the pinch welds can only do so much, so racers often add a series of stitch welds everywhere the sheetmetal overlaps. Typical spots are the strut towers (front and rear) and the frame rails. It requires some grinding to remove the paint, a welder to do the "stitches", and then the area has to be repainted. It might not be the easiest upgrade here but it's certainly cheap.
I did a series of small spot welds 1" apart on the towers and rails. Stitch welds are usually longer but I was nervous about blowing holes thru the metal. I'm not sure how much of a difference it will make for street driving, or even the occasional track day, but while I had the car apart it didn't take a lot of time.
This is an option that goes along with the strut brace. As mentioned above, the pinch welds can only do so much, so racers often add a series of stitch welds everywhere the sheetmetal overlaps. Typical spots are the strut towers (front and rear) and the frame rails. It requires some grinding to remove the paint, a welder to do the "stitches", and then the area has to be repainted. It might not be the easiest upgrade here but it's certainly cheap.
I did a series of small spot welds 1" apart on the towers and rails. Stitch welds are usually longer but I was nervous about blowing holes thru the metal. I'm not sure how much of a difference it will make for street driving, or even the occasional track day, but while I had the car apart it didn't take a lot of time.
Air Dam
 Admittedly, an air dam won't make a huge difference around town but I think they look great.
An air dam forces air to go around the car instead of underneath, where it can cause turbulence, which in turn can reduce the top speed. It also has an agressive appearance. Some air dams come with cooling vents for the brakes (like this one), but I opted for the smooth version. They're available in urethane, which is less likely to be damaged if you tap a parking lot block, or fiberglass, which doesn't flex at higher speeds.
It's an easy upgrade, typically only requiring a wrench and a drill and an hour or two.
However... if it doesn't fit right, you have three choices: 1) return it for a refund, or 2) live with it, or 3) fix it, which isn't exactly "easy" but the results are worth the effort. Take a look here to see what's involved.
Admittedly, an air dam won't make a huge difference around town but I think they look great.
An air dam forces air to go around the car instead of underneath, where it can cause turbulence, which in turn can reduce the top speed. It also has an agressive appearance. Some air dams come with cooling vents for the brakes (like this one), but I opted for the smooth version. They're available in urethane, which is less likely to be damaged if you tap a parking lot block, or fiberglass, which doesn't flex at higher speeds.
It's an easy upgrade, typically only requiring a wrench and a drill and an hour or two.
However... if it doesn't fit right, you have three choices: 1) return it for a refund, or 2) live with it, or 3) fix it, which isn't exactly "easy" but the results are worth the effort. Take a look here to see what's involved.
Spoiler
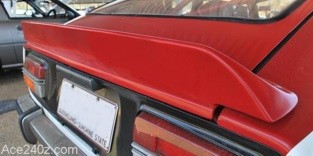 Like the air dam, a spoiler won't make a huge difference around town but if you're planning on any high-speed driving don't use one without an air dam. A spoiler will push down the rear of the car, which means the front will be higher and that can result in more air going underneath and potentially lift the front further, leading to decreased control.
Thankfully that won't happen if you're going less than 100 mph.
It's another easy upgrade. The one I bought only required two holes in the rear hatch. If I decide to remove it later, a pair of black rubber plugs will seal the holes and very few people will know they're not stock.
Like the air dam, a spoiler won't make a huge difference around town but if you're planning on any high-speed driving don't use one without an air dam. A spoiler will push down the rear of the car, which means the front will be higher and that can result in more air going underneath and potentially lift the front further, leading to decreased control.
Thankfully that won't happen if you're going less than 100 mph.
It's another easy upgrade. The one I bought only required two holes in the rear hatch. If I decide to remove it later, a pair of black rubber plugs will seal the holes and very few people will know they're not stock.
Fill The Gap Beneath The Bumper
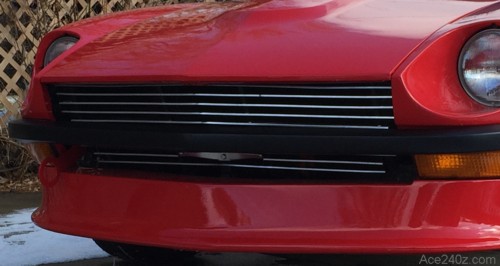 Crouch down at the front of your car and you can see there's no grille beneath the front bumper. I thought it looked awful, so I filled mine in.
It's easy and here's how to do it.
Crouch down at the front of your car and you can see there's no grille beneath the front bumper. I thought it looked awful, so I filled mine in.
It's easy and here's how to do it.
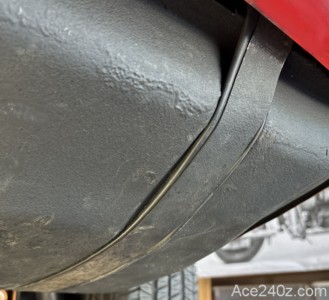
Hide The Body Seam
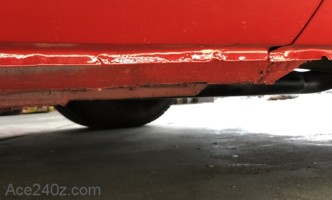 There's a ugly, rough unibody seam right underneath the rockers. On a freshly-painted car it really stands out.
It's not a big deal and few people notice it, but hiding it is easy and here's how to do it.
There's a ugly, rough unibody seam right underneath the rockers. On a freshly-painted car it really stands out.
It's not a big deal and few people notice it, but hiding it is easy and here's how to do it.
Tail Light Gaskets
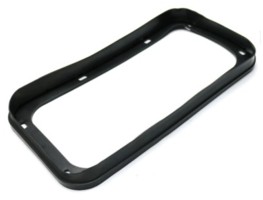 Tail light gaskets are pretty important, partly to keep rain out of your car, but mostly to keep stinky exhaust and gasoline fumes out of the cabin. The only problem is that replacements can be pricey.
If yours are rotted and leaking, here's an easy way to make a set for a minimum of 79% less.
Click here to learn how to do it.
Tail light gaskets are pretty important, partly to keep rain out of your car, but mostly to keep stinky exhaust and gasoline fumes out of the cabin. The only problem is that replacements can be pricey.
If yours are rotted and leaking, here's an easy way to make a set for a minimum of 79% less.
Click here to learn how to do it.
Air Cleaner Restoration
 If your car's air cleaner looks faded and dull, Dupli-Color makes an almost-exact match.
It's called Chrysler Hemi Orange, part number DE1652. You can find it online, but the local O'Reilly auto part store had the cheapest price and I didn't have to wait for shipping.
Give it a good cleaning (dish soap and steel wool work great), then use some fine grit wet sandpaper to smooth out any scratches and pits. Rinse it, dry it, then give it several light coats of paint a few minutes apart (no need for primer) and let it cure for 3-4 hours.
How does your existing filter look? What about the gaskets that go between the air cleaner's backing plate and the carbs? Replacing those are easy maintenance while the paint is drying.
If the thin rubber seal around the edge of the air cleaner cover is broken or rotted, your local hardware store probably has some small adhesive-backed foam intended for doors and windows. Before you do any painting, remove the old rubber and clean the little channel it sits in with a rag and some rubbing alcohol. When the painting is done, apply the foam.
If your car's air cleaner looks faded and dull, Dupli-Color makes an almost-exact match.
It's called Chrysler Hemi Orange, part number DE1652. You can find it online, but the local O'Reilly auto part store had the cheapest price and I didn't have to wait for shipping.
Give it a good cleaning (dish soap and steel wool work great), then use some fine grit wet sandpaper to smooth out any scratches and pits. Rinse it, dry it, then give it several light coats of paint a few minutes apart (no need for primer) and let it cure for 3-4 hours.
How does your existing filter look? What about the gaskets that go between the air cleaner's backing plate and the carbs? Replacing those are easy maintenance while the paint is drying.
If the thin rubber seal around the edge of the air cleaner cover is broken or rotted, your local hardware store probably has some small adhesive-backed foam intended for doors and windows. Before you do any painting, remove the old rubber and clean the little channel it sits in with a rag and some rubbing alcohol. When the painting is done, apply the foam.
Wide-Angle Side Mirror
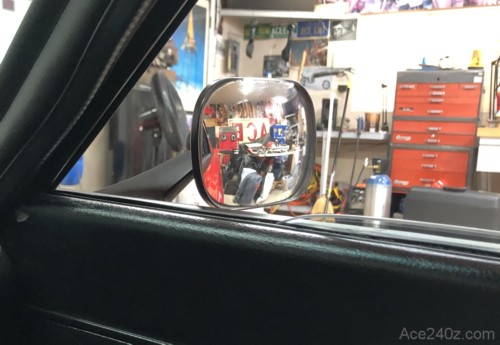 Modern cars have a wide-angle mirror on the passenger side to make it easier for you to see what's behind and beside your car. You've seen the little warning on it: "Objects in mirror are closer than they appear"
Unfortunately, modern universtal-type mirrors don't have that, but you can make one yourself. I found an accessory mirror online that was designed to attach to a much larger mirror (like a truck) but it happened to be close to the size of my flat-glass mirror. It was only $12. I also found a cheap "diamond surface" sanding block that's used to smooth the edges when making a stained glass window, and it was just $8.
I carefully broke the existing mirror to pull it out of the frame, then sanded the edges down on the new mirror (and it took a while) until it fit in the frame. I used some black RTV sealant to glue it into place, and a little more around the edges for a almost-stock appearance.
As you can see in the photo, it works pretty well.
Here's how you can do it.
Modern cars have a wide-angle mirror on the passenger side to make it easier for you to see what's behind and beside your car. You've seen the little warning on it: "Objects in mirror are closer than they appear"
Unfortunately, modern universtal-type mirrors don't have that, but you can make one yourself. I found an accessory mirror online that was designed to attach to a much larger mirror (like a truck) but it happened to be close to the size of my flat-glass mirror. It was only $12. I also found a cheap "diamond surface" sanding block that's used to smooth the edges when making a stained glass window, and it was just $8.
I carefully broke the existing mirror to pull it out of the frame, then sanded the edges down on the new mirror (and it took a while) until it fit in the frame. I used some black RTV sealant to glue it into place, and a little more around the edges for a almost-stock appearance.
As you can see in the photo, it works pretty well.
Here's how you can do it.
Steering Wheel Restoration
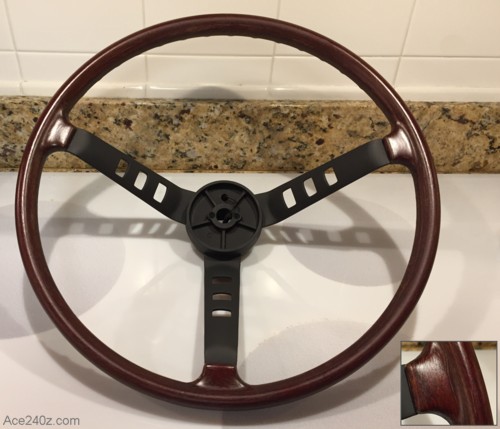 Does your steering wheel look a little old and faded? It's cheap and easy to make it look like new.
Note: this takes a full day and an overnight to let everything dry, so plan accordingly.
Start by removing the horn pad. It's held in place with some spring clips, so a little wiggling will it pull off. Disconnect the horn wire. Loosen the nut that holds the wheel to the shaft, but leave it on a couple of threads. Tug and yank to pull the wheel off. A little WD-40 will help loosen it. Maybe give it a few gentle taps with a rubber mallet. It'll eventually come free, and when it does it can be pretty abrupt - having the nut on the shaft will prevent it from flying off and smacking you in the face. Trust me on that.
In the kitchen sink, wash the wheel thoroughly with warm soapy water. If there's any built-up gunk on the rim, use a scrubber or very fine steel wool to gently remove it. Rinse and let it dry.
Use some sandpaper to smooth out any scratches or pits on the metal spokes. If you have access to a sandblaster, wrap the rim in tape and remove every scrap of paint. Once the rungs are clean, give it another wash.
Mask off the wood and give the rungs a coat of primer, followed by several light coats of satin black. Don't go too heavy or the paint will run and you'll have to sand it down and start from scratch, or leave it and have to look at the run every time you drive.
When the paint is dry, unwrap the rim, then mask off the rungs. At your local hardware store, find a little can of wood stain with a color you like. The steering wheel rim is actually an epoxy mixed with wood fiber to give it a "grain" appearance, but it'll absorb the stain. Follow the manufacturer's directions and let it dry.
Here's the final (and important) step: Instead of using an ordinary spray polyurethane, find some "spar varnish". It's designed for wooden sailboat masts that receive a lot of sun and UV. Make sure the spokes are still masked off, then give the rim several coats about ten minutes apart. Once again, use light coats to prevent any runs. Let it cure overnight. It might still be a little tacky, so if you can do without your car for a few more hours, let it continue to cure.
That's it. Reassemble everything and enjoy a beautifully restored steering wheel.
Does your steering wheel look a little old and faded? It's cheap and easy to make it look like new.
Note: this takes a full day and an overnight to let everything dry, so plan accordingly.
Start by removing the horn pad. It's held in place with some spring clips, so a little wiggling will it pull off. Disconnect the horn wire. Loosen the nut that holds the wheel to the shaft, but leave it on a couple of threads. Tug and yank to pull the wheel off. A little WD-40 will help loosen it. Maybe give it a few gentle taps with a rubber mallet. It'll eventually come free, and when it does it can be pretty abrupt - having the nut on the shaft will prevent it from flying off and smacking you in the face. Trust me on that.
In the kitchen sink, wash the wheel thoroughly with warm soapy water. If there's any built-up gunk on the rim, use a scrubber or very fine steel wool to gently remove it. Rinse and let it dry.
Use some sandpaper to smooth out any scratches or pits on the metal spokes. If you have access to a sandblaster, wrap the rim in tape and remove every scrap of paint. Once the rungs are clean, give it another wash.
Mask off the wood and give the rungs a coat of primer, followed by several light coats of satin black. Don't go too heavy or the paint will run and you'll have to sand it down and start from scratch, or leave it and have to look at the run every time you drive.
When the paint is dry, unwrap the rim, then mask off the rungs. At your local hardware store, find a little can of wood stain with a color you like. The steering wheel rim is actually an epoxy mixed with wood fiber to give it a "grain" appearance, but it'll absorb the stain. Follow the manufacturer's directions and let it dry.
Here's the final (and important) step: Instead of using an ordinary spray polyurethane, find some "spar varnish". It's designed for wooden sailboat masts that receive a lot of sun and UV. Make sure the spokes are still masked off, then give the rim several coats about ten minutes apart. Once again, use light coats to prevent any runs. Let it cure overnight. It might still be a little tacky, so if you can do without your car for a few more hours, let it continue to cure.
That's it. Reassemble everything and enjoy a beautifully restored steering wheel.
Electric Fuel Pump
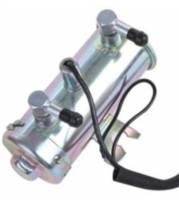 An electric fuel pump is more dependable than the mechanical version (at least to me) and since it's tucked underneath at the fuel tank, it helps clean up the engine compartment. Some people remove the stock pump to gain a little horsepower, but I doubt it's even a tenth of one. Regardless, it took less than two hours and I'm glad I made the swap.
Part of my motivation was when I ran out of gas. I walked to a gas station and bought a two-gallon can, then walked back to the car and poured it in. Unfortunately, the starter can't turn the engine over fast enough for the mechanical pump to pull the gas up to the carbs, so I had to walk back to the station and bring back more gas so that I could fill the carb bowls, which allowed the engine to start and get the pump working.
Hopefully I'll never run out of gas again, but if I do I won't have to prime the carbs.
Click here to see how it's done.
An electric fuel pump is more dependable than the mechanical version (at least to me) and since it's tucked underneath at the fuel tank, it helps clean up the engine compartment. Some people remove the stock pump to gain a little horsepower, but I doubt it's even a tenth of one. Regardless, it took less than two hours and I'm glad I made the swap.
Part of my motivation was when I ran out of gas. I walked to a gas station and bought a two-gallon can, then walked back to the car and poured it in. Unfortunately, the starter can't turn the engine over fast enough for the mechanical pump to pull the gas up to the carbs, so I had to walk back to the station and bring back more gas so that I could fill the carb bowls, which allowed the engine to start and get the pump working.
Hopefully I'll never run out of gas again, but if I do I won't have to prime the carbs.
Click here to see how it's done.
5-Speed Transmission
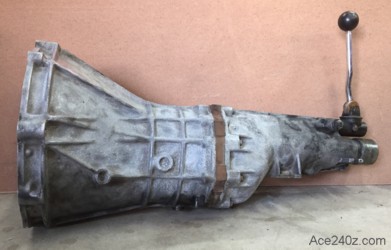 Changing your 4-speed transmission to a 5-speed makes a big difference at freeway speeds. The toughest part might be finding the transmission itself because it's a very popular upgrade. Any Z transmission can attach to any Z engine without an adapter. The support mount underneath is the same and the driveshaft doesn't have to be modified.
The relatively easy procedure is on my Do It Yourself page.
Changing your 4-speed transmission to a 5-speed makes a big difference at freeway speeds. The toughest part might be finding the transmission itself because it's a very popular upgrade. Any Z transmission can attach to any Z engine without an adapter. The support mount underneath is the same and the driveshaft doesn't have to be modified.
The relatively easy procedure is on my Do It Yourself page.
Door Strap Trim
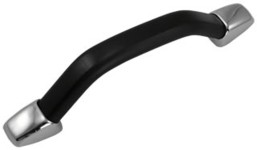 The passenger side door has a convenient strap on the inside to pull it closed. If you're missing the chrome trim on the ends, your only option was to buy this entire assembly for $90 (plus shipping), but here's how you can replace them for a lot less.
Look here.
The passenger side door has a convenient strap on the inside to pull it closed. If you're missing the chrome trim on the ends, your only option was to buy this entire assembly for $90 (plus shipping), but here's how you can replace them for a lot less.
Look here.
Starter Motor
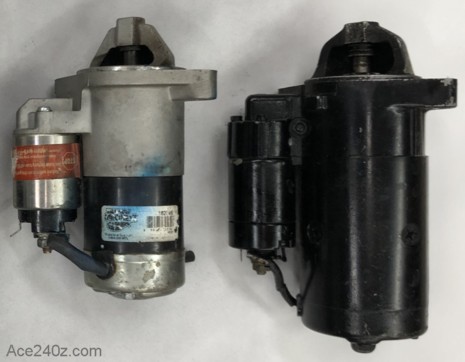 The starter motor on the right is the stock unit based on a 50-year-old design and weighs in at 13.3 lbs. The one on the left is a modern starter used on dozens of new cars and weighs a mere 7.36 lbs. It's probably more powerful and draws less current.
It's a "Pure Energy 16209" and can be found all over the place, including brand-new (not remanufactured) at Amazon for a mere $57, with free delivery and no core charge. By contrast, the cheapest remanufactured stock starter I could find was $44 plus shipping on eBay. If nothing else, the lighter weight makes it easier to wrestle into place.
I have one in my car and it works great, even with my higher-compression engine.
The starter motor on the right is the stock unit based on a 50-year-old design and weighs in at 13.3 lbs. The one on the left is a modern starter used on dozens of new cars and weighs a mere 7.36 lbs. It's probably more powerful and draws less current.
It's a "Pure Energy 16209" and can be found all over the place, including brand-new (not remanufactured) at Amazon for a mere $57, with free delivery and no core charge. By contrast, the cheapest remanufactured stock starter I could find was $44 plus shipping on eBay. If nothing else, the lighter weight makes it easier to wrestle into place.
I have one in my car and it works great, even with my higher-compression engine.
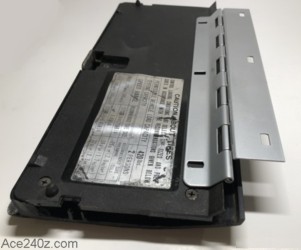
Fuel Tank Strap Cushioning
 The fuel tank is held in place with a pair of steel straps. Between the tank and the straps is a thin layer of rubber but after 50+ years, it's probably lost all flexibility. Here's a bargain solution.
Power Steering
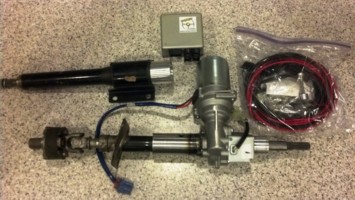 This is something new - genuine power steering for your Z. Instead of the traditional hydraulic system, it uses an electric motor connected to the steering column, which is typical for most modern cars. It's something I plan on trying in the future, but in the meantime take a look at one of the kits:
here .
This is something new - genuine power steering for your Z. Instead of the traditional hydraulic system, it uses an electric motor connected to the steering column, which is typical for most modern cars. It's something I plan on trying in the future, but in the meantime take a look at one of the kits:
here .