240z Current Status
I'm driving the car and it's as much fun as I'd hoped, but it's not 100% finished so the work continues.
If you want to see the restoration from start to present, click here.
March 11th, 2026
 The rear suspension is finally fixed thanks to Greg at Ignite Motorsports in Arvada. The problem turned out to be the rear control arm inner bushings.
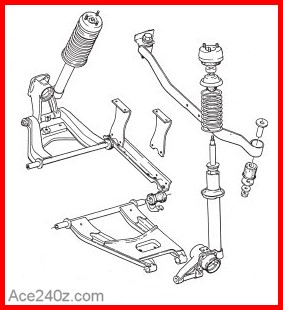
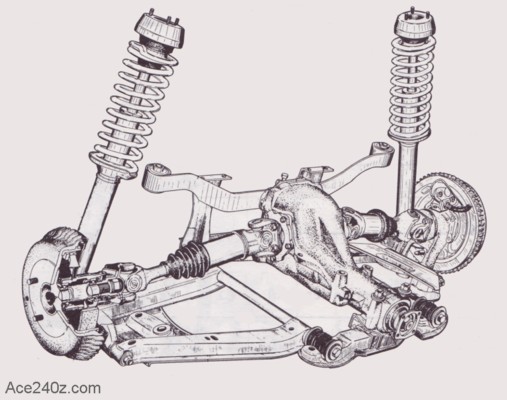
I had originally used the rubber type because I wanted the stock "plush" ride for around town. There are two sizes - one long and and short - and I had installed them backwards. The diagram at left shows where they're located. With the bushings reversed, the arm could move back and forth about half an inch, and with that much free play the arm would shift position and actually hit the underbody of the car, which caused the "bang".
I considered getting a new set of rubber bushings but decided to try the polyurethane versions instead. They weren't expensive and were relatively easy to install. I only installed the inner ones because the outer bushings need to be pressed out, which meant the arms would have to be removed and taken to a machine shop for the work.
The polyurethane bushings are definitely stiffer and I can "feel" little bumps but it's not so noticeable that I'm going to switch back to the rubber... at least not yet.
The rear suspension is finally fixed thanks to Greg at Ignite Motorsports in Arvada. The problem turned out to be the rear control arm inner bushings.
I had originally used the rubber type because I wanted the stock "plush" ride for around town. There are two sizes - one long and and short - and I had installed them backwards. The diagram at left shows where they're located. With the bushings reversed, the arm could move back and forth about half an inch, and with that much free play the arm would shift position and actually hit the underbody of the car, which caused the "bang".
I considered getting a new set of rubber bushings but decided to try the polyurethane versions instead. They weren't expensive and were relatively easy to install. I only installed the inner ones because the outer bushings need to be pressed out, which meant the arms would have to be removed and taken to a machine shop for the work.
The polyurethane bushings are definitely stiffer and I can "feel" little bumps but it's not so noticeable that I'm going to switch back to the rubber... at least not yet.
January 1st, 2026
 Here are the website stats for 2025.
"Unique Visitors" shows how many people came at least once. "Number of Visits" shows the total number of times the site was visited. "Hits" shows how many times my images came up in search engines.
The first year of this site was in 2018 and 2526 people came to look, which I thought was great. Eight years later it's 26,271 gearheads (a 1000% increase) from 94 countries and I'm totally stunned. I never, ever imagined it would be like this.
Total visits since the site opened is 82,648.
Many thanks to everyone who came for a look and I hope you enjoyed being here.
Here are the website stats for 2025.
"Unique Visitors" shows how many people came at least once. "Number of Visits" shows the total number of times the site was visited. "Hits" shows how many times my images came up in search engines.
The first year of this site was in 2018 and 2526 people came to look, which I thought was great. Eight years later it's 26,271 gearheads (a 1000% increase) from 94 countries and I'm totally stunned. I never, ever imagined it would be like this.
Total visits since the site opened is 82,648.
Many thanks to everyone who came for a look and I hope you enjoyed being here.
December 26th, 2025
 Merry Christmas to me - the roll bar is finished and looks great.
Check it out here.
Merry Christmas to me - the roll bar is finished and looks great.
Check it out here.
December 18th, 2025
 When I first built the car, I did a lot of searching for a pair of side mirrors that I liked. After installing them, I wasn't happy. They sat too low and just didn't "look right". That's the way projects often go.
I found a different set that looked more like the stock ones and they were available in black instead of chrome. They worked much better, but there was a big problem: they couldn't use the same holes. I gritted my teeth and drilled new holes and mounted them where they belonged. The "right" solution would be weld the previous holes shut and repaint both doors, but that wasn't within my budget so I put up with the holes for several years.
One day I came up with a solution. My '71 is considered a "Series 1" car, which is distinguished by a pair of small grilles on the rear hatch for air to escape when the interior vents are open. It wasn't one of Datsun's best designs and after two years they changed to better vents behind the quarter-windows.
I decided I could make miniature versions of those vents and glue them over the holes and (aside from other Z owners) nobody would think they weren't stock. Few people would notice them at all. I did a quick Photoshop to see how it looked and was pretty pleased. I used AutoCad to make a scaled-down version of the grilles and my friend Max did some 3D printing. With a little sanding, some faux screw heads and a little silver paint, they looked perfect.
I used some RTV as glue and the result is just what I wanted: no more holes in the door.
When I first built the car, I did a lot of searching for a pair of side mirrors that I liked. After installing them, I wasn't happy. They sat too low and just didn't "look right". That's the way projects often go.
I found a different set that looked more like the stock ones and they were available in black instead of chrome. They worked much better, but there was a big problem: they couldn't use the same holes. I gritted my teeth and drilled new holes and mounted them where they belonged. The "right" solution would be weld the previous holes shut and repaint both doors, but that wasn't within my budget so I put up with the holes for several years.
One day I came up with a solution. My '71 is considered a "Series 1" car, which is distinguished by a pair of small grilles on the rear hatch for air to escape when the interior vents are open. It wasn't one of Datsun's best designs and after two years they changed to better vents behind the quarter-windows.
I decided I could make miniature versions of those vents and glue them over the holes and (aside from other Z owners) nobody would think they weren't stock. Few people would notice them at all. I did a quick Photoshop to see how it looked and was pretty pleased. I used AutoCad to make a scaled-down version of the grilles and my friend Max did some 3D printing. With a little sanding, some faux screw heads and a little silver paint, they looked perfect.
I used some RTV as glue and the result is just what I wanted: no more holes in the door.
December 16th, 2025
 The rear suspension is still a problem but everything else works well enough for a nice drive up in the mountains. This section was so much fun that I had to run it several times. The signpost tells the story of how tight it was.
Click on the pic to watch the run on YouTube and turn up the volume.
The rear suspension is still a problem but everything else works well enough for a nice drive up in the mountains. This section was so much fun that I had to run it several times. The signpost tells the story of how tight it was.
Click on the pic to watch the run on YouTube and turn up the volume.
December 2nd, 2025
 I didn't have to drop the fuel tank. I was able to jack the rear up high enough to slide underneath. The problem was the O-ring that came with the sender was too small. When I installed the sender itself, the O-ring would slip across the opening and leave a big gap.
The right-size replacement from a Z-specialty store cost nearly as much as the kit I bought on eBay, but it works. Lesson learned.
I didn't have to drop the fuel tank. I was able to jack the rear up high enough to slide underneath. The problem was the O-ring that came with the sender was too small. When I installed the sender itself, the O-ring would slip across the opening and leave a big gap.
The right-size replacement from a Z-specialty store cost nearly as much as the kit I bought on eBay, but it works. Lesson learned.
November 20th, 2025
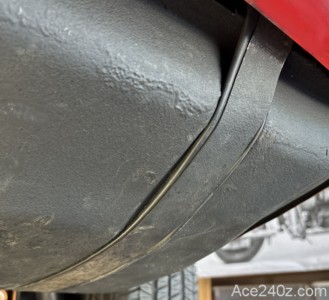
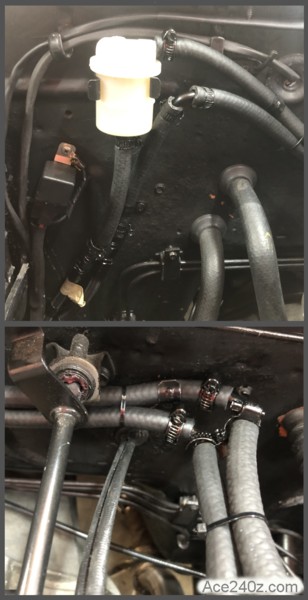
 At the moment the car isn't driveable thanks to a persistant gas tank leak. I pulled the fuel level sensor out a few weeks ago to modify how it connects to the wiring. I've never liked the "sliding" connectors and the insulating boots never fit very well, so I soldered wires to the posts and added barrel connectors at the ends. The posts were covered with a little RTV to protect against corrosion and back in it went. The tank leaked. A lot. I couldn't find the source, so I suspected I might have damaged the seals around the posts, so I pulled it back out and added more RTV. It still leaked, so I bought a new sensor and crimped the sliding connectors to get them as tight as possible, and once again used RTV for protection.
It still leaks, even with gasket sealer around the o-ring. In the photo you can see how it all-but poured out and disolved the undercoat. As much as I hate removing the tank, it looks like I'll have to do it once more to find out what the problem is and get it properly sealed.
I might even do a page on how to replace the sensor "properly" when I solve the problem.
At the moment the car isn't driveable thanks to a persistant gas tank leak. I pulled the fuel level sensor out a few weeks ago to modify how it connects to the wiring. I've never liked the "sliding" connectors and the insulating boots never fit very well, so I soldered wires to the posts and added barrel connectors at the ends. The posts were covered with a little RTV to protect against corrosion and back in it went. The tank leaked. A lot. I couldn't find the source, so I suspected I might have damaged the seals around the posts, so I pulled it back out and added more RTV. It still leaked, so I bought a new sensor and crimped the sliding connectors to get them as tight as possible, and once again used RTV for protection.
It still leaks, even with gasket sealer around the o-ring. In the photo you can see how it all-but poured out and disolved the undercoat. As much as I hate removing the tank, it looks like I'll have to do it once more to find out what the problem is and get it properly sealed.
I might even do a page on how to replace the sensor "properly" when I solve the problem.
October 23rd, 2025
 I finally got around to fabricating the roll bar. It came as a kit that "required professional assembly", which meant I had to do a bunch of cutting and a lot of grinding to make it fit. At the moment it's just the main hoop and cross-brace. I'll find a local shop that can bend and cut the support pieces that go from the bar to the top of the strut towers. It's a little too complex for me to do.
 There may come a point where I don't want to carry the weight of the bar around, so I made it removeable. Not being welded in place means it's not SCCA-compliant, but that's okay because I don't plan on racing. Like with the front air dam and the rear spoiler, it's more decorative than a genuine race accessory.
At the base I made some mounts from 12 ga. steel and used grade-8 hardware to fasten it to the floor, with a big plate underneath for reinforcement. A friend welded it together, then later welded the roll bar to it when everything was fitted. It's not the prettiest thing I've made, but it's sure as hell rugged. The carpet fits underneath, so if the roll bar ever gets removed, it won't have to be replaced.
There may come a point where I don't want to carry the weight of the bar around, so I made it removeable. Not being welded in place means it's not SCCA-compliant, but that's okay because I don't plan on racing. Like with the front air dam and the rear spoiler, it's more decorative than a genuine race accessory.
At the base I made some mounts from 12 ga. steel and used grade-8 hardware to fasten it to the floor, with a big plate underneath for reinforcement. A friend welded it together, then later welded the roll bar to it when everything was fitted. It's not the prettiest thing I've made, but it's sure as hell rugged. The carpet fits underneath, so if the roll bar ever gets removed, it won't have to be replaced.
September 16th, 2025
 I'm still trying to find the source of the aggravating rear suspension noise. I (very reluctantly) dropped the fuel tank, hoping I might find some sort of hidden unibody damage that would explain the loud clank.
It's a procedure I truly dislike. Even with the tank empty, it's heavy, holding it up is awkward, and disconnecting all of the supply and vent hoses is awful. There's a removable plate behing the passenger side rear wheel which makes it somewhat easy to unclamp the filler hose, but even so it's a thankless chore. Putting the tank back into place is pretty frustrating, but thankfully a good friend was able to lend a hand.
Unfortunately, this was one of many times where I couldn't find anything wrong. Damn.
Making things worse, I somehow damaged the fuel sensor's base where it connects to the tank. Went I started filling it, gas leaked all over. After emptying the tank (again), I added some sealer around the o-ring but it still leaked. I bought a replacement sensor and it should be here in a couple more days.
The fun never ends.
I'm still trying to find the source of the aggravating rear suspension noise. I (very reluctantly) dropped the fuel tank, hoping I might find some sort of hidden unibody damage that would explain the loud clank.
It's a procedure I truly dislike. Even with the tank empty, it's heavy, holding it up is awkward, and disconnecting all of the supply and vent hoses is awful. There's a removable plate behing the passenger side rear wheel which makes it somewhat easy to unclamp the filler hose, but even so it's a thankless chore. Putting the tank back into place is pretty frustrating, but thankfully a good friend was able to lend a hand.
Unfortunately, this was one of many times where I couldn't find anything wrong. Damn.
Making things worse, I somehow damaged the fuel sensor's base where it connects to the tank. Went I started filling it, gas leaked all over. After emptying the tank (again), I added some sealer around the o-ring but it still leaked. I bought a replacement sensor and it should be here in a couple more days.
The fun never ends.
July 27th, 2025
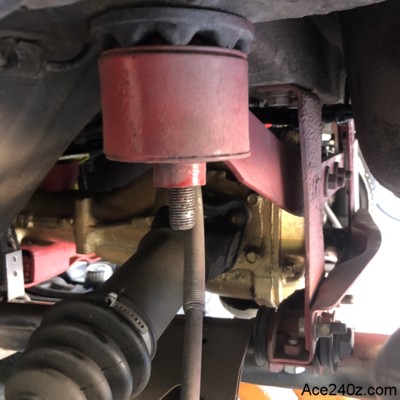
 Last weekend I replaced the strut cartridges in the rear. I suspected the horrible noise might be caused by a failed cartridge. They only have about 2000 miles on them, but one might have been defective from the factory. Once again the car went up on stands, once again the Chapman struts were lowered, and once again I experienced the terror of compressing and removing the springs. The cartridge on the passenger side slid right out, but the one on the driver's side wouldn't budge.
Soaking it in PB Blaster did nothing. Yanking with a side hammer did nothing. Heat from a torch did nothing. Since the cartridge wasn't going to be reused, I attached a couple pieces of steel to the threaded top (red arrow) and proceeded to beat the thing at least two dozen times with a 5-pound sledgehamer (aka the "Tonya Harding) but no success.
That's when I spotted something awful: the strut tube itself was slightly bent. The yellow line sort-of shows it. At that point there was nothing to do but replace the entire thing. Shit.
Fortunately my friend Junkyard Jenny, the best used-parts reseller I've ever met, had just taken one apart and cleaned and painted it, and gave it to me at an incredible bargain price. (Thank you again!). A mere 24 hours after finding the damage, I had a replacement in-hand. Of course, I had to swap the stub axle and bearings, as well as the drum brake assembly, neither of which was fun, but eventually it all went back together and into the car and ready for a test drive,
Failure. The loud "clank" remained.
Next will be dropping the fuel tank in the hope I'll find some sort of damage between it and the body. While the tank is out I'll connect a lawn mower can of gas to the fuel pump and take the car for a test drive. If the clank remains, I'm giving up. I'll continue driving the car and eventually something will fail and I'll finally find the problem.
Last weekend I replaced the strut cartridges in the rear. I suspected the horrible noise might be caused by a failed cartridge. They only have about 2000 miles on them, but one might have been defective from the factory. Once again the car went up on stands, once again the Chapman struts were lowered, and once again I experienced the terror of compressing and removing the springs. The cartridge on the passenger side slid right out, but the one on the driver's side wouldn't budge.
Soaking it in PB Blaster did nothing. Yanking with a side hammer did nothing. Heat from a torch did nothing. Since the cartridge wasn't going to be reused, I attached a couple pieces of steel to the threaded top (red arrow) and proceeded to beat the thing at least two dozen times with a 5-pound sledgehamer (aka the "Tonya Harding) but no success.
That's when I spotted something awful: the strut tube itself was slightly bent. The yellow line sort-of shows it. At that point there was nothing to do but replace the entire thing. Shit.
Fortunately my friend Junkyard Jenny, the best used-parts reseller I've ever met, had just taken one apart and cleaned and painted it, and gave it to me at an incredible bargain price. (Thank you again!). A mere 24 hours after finding the damage, I had a replacement in-hand. Of course, I had to swap the stub axle and bearings, as well as the drum brake assembly, neither of which was fun, but eventually it all went back together and into the car and ready for a test drive,
Failure. The loud "clank" remained.
Next will be dropping the fuel tank in the hope I'll find some sort of damage between it and the body. While the tank is out I'll connect a lawn mower can of gas to the fuel pump and take the car for a test drive. If the clank remains, I'm giving up. I'll continue driving the car and eventually something will fail and I'll finally find the problem.
June 23rd, 2025
 The cushion strips between the fuel tank and steel straps were long gone, so I figured out a cheap solution. Take a look here.
Unfortunately, the suspension nightmare has not been solved but I'm not giving up.
The cushion strips between the fuel tank and steel straps were long gone, so I figured out a cheap solution. Take a look here.
Unfortunately, the suspension nightmare has not been solved but I'm not giving up.
May 29th, 2025
The horrible rear suspension clang-bang-crash is still unsolved. A friend has a totally-custom 280z that he uses for autocross, so I'm going to let him drive it around and listen to the nightmare and hopefully pinpoint the problem. I'm now selling -t-shirts and hoodies with the great photo of my car. Unlike most other online sellers, I didn't do any markup on the price. I'd rather see people wearing the shirts than making a profit. You can snag one for yourself here . If you buy a shirt, send me a pic of you wearing it and I'll add you to the Photo Gallery where you'll be the envy of thousands of people worldwide.April 3rd, 2025
 Nobody likes dealing with electrical problems, so I added a page to show how easy it can be.
All you need are a few inexpensive tools and a copy of the factory wiring diagram.
Click here to see it.
Nobody likes dealing with electrical problems, so I added a page to show how easy it can be.
All you need are a few inexpensive tools and a copy of the factory wiring diagram.
Click here to see it.
March 13th, 2025
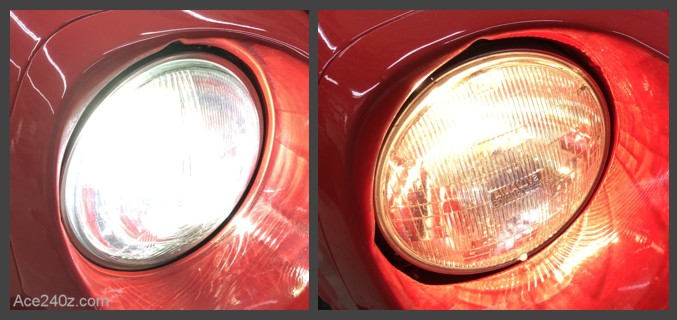 My stock headlights were so dim that I needed a flashlight to see if they were on, so I replaced then with new, modern LED units. What a difference.
I made a handy procedure here .
My stock headlights were so dim that I needed a flashlight to see if they were on, so I replaced then with new, modern LED units. What a difference.
I made a handy procedure here .
February 20th, 2025
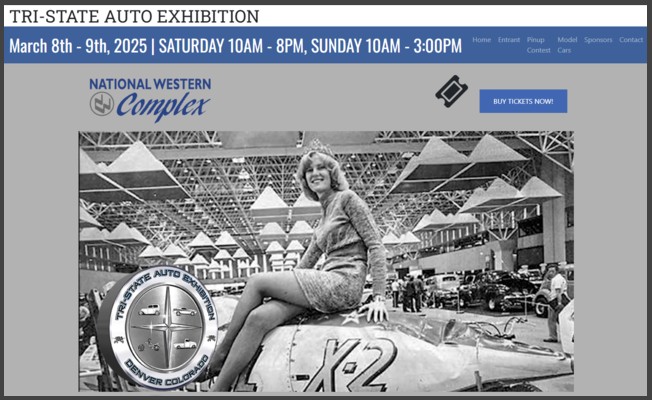 Much to my amazement, I've been selected to be part of the Tri-State Auto Exhibition, which is the largest, most prestigious car show in the Colorado region. It's not just a show - it's a judged event with trophies and prizes and thousands of people wandering thru the halls. Being picked out of hundreds of applicants is a tremendous thrill.
Unfortunately... I can't be at the show because I'm going to be at the Air Force Museum in Dayton, Ohio, and can't back out. I'm absolutely crushed.
Hopefully I'll be accepted next year but there's no telling what might happen in the meantime. All I can do is cross my fingers and put on a good face and hope for the best.
Much to my amazement, I've been selected to be part of the Tri-State Auto Exhibition, which is the largest, most prestigious car show in the Colorado region. It's not just a show - it's a judged event with trophies and prizes and thousands of people wandering thru the halls. Being picked out of hundreds of applicants is a tremendous thrill.
Unfortunately... I can't be at the show because I'm going to be at the Air Force Museum in Dayton, Ohio, and can't back out. I'm absolutely crushed.
Hopefully I'll be accepted next year but there's no telling what might happen in the meantime. All I can do is cross my fingers and put on a good face and hope for the best.
Christmas Day 2024
 Rebuilding the entire rear suspension is finished but it failed to eliminate the irritating "clank". Making things worse, I couldn't get the exhaust connection aligned properly and it leaks badly. It's so loud that I'm ashamed to drive the car in public.
The only thing in the rear suspension that hasn't been replaced or throughly inspected are the strut cartridges. They're the basic KYB units and were new when I rebuilt the car, so they have less a thousand miles of wear, but some people have told me about problems they've had, particularly a couple that failed in the first few weeks.
When I had everything apart, the cartridge on the passenger side came out easily but the one on the driver's side was stuck. A friend and I tried different methods to remove the thing without damaging it but failed. We suspected there was some rust or corrosion holding it in place, so we left it there and buttoned everything back together. Now I'm wondering if it's damaged somehow, which could possibly be why it wouldn't come out, and more importantly, might be the cause of the clank.
The only way to know is replace it, and replacing the other side at the same time makes sense. $138 (including shipping) for a new pair isn't a really tough bite, and I can once-again borrow a coil spring compressor, but I'm getting really tired of spending more time working on the car than I am driving it.
For the exhaust, I'm taking it to a local muffler shop and have them replace the entire pipe from the header all the way back to the muffler. The existing one has been cut and modified and re-welded too many times and no longer works the way it's supposed to.
It's only money, right?
Rebuilding the entire rear suspension is finished but it failed to eliminate the irritating "clank". Making things worse, I couldn't get the exhaust connection aligned properly and it leaks badly. It's so loud that I'm ashamed to drive the car in public.
The only thing in the rear suspension that hasn't been replaced or throughly inspected are the strut cartridges. They're the basic KYB units and were new when I rebuilt the car, so they have less a thousand miles of wear, but some people have told me about problems they've had, particularly a couple that failed in the first few weeks.
When I had everything apart, the cartridge on the passenger side came out easily but the one on the driver's side was stuck. A friend and I tried different methods to remove the thing without damaging it but failed. We suspected there was some rust or corrosion holding it in place, so we left it there and buttoned everything back together. Now I'm wondering if it's damaged somehow, which could possibly be why it wouldn't come out, and more importantly, might be the cause of the clank.
The only way to know is replace it, and replacing the other side at the same time makes sense. $138 (including shipping) for a new pair isn't a really tough bite, and I can once-again borrow a coil spring compressor, but I'm getting really tired of spending more time working on the car than I am driving it.
For the exhaust, I'm taking it to a local muffler shop and have them replace the entire pipe from the header all the way back to the muffler. The existing one has been cut and modified and re-welded too many times and no longer works the way it's supposed to.
It's only money, right?
December 8th, 2024
 After a few delays and some stalling, the drivetrain is back together. It was a lot of tiring work. Hopefully I'll never have to do it again.
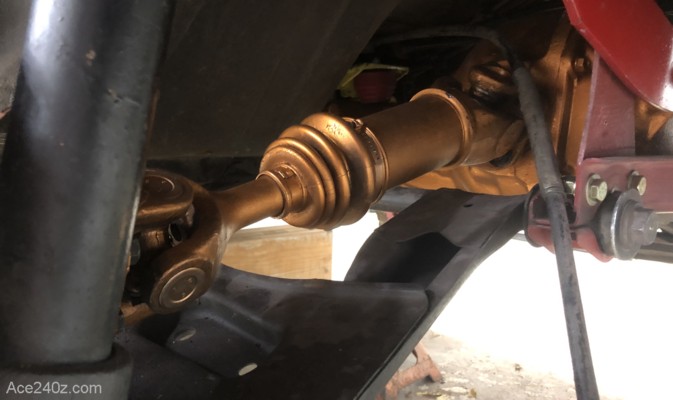
The refreshed R200 differential fits perfectly. Connecting the driveshaft was a major pain in the ass. The half-shafts were relatively straightforward. Little bits of this-n-that add up to a lot of time.
The Chapman strut springs were removed (again) and the strut cartridges seem okay, so all I did was shim them for a tighter fit.
Every nut and every bolt was given a few drops of Loctite and double-checked to make sure they're snug. So far I haven't seen anything that appears defective or suspect, but I won't know for certain until I take it for a test drive. I hope the annoying rattles are gone.
The bronze paint turned out great. Hopefully it'll hold up to daily driving. The color gives the illusion of being "super trick aftermarket parts" when really it's just stock. If nothing else, it makes me laugh.
The exhaust turned out to be a pain. The guy at Midas who did the connector is a shitty welder. I'm a rank amateur but did better than him when I repaired his crap. Every seam was slathered with exhaust sealer, and I'll use more when the two sections get bolted together.
While the pipe was off, I started the engine to see how it sounded with an uncorked header. Video of that lovely noise will be added soon.
After a few delays and some stalling, the drivetrain is back together. It was a lot of tiring work. Hopefully I'll never have to do it again.
The refreshed R200 differential fits perfectly. Connecting the driveshaft was a major pain in the ass. The half-shafts were relatively straightforward. Little bits of this-n-that add up to a lot of time.
The Chapman strut springs were removed (again) and the strut cartridges seem okay, so all I did was shim them for a tighter fit.
Every nut and every bolt was given a few drops of Loctite and double-checked to make sure they're snug. So far I haven't seen anything that appears defective or suspect, but I won't know for certain until I take it for a test drive. I hope the annoying rattles are gone.
The bronze paint turned out great. Hopefully it'll hold up to daily driving. The color gives the illusion of being "super trick aftermarket parts" when really it's just stock. If nothing else, it makes me laugh.
The exhaust turned out to be a pain. The guy at Midas who did the connector is a shitty welder. I'm a rank amateur but did better than him when I repaired his crap. Every seam was slathered with exhaust sealer, and I'll use more when the two sections get bolted together.
While the pipe was off, I started the engine to see how it sounded with an uncorked header. Video of that lovely noise will be added soon.
October 3rd, 2024
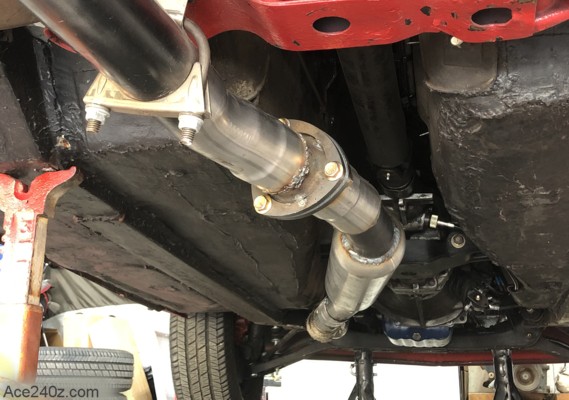 I'm getting ready to remove the rear suspension (again) to install the new differential and hopefully find the source of the elusive "clank". To make the work a little easier I had my local muffler shop add a connector flange to the exhaust pipe. It'll make it easy to remove the pipe and muffler for work like this.
Hopefully I won't have to do it again, but if something crops up I'll be ready.
I'm getting ready to remove the rear suspension (again) to install the new differential and hopefully find the source of the elusive "clank". To make the work a little easier I had my local muffler shop add a connector flange to the exhaust pipe. It'll make it easy to remove the pipe and muffler for work like this.
Hopefully I won't have to do it again, but if something crops up I'll be ready.
October 1st, 2024
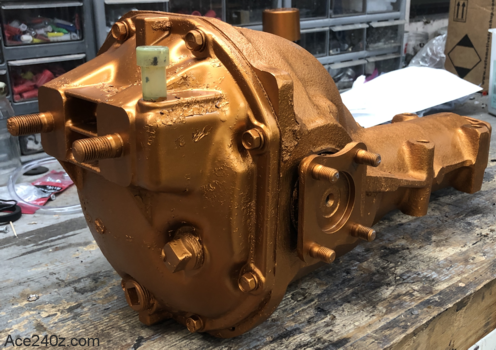 The replacement R200 differential hasn't been installed (yet) but I've done a full "refresh", which was new seals, cover gasket, fluid and several coats of bronze paint. Hopefully it'll work as good as it looks.
I've added the procedure for that, and a few others, to the Do It Youself page, with more on the way.
The replacement R200 differential hasn't been installed (yet) but I've done a full "refresh", which was new seals, cover gasket, fluid and several coats of bronze paint. Hopefully it'll work as good as it looks.
I've added the procedure for that, and a few others, to the Do It Youself page, with more on the way.
September 9th, 2024
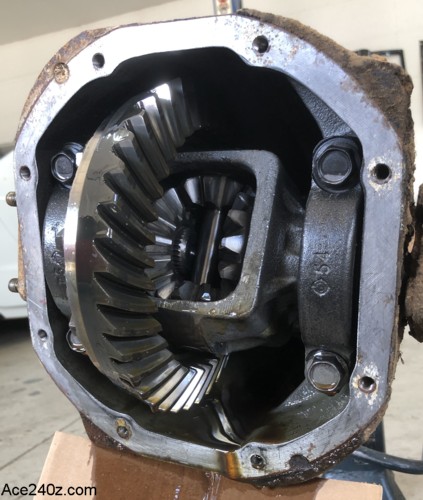 The elusive "clunk" in the rear seems to be getting worse. Since everything has been replaced... except for the stock R180 differential. Considering how worn out everything else in this car has been, perhaps the 53 year old diff was simply falling apart. I looked around to see about getting it rebuilt but it turns out the parts alone are about $500, plus labor. Ouch.
However, my favorite source for used parts, Junkyard Jenny, had just snagged a very low mileage R200, which was stock for the higher-powered 280z. It's also a 3.54 ratio, which should work fine with my 5-speed transmission. We worked out a deal where I gave her most of my leftover parts and a little cash and in return I got the diff. She was nice enough to include the matching moustache bar and crossmember, which is required to swap it into a '71. She popped the cover off to give it a quick inspection. The oil that spilled out looked better than either of us expected and it didn't have the typically horrible burned smell. No metal chips tumbled out, which is always a good sign.
Sure, it's overkill for my 152hp engine, but there's no telling what the future might hold. More important was it being available today. I ordered new seals and a gasket and some fluid, which won't be here for a few days, but that gives me time to hit it with some rattle-can black and yank the existing diff out and get everything prepped for the swap which will probably take an entire day.
I sure hope this fixes the clunk.
The elusive "clunk" in the rear seems to be getting worse. Since everything has been replaced... except for the stock R180 differential. Considering how worn out everything else in this car has been, perhaps the 53 year old diff was simply falling apart. I looked around to see about getting it rebuilt but it turns out the parts alone are about $500, plus labor. Ouch.
However, my favorite source for used parts, Junkyard Jenny, had just snagged a very low mileage R200, which was stock for the higher-powered 280z. It's also a 3.54 ratio, which should work fine with my 5-speed transmission. We worked out a deal where I gave her most of my leftover parts and a little cash and in return I got the diff. She was nice enough to include the matching moustache bar and crossmember, which is required to swap it into a '71. She popped the cover off to give it a quick inspection. The oil that spilled out looked better than either of us expected and it didn't have the typically horrible burned smell. No metal chips tumbled out, which is always a good sign.
Sure, it's overkill for my 152hp engine, but there's no telling what the future might hold. More important was it being available today. I ordered new seals and a gasket and some fluid, which won't be here for a few days, but that gives me time to hit it with some rattle-can black and yank the existing diff out and get everything prepped for the swap which will probably take an entire day.
I sure hope this fixes the clunk.
September 2nd, 2024
 It's been a while since I talked about money.
When I started this project, I made a spreadsheet to keep track of the costs and have been fanatical about adding purchases, even when it was just a couple of dollars for nuts and bolts. At this point the total is $35257.11
But that number is fungible. There are things I bought but never actually used, such as seat heaters which didn't fit right. There were parts which came with the car, such as a second rear suspension that got sold. Those things aren't part of the spreadsheet - it only contains money that was actually invested in the car. There were some unexpected costs like rebuilding the engine and letting a professional do the paint. There were a bunch of little upgrades. All of that added about $11k but was money well-spent because I have the car of my dreams.
It's been a while since I talked about money.
When I started this project, I made a spreadsheet to keep track of the costs and have been fanatical about adding purchases, even when it was just a couple of dollars for nuts and bolts. At this point the total is $35257.11
But that number is fungible. There are things I bought but never actually used, such as seat heaters which didn't fit right. There were parts which came with the car, such as a second rear suspension that got sold. Those things aren't part of the spreadsheet - it only contains money that was actually invested in the car. There were some unexpected costs like rebuilding the engine and letting a professional do the paint. There were a bunch of little upgrades. All of that added about $11k but was money well-spent because I have the car of my dreams.
If you're curious about the cost breakdown, take a look at the spreadsheet here.
August 28th, 2024
It's finally my daily driver. I absolutely love the way it looks and sounds and handles. I came out of a store the other day and would have taken this same photo even if it wasn't mine. After nearly 8 years and thousands of hours of sweat and toil, I can honestly say it was worth every minute.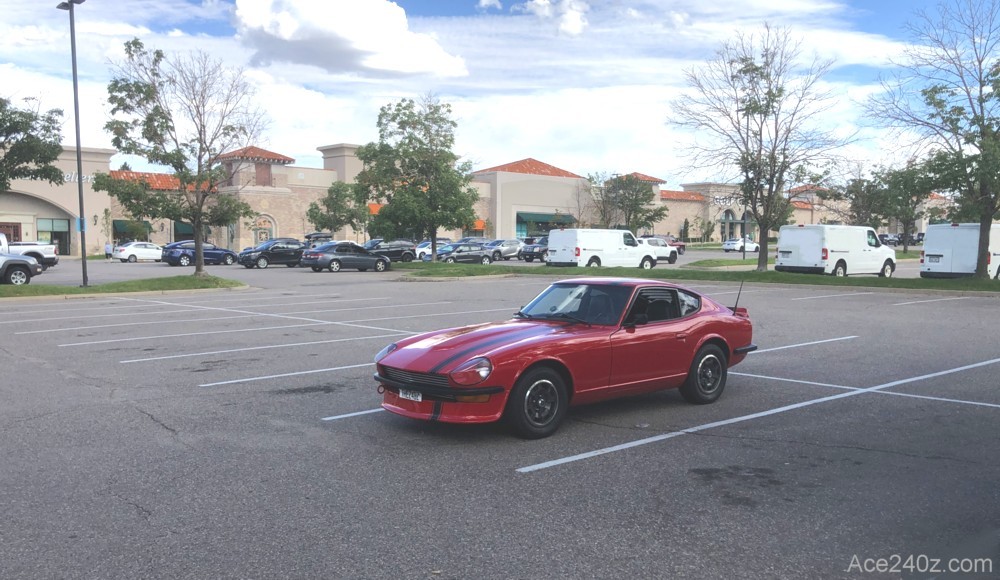
August 12th, 2024
I've added a new "do it yourself" section with step-by-step procedures on how to do simple things like replacing brake pads, tune-up, valve adjustments and so. At the moment, it's just the front brake pads, but additional procedures will be added whenever possible. Click here to see it.August 2nd, 2024
 Much to my dismay, new springs didn't fix the problem.
It took a lot of time to get all four installed. While everything was apart I took the opportunity to swap the rubber brake hoses for the braided steel versions. When it was all back together and I went for a drive, the clunk was still there. I put it back up on the jack and triple-checked everything but no dice.
I stripped all of the interior plastic out of the rear in the hope I might have left a large tool (or a rock) inside and it was the source. Nope.
I found a local custom car builder who owns a custom 240z (and a beautiful AMC AMX) and he rode crouched down in the back while I drove over some bumps and potholes. It only clunked a couple of times (I suspect his weight might have kept the pieces further apart) but he couldn't locate where the sound was coming from. He looked underneath and didn't see anything amiss. The fuel tank can slide back and forth a little, which produces a squeak but that's an issue for another day.
I'm giving up. I'll drive it daily and try to ignore the pesky noise and wait for something to fail and then I can see what the problem is. That's not a solution but I can't fix a problem if I can't find the source.
On the bright side, the springs are a nice upgrade. The car feels a lot firmer in turns.
In my never-ending quest to find inexpensive ways to improve and upgrade your car, I came up with a cheap & easy way to replace the broken plastic hinge on your glove box door. There's an online company that sells a really nice replacement but it's $125 plus $20 shipping. Think about it: how often do you open the door? A couple of times a year? It turns out the hinge for a '56 Chevy works just as well, looks really good, and I bought one on Amazon for $33 with free shipping. Click here to see how it's done.
Much to my dismay, new springs didn't fix the problem.
It took a lot of time to get all four installed. While everything was apart I took the opportunity to swap the rubber brake hoses for the braided steel versions. When it was all back together and I went for a drive, the clunk was still there. I put it back up on the jack and triple-checked everything but no dice.
I stripped all of the interior plastic out of the rear in the hope I might have left a large tool (or a rock) inside and it was the source. Nope.
I found a local custom car builder who owns a custom 240z (and a beautiful AMC AMX) and he rode crouched down in the back while I drove over some bumps and potholes. It only clunked a couple of times (I suspect his weight might have kept the pieces further apart) but he couldn't locate where the sound was coming from. He looked underneath and didn't see anything amiss. The fuel tank can slide back and forth a little, which produces a squeak but that's an issue for another day.
I'm giving up. I'll drive it daily and try to ignore the pesky noise and wait for something to fail and then I can see what the problem is. That's not a solution but I can't fix a problem if I can't find the source.
On the bright side, the springs are a nice upgrade. The car feels a lot firmer in turns.
In my never-ending quest to find inexpensive ways to improve and upgrade your car, I came up with a cheap & easy way to replace the broken plastic hinge on your glove box door. There's an online company that sells a really nice replacement but it's $125 plus $20 shipping. Think about it: how often do you open the door? A couple of times a year? It turns out the hinge for a '56 Chevy works just as well, looks really good, and I bought one on Amazon for $33 with free shipping. Click here to see how it's done.
July 19th, 2024
 I might have found the source of the mysterious "clunk".
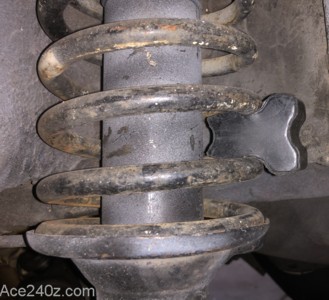
Talking with a hot-rodder friend, he asked about the rear springs and suggested that after 53 years they might have lost some of their strength. A sagging spring could compress too far when driving over a pothole and allow the strut to bottom out. There's a polyurethane "bumper" at the top of the strut's shaft that's intended to prevent damage to the strut if it bottoms out and I think the body of the strut hitting the bumper is where the clunk occurs.
To test that theory, I bought some rubber "dogbones" that are inserted in coil springs to "stiffen" them up. They're typically used for overloaded trailers but they worked well enough for me. They had to be shaved a little to fit inside my springs and then hammered into place. I drove around a little bit on the roughest streets in my neighborhood and it "clunked" less! As I'd expected, the dogbones didn't stay in place very long but worked well enough to get me one step closer to a solution.
Since the springs are pretty much the only things I didn't replace during the restoration, I bought a set of Eibach progressives (nobody makes replacement stock springs) and they should be here in the next couple days. It's not an easy procedure to swap them out - I expect it'll take a full day to do all four and requires using a coil spring compressor (which I dread) - but I don't really have a choice. Once it's done and tested, I'll post the results here, whether it's good or bad.
I might have found the source of the mysterious "clunk".
Talking with a hot-rodder friend, he asked about the rear springs and suggested that after 53 years they might have lost some of their strength. A sagging spring could compress too far when driving over a pothole and allow the strut to bottom out. There's a polyurethane "bumper" at the top of the strut's shaft that's intended to prevent damage to the strut if it bottoms out and I think the body of the strut hitting the bumper is where the clunk occurs.
To test that theory, I bought some rubber "dogbones" that are inserted in coil springs to "stiffen" them up. They're typically used for overloaded trailers but they worked well enough for me. They had to be shaved a little to fit inside my springs and then hammered into place. I drove around a little bit on the roughest streets in my neighborhood and it "clunked" less! As I'd expected, the dogbones didn't stay in place very long but worked well enough to get me one step closer to a solution.
Since the springs are pretty much the only things I didn't replace during the restoration, I bought a set of Eibach progressives (nobody makes replacement stock springs) and they should be here in the next couple days. It's not an easy procedure to swap them out - I expect it'll take a full day to do all four and requires using a coil spring compressor (which I dread) - but I don't really have a choice. Once it's done and tested, I'll post the results here, whether it's good or bad.
July 7th, 2024
 The aggravating rear "clunk" continues to elude me. It only happens at low speeds and only when driving over a rough road with potholes or big cracks or dips. It sounds like someone is hitting a control arm with a Tonya Harding-brand sledgehammer.
I took apart most of the rear suspension to find it, but failed. I suspected the bushings for the moustache bar might be worn out. Unfortunately, stock-type replacements are no longer available and the only real option is using polyurethane bushings, which I don't like because they don't provide any "cushion", which is important.
Anyway... after a lot of work it turned out the bushings are fine. I put everything went back together and took it for a test drive and the "clunk" was still there. I'm active in some of the Facebook Z groups and posted the problem. A lot of people replied with various suggestions, most of which had already been addressed. There were some really good questions and I looked into a few of them, but no luck.
Part of the exhaust pipe is less than an inch from the differential, so I wondered if the pipe was hitting it. A long shot, sure, but I wrapped several layers of heat tape around that area, and wedged more in for good measure but that wasn't the problem.
There's only one Z specialist in town but they're probably too busy with vintage racers to deal with mine. There are plenty of shops that work on "older" cars but I doubt they've ever worked on a Z and might not be willing to try.
I think the only way to find the problem is to drive it and put up with the clunk and eventually something will break and I'll know where the problem was, but other parts would probably get damaged in the process so I don't think I'll take that route.
The aggravating rear "clunk" continues to elude me. It only happens at low speeds and only when driving over a rough road with potholes or big cracks or dips. It sounds like someone is hitting a control arm with a Tonya Harding-brand sledgehammer.
I took apart most of the rear suspension to find it, but failed. I suspected the bushings for the moustache bar might be worn out. Unfortunately, stock-type replacements are no longer available and the only real option is using polyurethane bushings, which I don't like because they don't provide any "cushion", which is important.
Anyway... after a lot of work it turned out the bushings are fine. I put everything went back together and took it for a test drive and the "clunk" was still there. I'm active in some of the Facebook Z groups and posted the problem. A lot of people replied with various suggestions, most of which had already been addressed. There were some really good questions and I looked into a few of them, but no luck.
Part of the exhaust pipe is less than an inch from the differential, so I wondered if the pipe was hitting it. A long shot, sure, but I wrapped several layers of heat tape around that area, and wedged more in for good measure but that wasn't the problem.
There's only one Z specialist in town but they're probably too busy with vintage racers to deal with mine. There are plenty of shops that work on "older" cars but I doubt they've ever worked on a Z and might not be willing to try.
I think the only way to find the problem is to drive it and put up with the clunk and eventually something will break and I'll know where the problem was, but other parts would probably get damaged in the process so I don't think I'll take that route.
June 25th, 2024
 It's been quite some time since I've updated the site, partly because I've been busy with other projects... and partly because I was still having electrical problems with the ignition system. It wouldn't rev above 2500 rpm without shaking like a one-legged washing machine on spin cycle and I grew so frustrated that I let it sit and collect dust.
March 17th, 2024
 Some days you get lucky. Other days you get really lucky.
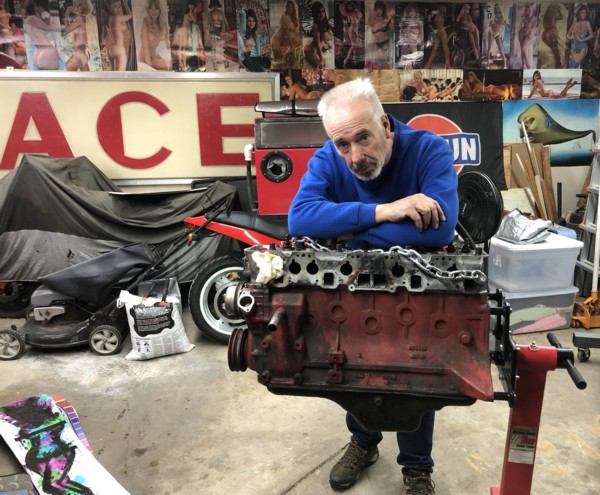
I spotted this L28 online about an hour after it was posted for sale. A very short while later it was in the bed of my truck. It's a good condition N42 block and a P90 head, both of which are desireable, and came with a smattering of other parts (such as a high-volume oil pump, oil pan, water pump, engine front cover and valve cover) for a mere $200. The head by itself is worth that, so the rest is essentially free.
Even though I have a freshly built L26 and two other spare engines, I couldn't pass it up.
Grab 'em while you can.
Some days you get lucky. Other days you get really lucky.
I spotted this L28 online about an hour after it was posted for sale. A very short while later it was in the bed of my truck. It's a good condition N42 block and a P90 head, both of which are desireable, and came with a smattering of other parts (such as a high-volume oil pump, oil pan, water pump, engine front cover and valve cover) for a mere $200. The head by itself is worth that, so the rest is essentially free.
Even though I have a freshly built L26 and two other spare engines, I couldn't pass it up.
Grab 'em while you can.
March 12th, 2024
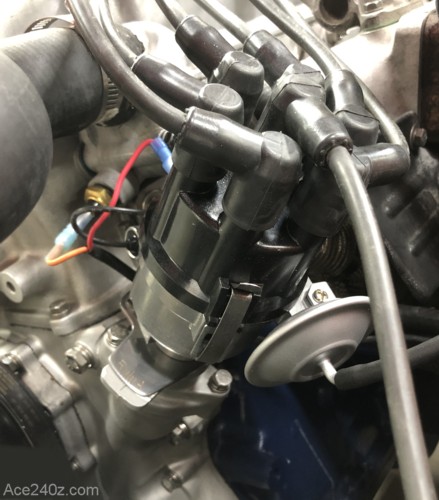
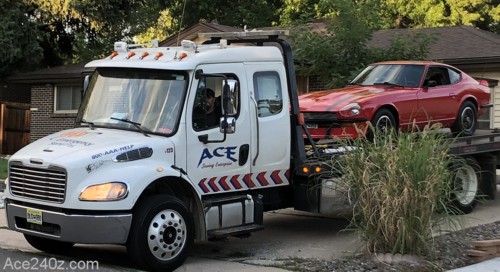
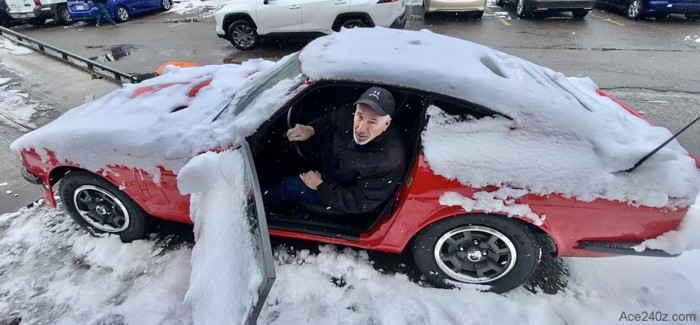 I've been having some ignition issues. While driving, the engine dies so abruptly that it's like turning off the key. Oddly enough, it would typically start right back up but one night it refused and it sat overnight in a parking lot and got snowed on.
When this pic was taken, it was getting dragged onto a flatbed for an inglorious trip home.
I'm still trying to track down the problem. Replacing the condenser enabled it to start but now it won't rev past 2500 rpm without shuddering and popping and fighting. I've replaced nearly everything in the system, adjusted and fiddled and fussed, all to no avail.
I hate to admit defeat but I'm going to let the expert figure it out.
I've been having some ignition issues. While driving, the engine dies so abruptly that it's like turning off the key. Oddly enough, it would typically start right back up but one night it refused and it sat overnight in a parking lot and got snowed on.
When this pic was taken, it was getting dragged onto a flatbed for an inglorious trip home.
I'm still trying to track down the problem. Replacing the condenser enabled it to start but now it won't rev past 2500 rpm without shuddering and popping and fighting. I've replaced nearly everything in the system, adjusted and fiddled and fussed, all to no avail.
I hate to admit defeat but I'm going to let the expert figure it out.
January 23rd, 2024
 I finally got to take the car to the same dyno that I used for the original engine. With the help of noted builder/tuner Jeff Winter, we did 12 pulls and he slowly dialed in the best numbers.
140 horsepower and 149 foot-pounds of torque at 5,400 rpm.
That's at 5300 feet above sea level and measured at the rear wheels as opposed to measured at the crank. Corrected for the altitude, it's about 160 horsepower at sea level. That's pretty good compared to the 116 horsepower from a stock engine.
The graph at the bottom is the air/fuel mixture. It's a little rich at the bottom end but pretty optimal the rest of the way.
Here are the engine details: 2600cc with a slightly shaved head, a mild aftermarket cam, a heat-wrapped header, stock SU carbs, stock single-points distributor, stock coil and 91 octane gas.
One notable thing was the difference with and without the stock air filter: a mere 3 horsepower. Think about that the next time you see a commercial for K&N. If their filter is half as restrictive as the stock one, you'd only gain 1-1/2 horsepower at the expense of cleaner air.
I finally got to take the car to the same dyno that I used for the original engine. With the help of noted builder/tuner Jeff Winter, we did 12 pulls and he slowly dialed in the best numbers.
140 horsepower and 149 foot-pounds of torque at 5,400 rpm.
That's at 5300 feet above sea level and measured at the rear wheels as opposed to measured at the crank. Corrected for the altitude, it's about 160 horsepower at sea level. That's pretty good compared to the 116 horsepower from a stock engine.
The graph at the bottom is the air/fuel mixture. It's a little rich at the bottom end but pretty optimal the rest of the way.
Here are the engine details: 2600cc with a slightly shaved head, a mild aftermarket cam, a heat-wrapped header, stock SU carbs, stock single-points distributor, stock coil and 91 octane gas.
One notable thing was the difference with and without the stock air filter: a mere 3 horsepower. Think about that the next time you see a commercial for K&N. If their filter is half as restrictive as the stock one, you'd only gain 1-1/2 horsepower at the expense of cleaner air.
January 1st, 2024
 After suffering problems with various used distributors and electronic adapters, I had a fully-stock, single-points distributor rebuilt by a professional. Sure, going back to points sacrificed a few horsepower at the top end, but now I've got something I can depend on. The engine pulls solid all the way to 6k RPM and makes a wonderful sound. A bonus is how great it looks.
I created a page just for distributors and here's a link to it.
On a side note, the website did pretty well last year. I had nearly 12,000 visits but the amazing part was the photos were viewed a quarter of a million times by people in 46 countries. When I initially built this site, I never, ever imagined anything like that. Many thanks to all of you who made it happen.
For the financially curious, my total investment in the car at this point is $34,265. That's about triple my original estimate. I've been pretty fanatical about adding everything (even nuts & bolts) to the spreadsheet and I'm pretty certain it's within $100, but numbers are fungible. There are things I bought (such as the failed 123ignition distributor and seat heaters that didn't fit) and never used, so they don't qualify for the actual build. There were also parts I sold, but that money didn't get subtracted. As such, the "cost" is only the actual amount that was spent directly on the car. Of course, my time, and the time of others who helped, wasn't tracked but I'd estimate it's a couple of thousand hours (with more to come). I have no idea of how much that time would be worth but obviously it was well-spent.
Walt Disney said "Disneyland will never be finished" because there would always be new rides and various upgrades. That holds true with my Z.
After suffering problems with various used distributors and electronic adapters, I had a fully-stock, single-points distributor rebuilt by a professional. Sure, going back to points sacrificed a few horsepower at the top end, but now I've got something I can depend on. The engine pulls solid all the way to 6k RPM and makes a wonderful sound. A bonus is how great it looks.
I created a page just for distributors and here's a link to it.
On a side note, the website did pretty well last year. I had nearly 12,000 visits but the amazing part was the photos were viewed a quarter of a million times by people in 46 countries. When I initially built this site, I never, ever imagined anything like that. Many thanks to all of you who made it happen.
For the financially curious, my total investment in the car at this point is $34,265. That's about triple my original estimate. I've been pretty fanatical about adding everything (even nuts & bolts) to the spreadsheet and I'm pretty certain it's within $100, but numbers are fungible. There are things I bought (such as the failed 123ignition distributor and seat heaters that didn't fit) and never used, so they don't qualify for the actual build. There were also parts I sold, but that money didn't get subtracted. As such, the "cost" is only the actual amount that was spent directly on the car. Of course, my time, and the time of others who helped, wasn't tracked but I'd estimate it's a couple of thousand hours (with more to come). I have no idea of how much that time would be worth but obviously it was well-spent.
Walt Disney said "Disneyland will never be finished" because there would always be new rides and various upgrades. That holds true with my Z.
November 19th, 2023
I haven't done much on the car recently, but I've added more tips & tricks to (hopefully) make your life a little easier when working on your car and here's the link.November 1st, 2023
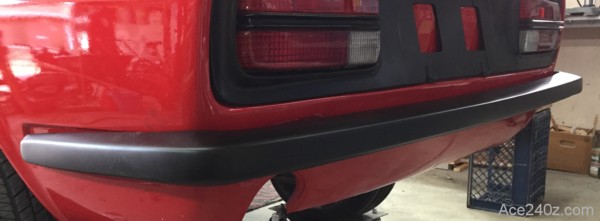 I put together a page showing how to shave and clean a rear bumper.
I did this to mine a few years ago but finally got around to making a page to show how it's done.
You can see it here.
I put together a page showing how to shave and clean a rear bumper.
I did this to mine a few years ago but finally got around to making a page to show how it's done.
You can see it here.
October 17th, 2023
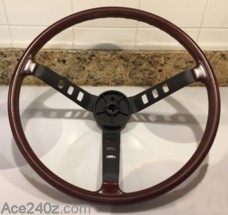 I've added a couple of new upgrade tips over the last few weeks, such as how to restore your steering wheel and how to get an air dam to fit properly, so here's a handy link.
October 1st, 2023
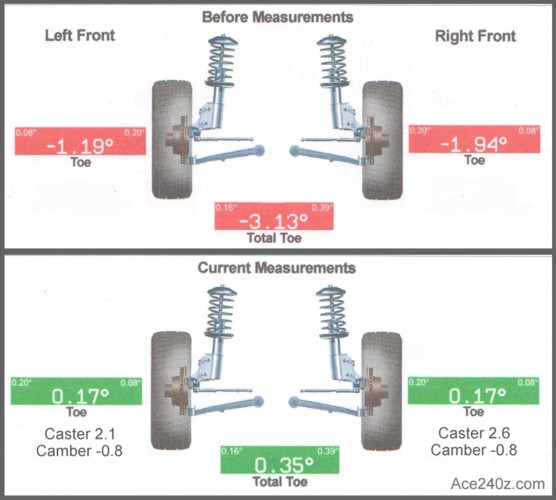 I was doing some fussing with the front end today. It drove okay after the work, but eyeballing the alignment in the driveway isn't really accurate.
I took it to a professional shop and it's a good thing I did.
There's no way to adjust the camber and caster - it's locked into place - but both sides are just about equal and that's good enough for a 58-year-old car.
It steers really well despite the rack being a little worn, so it tends to "wander" slightly on the highway but not enough that I need to rebuild it right now.
I was doing some fussing with the front end today. It drove okay after the work, but eyeballing the alignment in the driveway isn't really accurate.
I took it to a professional shop and it's a good thing I did.
There's no way to adjust the camber and caster - it's locked into place - but both sides are just about equal and that's good enough for a 58-year-old car.
It steers really well despite the rack being a little worn, so it tends to "wander" slightly on the highway but not enough that I need to rebuild it right now.
September 17th, 2023
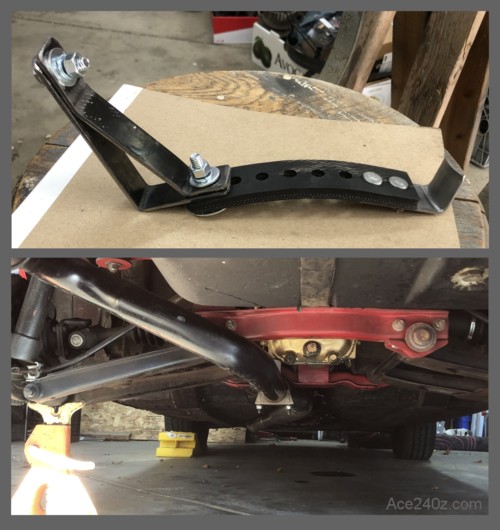 At one point I had three different headers. I picked the race/track version, then had a local exhaust shop bend some pipe and add a resonator and put it all together. The work itself was good but the pipe kinda sagged where it curved around the differntial. It needed to be higher, close to the suspension mount. A minor detail, to be certain, but I've dealt with a lot of minor things during this restoration and wasn't going to let this one keep bugging me.
A couple of months ago I took it back to the shop and the (new) owner ran it up on the lift and said it was as good as could they get it, especially since there was no warranty. I took it to a different shop and they said they'd have to re-do the entire thing, but tried to assure me it was fine. The world would be a better place if people just learned to say "Yes, Ace, we can do that."
Today I put the rear of the car up on axle stands and used my jack to push the pipe up where it should be, then made a bracket to clamp around the differential mount and added a hanger. A few hours later it fits like it came from the factory and I'm happy. One more item off the list.
At one point I had three different headers. I picked the race/track version, then had a local exhaust shop bend some pipe and add a resonator and put it all together. The work itself was good but the pipe kinda sagged where it curved around the differntial. It needed to be higher, close to the suspension mount. A minor detail, to be certain, but I've dealt with a lot of minor things during this restoration and wasn't going to let this one keep bugging me.
A couple of months ago I took it back to the shop and the (new) owner ran it up on the lift and said it was as good as could they get it, especially since there was no warranty. I took it to a different shop and they said they'd have to re-do the entire thing, but tried to assure me it was fine. The world would be a better place if people just learned to say "Yes, Ace, we can do that."
Today I put the rear of the car up on axle stands and used my jack to push the pipe up where it should be, then made a bracket to clamp around the differential mount and added a hanger. A few hours later it fits like it came from the factory and I'm happy. One more item off the list.
August 26th, 2023
 The new fuel system is finally finished.
I ran the pump for several minutes and saw fuel coming thru the filter and could feel it running thru the hoses. Didn't find any leaks, front or back.
The engine started right up, so fuel is getting to the carbs but I'll need to get it on the highway to make sure I solved the problem. If it goes a couple of miles at highway speeds I might have to drive for another ten or twenty or even thirty miles just to "make certain".
The new fuel system is finally finished.
I ran the pump for several minutes and saw fuel coming thru the filter and could feel it running thru the hoses. Didn't find any leaks, front or back.
The engine started right up, so fuel is getting to the carbs but I'll need to get it on the highway to make sure I solved the problem. If it goes a couple of miles at highway speeds I might have to drive for another ten or twenty or even thirty miles just to "make certain".
August 24th, 2023
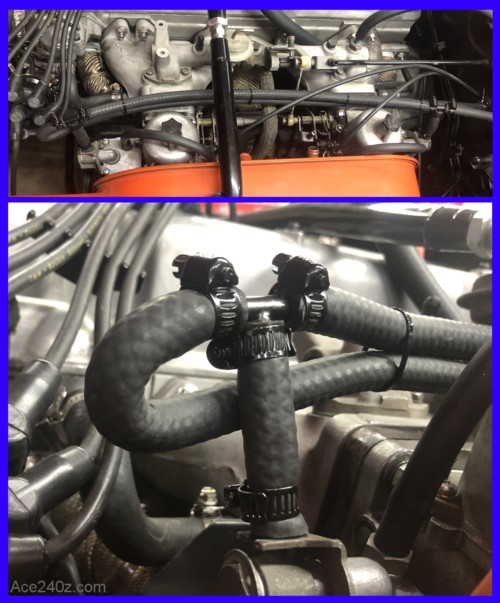 I no longer have a mechanical pump so there's no reason to keep the stock fuel routing. It goes all the way to the front of the engine bay (where the pump used to be), then up and around the valve cover to the fuel rail, out to the carbs, then back around the valve cover and down to the steel line.
For the new fuel system I originally intended to use braided hoses and AN fittings to the carbs but opted for ordinary rubber hose and screw clamps.
The final cost ended up just under $60, which isn't bad when you consider everything is new and dramatically cleans up the engine compartment. I looked at stock fuel rails on eBay and the prices ran from $75 to $125 (plus shipping) so if I sell my ugly, dented one for just $60 it'll completely offset what I spent for something new and custom. Sounds like a win to me.
Here's a link to see how it's done.
I no longer have a mechanical pump so there's no reason to keep the stock fuel routing. It goes all the way to the front of the engine bay (where the pump used to be), then up and around the valve cover to the fuel rail, out to the carbs, then back around the valve cover and down to the steel line.
For the new fuel system I originally intended to use braided hoses and AN fittings to the carbs but opted for ordinary rubber hose and screw clamps.
The final cost ended up just under $60, which isn't bad when you consider everything is new and dramatically cleans up the engine compartment. I looked at stock fuel rails on eBay and the prices ran from $75 to $125 (plus shipping) so if I sell my ugly, dented one for just $60 it'll completely offset what I spent for something new and custom. Sounds like a win to me.
Here's a link to see how it's done.
August 7th, 2023
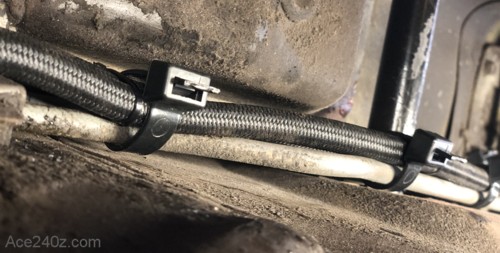 The replacement hoses, one for supply and one for return, are in place. I was a little hesitant about using a hose instead of the steel lines but the AN braided hoses take several minutes to cut thru it with a hacksaw, so rocks and road debris shouldn't be a problem.
The driveshaft had to come out, along with part of the rear suspension. With it apart, I took the opportunity to modify the R/T differential mount (again) to eliminate the "clunk" I occasionally heard. What a pain.
The hoses themselves went in pretty easy. I used extra-wide zip-ties spaced 5" to 6" apart to attach them to the existing fuel lines. Them seemed to be pretty secure and with any luck I'll never see them again.
I still have to connect them to the fuel tank & pump, and then to the distribution hoses in the engine bay, but the hardest part is over.
The replacement hoses, one for supply and one for return, are in place. I was a little hesitant about using a hose instead of the steel lines but the AN braided hoses take several minutes to cut thru it with a hacksaw, so rocks and road debris shouldn't be a problem.
The driveshaft had to come out, along with part of the rear suspension. With it apart, I took the opportunity to modify the R/T differential mount (again) to eliminate the "clunk" I occasionally heard. What a pain.
The hoses themselves went in pretty easy. I used extra-wide zip-ties spaced 5" to 6" apart to attach them to the existing fuel lines. Them seemed to be pretty secure and with any luck I'll never see them again.
I still have to connect them to the fuel tank & pump, and then to the distribution hoses in the engine bay, but the hardest part is over.
July 24th, 2023
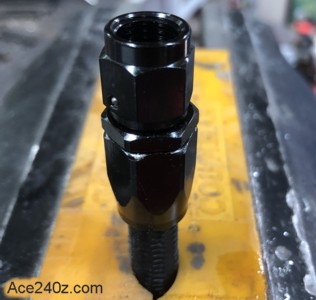 II bought some AN-4 braided hose and fittings and started experimenting. It was a little tricky to put the first fitting together so I took it apart to make sure I did it right, and it looked okay. When they're properly assembled, they can withstand several thousand PSI. My pump only delivers 5 PSI so I think the fittings will work fine even if they're a little off.
July 12th, 2023
 This shit is getting old.
I've been having a fuel supply problem. Around town in stop & go traffic it runs fine but on the freeway at sustained speeds above 2500 rpm the engine will abruptly sputter and die as if it's out of gas. When I pull off to the side, it starts running fine. I changed fuel pumps. I simplified the hose routing at the tank. I made sure it wasn't vapor-locking. The filter wasn't clogged. I ran my borescopre into the tank and it's sparkly clean. I verified fuel was getting to the carbs and I painstakingly adjusted the floats.
Despite all that, when I was on the way to a friend's house it died and wouldn't restart. Thankfully I have AAA and they sent out a truck to ingloriously drag me home. At least it had my name on it.
After nearly tearing my hair out, I finally found the problem. Where the steel fuel line from the tank bends around and into the engine bay is a small crimp. The line was barely open enough to keep the bowls full around town, but small enough to starve the engine at full speed.
The "correct" solution is to drop the exhaust and driveshaft and replace the entire steel line, with all of its complex bends. A couple people suggested bypassing the steel line and use ordinary fuel hose, zip-tied to the existing lines. I'd still need to drop the exhaust and driveshaft, but it would be much easier. I was hesitant to do that because a rubber hose can easily be punctured or torn by road debris, which might easily lead to a tragic fire.
I want to replace the entire fuel system in the engine bay with braided hoses and AN fittings, but the price to do everything now is more than I can afford. However... I can run a short piece of braided hose from the fuel tank to the engine bay for just a little more money than the rubber hose. The exhaust and driveshaft have to come out no matter what, but when I'm ready to redo the engine bay, I'll already have the proper hose from the tank.
This shit is getting old.
I've been having a fuel supply problem. Around town in stop & go traffic it runs fine but on the freeway at sustained speeds above 2500 rpm the engine will abruptly sputter and die as if it's out of gas. When I pull off to the side, it starts running fine. I changed fuel pumps. I simplified the hose routing at the tank. I made sure it wasn't vapor-locking. The filter wasn't clogged. I ran my borescopre into the tank and it's sparkly clean. I verified fuel was getting to the carbs and I painstakingly adjusted the floats.
Despite all that, when I was on the way to a friend's house it died and wouldn't restart. Thankfully I have AAA and they sent out a truck to ingloriously drag me home. At least it had my name on it.
After nearly tearing my hair out, I finally found the problem. Where the steel fuel line from the tank bends around and into the engine bay is a small crimp. The line was barely open enough to keep the bowls full around town, but small enough to starve the engine at full speed.
The "correct" solution is to drop the exhaust and driveshaft and replace the entire steel line, with all of its complex bends. A couple people suggested bypassing the steel line and use ordinary fuel hose, zip-tied to the existing lines. I'd still need to drop the exhaust and driveshaft, but it would be much easier. I was hesitant to do that because a rubber hose can easily be punctured or torn by road debris, which might easily lead to a tragic fire.
I want to replace the entire fuel system in the engine bay with braided hoses and AN fittings, but the price to do everything now is more than I can afford. However... I can run a short piece of braided hose from the fuel tank to the engine bay for just a little more money than the rubber hose. The exhaust and driveshaft have to come out no matter what, but when I'm ready to redo the engine bay, I'll already have the proper hose from the tank.
July 1st, 2023
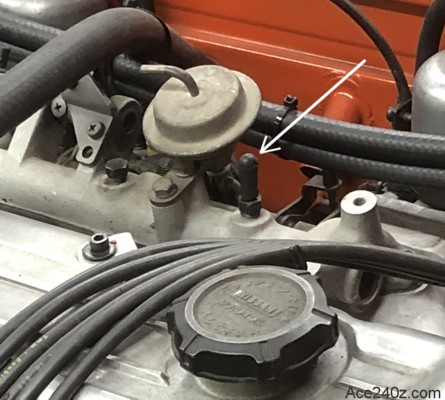
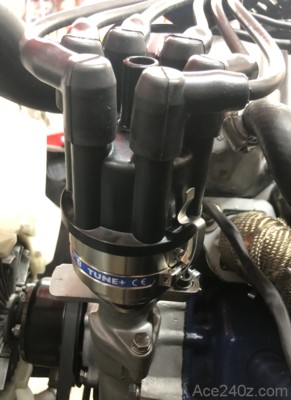 My engine suddenly started running like crap. After a lot of head scratching, it turns out the vacuum advance on the distributor had locked in place about halfway open.
By sheer luck, I happened to have a brand-new 123ignition programmable electronic distributor sitting on a shelf, so now it was time to bite the bullet and do the swap.
It took a few hours but now the engine runs better than before.
Since their instructions were a little vague, I made a page showing the conversion step-by-step and here's an easy link to it.
My engine suddenly started running like crap. After a lot of head scratching, it turns out the vacuum advance on the distributor had locked in place about halfway open.
By sheer luck, I happened to have a brand-new 123ignition programmable electronic distributor sitting on a shelf, so now it was time to bite the bullet and do the swap.
It took a few hours but now the engine runs better than before.
Since their instructions were a little vague, I made a page showing the conversion step-by-step and here's an easy link to it.
June 21st, 2023
 Here's how the modified fuse block turned out. At the moment it's covered with black canvas until I can get a few scraps of carpet, which I think will almost make it disappear.
It works just like I wanted - the modern bayonette fuses are easily accessable, it doesn't get the way of a passenger getting in or out, and all of the wiring is tucked nearly away.
Of course, as always, it took more time than I'd hoped. Part of that was retracing every connection underneath the dash to make sure it was the right wire, then tagging it to match the wires coming from the fuse block. In the process of doing that, I confirmed that everything worked, including the pesky "map light" with its fiddly little switch. I upgraded the bulb to an LED version and now it's brighter than Nissan could have ever imagined.
When I changed the instrument lights to the LED versions, I added a little dimmer. It's been dangling under the dash since then, but with all of the electrical work going on I took the time to drill a hole in the back of the glovebox and screw it into place.
Being unemployed has put a strain on my pocketbook but now I have plenty of time to finish some of the smaller items on my checklist, as well as a few big ones.
Here's how the modified fuse block turned out. At the moment it's covered with black canvas until I can get a few scraps of carpet, which I think will almost make it disappear.
It works just like I wanted - the modern bayonette fuses are easily accessable, it doesn't get the way of a passenger getting in or out, and all of the wiring is tucked nearly away.
Of course, as always, it took more time than I'd hoped. Part of that was retracing every connection underneath the dash to make sure it was the right wire, then tagging it to match the wires coming from the fuse block. In the process of doing that, I confirmed that everything worked, including the pesky "map light" with its fiddly little switch. I upgraded the bulb to an LED version and now it's brighter than Nissan could have ever imagined.
When I changed the instrument lights to the LED versions, I added a little dimmer. It's been dangling under the dash since then, but with all of the electrical work going on I took the time to drill a hole in the back of the glovebox and screw it into place.
Being unemployed has put a strain on my pocketbook but now I have plenty of time to finish some of the smaller items on my checklist, as well as a few big ones.
June 12th, 2023
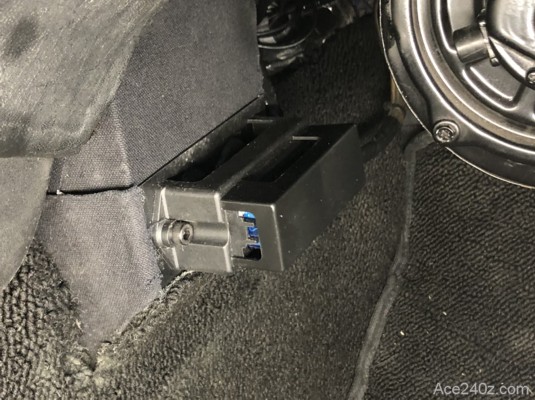
 The stock fuse block is located at the bottom of the console. When I rewired the car, I wanted to upgrade the fuses to the modern bayonet-type, which meant a new block and a new location. This one is an $8 eBay buy.
I decided the best spot would be at the top of the passenger footwell, kind of between the console and the heater fan, and bolted to the transmission tunnel. All of the wiring from beneath the dash was bundled and routed in that direction, and it seemed to work, but there really wasn't enough room to tuck the wiring up and out of the way.
To solve that, I made a metal "box" which moved the block about 2" away from the transmission tunnel and provides plenty of room for the wires and connectors. It's not the prettiest thing I've made, but I painted it flat black and once it's in place nobody will ever notice it. Click on the photo to see a larger version.
Hopefully I won't have to do any changes to the electrical system, but I labelled all of the wires on both sides of the barrel connectors. I originally did that with pieces of masking tape, but they tore off kind of easily, so I found some adhesive-backed vinyl for name tags. There's a cover that goes over the fuses so that I can label what each fuse is for.
Here's a tip: when you're doing any kind of wiring with barrel connectors, use the female half on the power supply side. That way, if the male side somehow falls out, there won't be a piece of bare metal to short-circuit against anything.
There are some other updates to the site. I was finally able to make an adapter for modern 3-point seatbelts that locates the seat belt's tongue in the same spot as modern cars, and here's a quick link to the page. I also added a few things to the Tips & Tricks that some of you might want to try yourselves.
The stock fuse block is located at the bottom of the console. When I rewired the car, I wanted to upgrade the fuses to the modern bayonet-type, which meant a new block and a new location. This one is an $8 eBay buy.
I decided the best spot would be at the top of the passenger footwell, kind of between the console and the heater fan, and bolted to the transmission tunnel. All of the wiring from beneath the dash was bundled and routed in that direction, and it seemed to work, but there really wasn't enough room to tuck the wiring up and out of the way.
To solve that, I made a metal "box" which moved the block about 2" away from the transmission tunnel and provides plenty of room for the wires and connectors. It's not the prettiest thing I've made, but I painted it flat black and once it's in place nobody will ever notice it. Click on the photo to see a larger version.
Hopefully I won't have to do any changes to the electrical system, but I labelled all of the wires on both sides of the barrel connectors. I originally did that with pieces of masking tape, but they tore off kind of easily, so I found some adhesive-backed vinyl for name tags. There's a cover that goes over the fuses so that I can label what each fuse is for.
Here's a tip: when you're doing any kind of wiring with barrel connectors, use the female half on the power supply side. That way, if the male side somehow falls out, there won't be a piece of bare metal to short-circuit against anything.
There are some other updates to the site. I was finally able to make an adapter for modern 3-point seatbelts that locates the seat belt's tongue in the same spot as modern cars, and here's a quick link to the page. I also added a few things to the Tips & Tricks that some of you might want to try yourselves.
May 25th, 2023
 It's springtime in the Rockies and the curvy roads in the foothills are calling my name.
The legendary Jeff Winter at Rallye Sport was kind enough to take some time from his busy schedule to sort out the engine problems. Now it runs great. I'm waiting to get the rings seated before I take it to the dyno, but it sure feels strong.
Unfortunately, there's a vexing problem. Several times on the freeway the engine has suddenly lost power as if it was out of gas, but when I slow down to pull off to the side, it goes back to normal. I suspect the generic electrical fuel pump doesn't have the capacity to keep up with the carbs. Stay tuned for the solution.
Another ongoing problem is a distinctive "clunk" in the rear suspension. I've been underneath it several times, including up on a lift, but everything seems fine. I might have to take it to a shop and let a professional mechanic find the issue.
I added a few things to the Tips & Tricks pages, such as the ultimate way to add modern 3-point seat belts, so check 'em out.
It's springtime in the Rockies and the curvy roads in the foothills are calling my name.
The legendary Jeff Winter at Rallye Sport was kind enough to take some time from his busy schedule to sort out the engine problems. Now it runs great. I'm waiting to get the rings seated before I take it to the dyno, but it sure feels strong.
Unfortunately, there's a vexing problem. Several times on the freeway the engine has suddenly lost power as if it was out of gas, but when I slow down to pull off to the side, it goes back to normal. I suspect the generic electrical fuel pump doesn't have the capacity to keep up with the carbs. Stay tuned for the solution.
Another ongoing problem is a distinctive "clunk" in the rear suspension. I've been underneath it several times, including up on a lift, but everything seems fine. I might have to take it to a shop and let a professional mechanic find the issue.
I added a few things to the Tips & Tricks pages, such as the ultimate way to add modern 3-point seat belts, so check 'em out.
March 31st, 2023
 It's been a while since I've done any updates. I've been a little burned out on the car (which has happened a few times over the last six years) but I'm back on track.
The ignition has been problematic, mainly due to the oil pump shaft. I still don't think I have it in the right place. The engine starts and runs pretty good, but the timing is a little too advanced and I can't twist the distributor any further to retard it. I'm going to take it to a professional and let him sort it out.
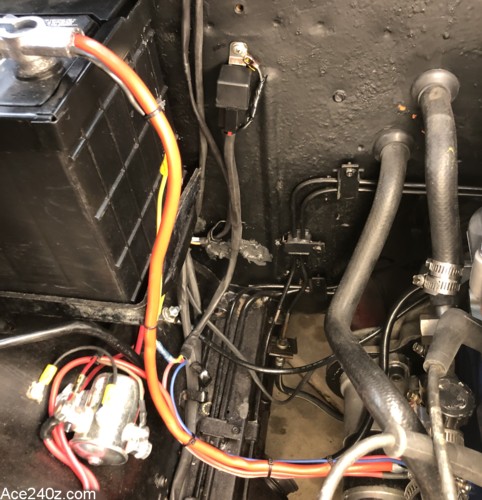
In the meantime, I did some wiring cleanup in the engine compartment. I added a little relay between the ignition switch and the starter solenoid. If I have to do any lengthy cranking, the current goes thru the relay directly from the battery and not all the way to the ignition switch and back. It works pretty well but the wiring was a mess. It takes a lot of work to make simple things look good and this was no exception. It's not show quality but much better than when I started.
I've also been working (again) on how to adapt modern seat belts and after about a dozen different configurations I think I've got the right method. It'll be a future update.
It's been a while since I've done any updates. I've been a little burned out on the car (which has happened a few times over the last six years) but I'm back on track.
The ignition has been problematic, mainly due to the oil pump shaft. I still don't think I have it in the right place. The engine starts and runs pretty good, but the timing is a little too advanced and I can't twist the distributor any further to retard it. I'm going to take it to a professional and let him sort it out.
In the meantime, I did some wiring cleanup in the engine compartment. I added a little relay between the ignition switch and the starter solenoid. If I have to do any lengthy cranking, the current goes thru the relay directly from the battery and not all the way to the ignition switch and back. It works pretty well but the wiring was a mess. It takes a lot of work to make simple things look good and this was no exception. It's not show quality but much better than when I started.
I've also been working (again) on how to adapt modern seat belts and after about a dozen different configurations I think I've got the right method. It'll be a future update.
January 29th, 2023
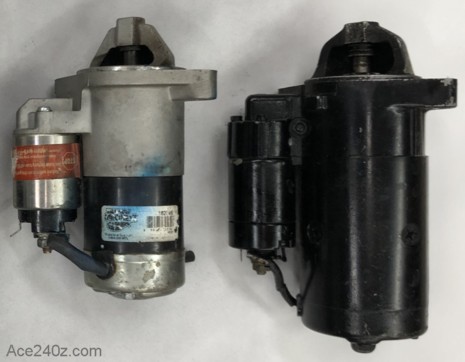 I was recently given a low-milage L24 engine and transmission (amazing how such things happen) and attached to it was a very small starter motor. Here it is next to my stock one.
Thanks to David Hogan, it's been identified as a "Pure Energy 16209" and can be found all over the place, including brand-new (not reman) at Amazon for a mere $57, eith free delivery and no core charge. According to their page, it's OEM for about 3 dozen domestic cars and trucks, and now we know it's a perfect fit for a Datsun S30 series.
The Pure Energy starter weighs just 7.6 lbs compared to the stock one at 13.3 lbs, and probably draws less current.
It works great.
I was recently given a low-milage L24 engine and transmission (amazing how such things happen) and attached to it was a very small starter motor. Here it is next to my stock one.
Thanks to David Hogan, it's been identified as a "Pure Energy 16209" and can be found all over the place, including brand-new (not reman) at Amazon for a mere $57, eith free delivery and no core charge. According to their page, it's OEM for about 3 dozen domestic cars and trucks, and now we know it's a perfect fit for a Datsun S30 series.
The Pure Energy starter weighs just 7.6 lbs compared to the stock one at 13.3 lbs, and probably draws less current.
It works great.
December 29th, 2022
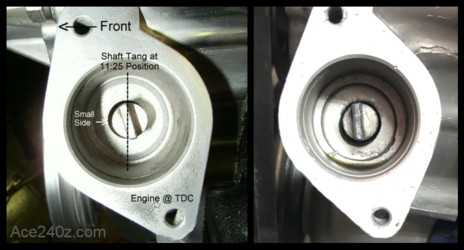 When my new engine was installed, it wouldn't start. After some diagnostic efforts, it turned out the guys who assembled it had installed the oil pump shaft, which turns the distributor, backwards.
I pulled the oil pump and turned the shaft around, then put everything back together and the engine started right up! However... when I goosed the throttle, it ran rough and wouldn't rev above 2500 rpm. I checked the dwell, the timing and the carbs but everything looked good.
Then I pulled the distributor and cranked the engine around to TDC and discovered that (somehow) when I reinstalled the oil pump shaft, the pinion gear was one tooth off from the correct position. It was close enough to let the engine start but when the vacuum diaphram started to advance the timing, it was too far out of sync and thus ran like crap.
On the left is an example of the correct position and on the right is my failure.
Here's the fix: drain the oil, remove the sway bar, remove the pump, scrape off the old gasket, apply a new gasket and sealer, carefully re-install the oil pump and this time make certain the shaft is properly aligned, attach the sway bar, put the oil back in, install the distributor, set the dwell and the timing and hope like hell I finally got it right.
When my new engine was installed, it wouldn't start. After some diagnostic efforts, it turned out the guys who assembled it had installed the oil pump shaft, which turns the distributor, backwards.
I pulled the oil pump and turned the shaft around, then put everything back together and the engine started right up! However... when I goosed the throttle, it ran rough and wouldn't rev above 2500 rpm. I checked the dwell, the timing and the carbs but everything looked good.
Then I pulled the distributor and cranked the engine around to TDC and discovered that (somehow) when I reinstalled the oil pump shaft, the pinion gear was one tooth off from the correct position. It was close enough to let the engine start but when the vacuum diaphram started to advance the timing, it was too far out of sync and thus ran like crap.
On the left is an example of the correct position and on the right is my failure.
Here's the fix: drain the oil, remove the sway bar, remove the pump, scrape off the old gasket, apply a new gasket and sealer, carefully re-install the oil pump and this time make certain the shaft is properly aligned, attach the sway bar, put the oil back in, install the distributor, set the dwell and the timing and hope like hell I finally got it right.
November 24th, 2022
I've added a few pages to the "Tips & Tricks" section: How to install door window glass Inexpensive tail light gaskets An easy way to sort nuts & bolts Check 'em out here.November 19th, 2022
 I bought the parts for the Toyota Calipers brake upgrade, but something didn't look right.
After taking some measurements and doing some calculations I realized that the famed upgrade is actually a fraud. Replacing the calipers and brake pads and the larger Wilwood master cylinder actually decreases your braking ability and adds needless unsprung weight to your wheels.
The stock twin-piston calipers and solid rotors are perfect for street driving and the occasional track day. If you're racing, the upgrade helps but only if you add vented & slotted rotors because they'll help dissipate the heat from heavy and frequent decelaration, which is something you'll never encounter around town. When was the last time you've experienced brake fade?
Don't believe me? Look here to see for yourself.
I bought the parts for the Toyota Calipers brake upgrade, but something didn't look right.
After taking some measurements and doing some calculations I realized that the famed upgrade is actually a fraud. Replacing the calipers and brake pads and the larger Wilwood master cylinder actually decreases your braking ability and adds needless unsprung weight to your wheels.
The stock twin-piston calipers and solid rotors are perfect for street driving and the occasional track day. If you're racing, the upgrade helps but only if you add vented & slotted rotors because they'll help dissipate the heat from heavy and frequent decelaration, which is something you'll never encounter around town. When was the last time you've experienced brake fade?
Don't believe me? Look here to see for yourself.
November 17th, 2022
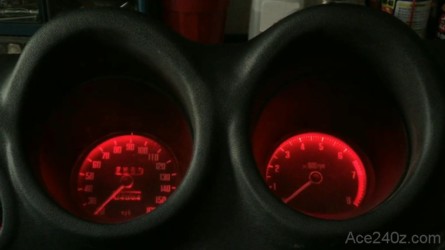 While I had the dashboard out (six or seven times) I changed the instrument lights from the stock green incandescent bulbs to red LEDs.
I learned a lot of things along the way (especially what to avoid) so I put a page together to make it easier for other Z owners to do it as well.
See it here .
While I had the dashboard out (six or seven times) I changed the instrument lights from the stock green incandescent bulbs to red LEDs.
I learned a lot of things along the way (especially what to avoid) so I put a page together to make it easier for other Z owners to do it as well.
See it here .
November 6th, 2022
 Progress has been slow but the car is nearly ready to drive.
The carbs have been synchronized and fuel mixture optimized. The timing still needs a little tweaking. The passenger door latch mechanism is back in place so the door won't have to be held shut with a bungee cord but the window glass is still sitting on a table. The clutch probably needs some adjustment.
Even when I get it back on the road I'll have to restrain my heavy right foot because the new engine will need at least 500 miles to fully break in.
In the meantime, I'd like to thank everyone who has come to see my site because it appears I'll reach 10,000 visits for 2022, which is truly astounding. People from 14 countries have been here.
When I started building this, it was mainly to show friends what I was doing but it took off. There have been plenty of people over the years who shared advice and tips and I'm pleased that I can pass that along and hopefully help other Z owners with their projects. I sometimes think I've spent as many hours on the site as I have on the car itself and enjoyed every minute of it.
Progress has been slow but the car is nearly ready to drive.
The carbs have been synchronized and fuel mixture optimized. The timing still needs a little tweaking. The passenger door latch mechanism is back in place so the door won't have to be held shut with a bungee cord but the window glass is still sitting on a table. The clutch probably needs some adjustment.
Even when I get it back on the road I'll have to restrain my heavy right foot because the new engine will need at least 500 miles to fully break in.
In the meantime, I'd like to thank everyone who has come to see my site because it appears I'll reach 10,000 visits for 2022, which is truly astounding. People from 14 countries have been here.
When I started building this, it was mainly to show friends what I was doing but it took off. There have been plenty of people over the years who shared advice and tips and I'm pleased that I can pass that along and hopefully help other Z owners with their projects. I sometimes think I've spent as many hours on the site as I have on the car itself and enjoyed every minute of it.
October 10th, 2022
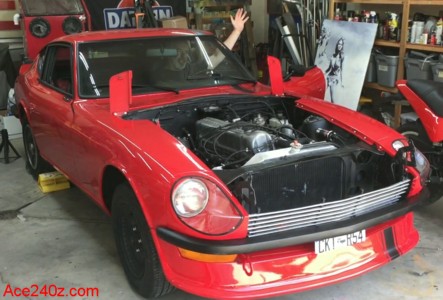 The new L26 (2600cc) engine runs!
After triple-checking everything, it turns out the pump shaft was completely backwards. I pulled the pump and turned the shaft and got it lined up correctly... and the engine started. It took a little cranking and some timing tweaking but it finally came to life.
There's still a lot of work needed. The carbs were originally set for a 2400cc engine so the fuel mixture needs to be bumped up. The intake manifolds were smoothed inside and port-matched to the heads, which allows another little bump. I'm told a Gunson Colortune is the best way to set the air/fuel mixture, so I bought one and should see it in a week. When the mix is optimized, the carbs need to be syncronized to ensure both are pulling the same amount of air.
For the moment I'm keeping the stock vacuum-advance distributor, which means there are points to be gapped and the timing dialed-in. It's an ancient process but relatively simple. Once the 500 mile break-in period is done I'll take the car back to the dyno to see how much horsepower the new engine produces.
I bought a new electronic distributor that can be adjusted via an app on my phone. After the first dyno test I'll swap it in and do another pull to see what difference it really makes. A lot of people make various horsepower claims but don't have any data to back it up, so here's the perfect opportunity to find out exactly what my $600 investment really does.
The new L26 (2600cc) engine runs!
After triple-checking everything, it turns out the pump shaft was completely backwards. I pulled the pump and turned the shaft and got it lined up correctly... and the engine started. It took a little cranking and some timing tweaking but it finally came to life.
There's still a lot of work needed. The carbs were originally set for a 2400cc engine so the fuel mixture needs to be bumped up. The intake manifolds were smoothed inside and port-matched to the heads, which allows another little bump. I'm told a Gunson Colortune is the best way to set the air/fuel mixture, so I bought one and should see it in a week. When the mix is optimized, the carbs need to be syncronized to ensure both are pulling the same amount of air.
For the moment I'm keeping the stock vacuum-advance distributor, which means there are points to be gapped and the timing dialed-in. It's an ancient process but relatively simple. Once the 500 mile break-in period is done I'll take the car back to the dyno to see how much horsepower the new engine produces.
I bought a new electronic distributor that can be adjusted via an app on my phone. After the first dyno test I'll swap it in and do another pull to see what difference it really makes. A lot of people make various horsepower claims but don't have any data to back it up, so here's the perfect opportunity to find out exactly what my $600 investment really does.
September 29th, 2022
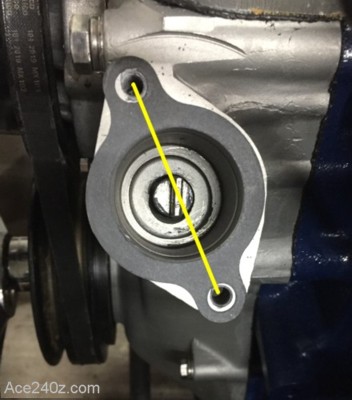 I found out why my brand-new engine won't start.
The guys at Vintage Thunder in Arvada didn't get the oil pump shaft aligned properly at TDC, which puts the distributor's rotor in the wrong place and the plugs fire too soon.
The "tang" on the shaft should almost be parallel with the yellow line.
The solution isn't fun. Drain the oil. Jack the car up. Remove the sway bar. Remove the oil pump. Remove the oil pump shaft. Reinstall the shaft with it correctly aligned. Put the pump back in. Attach the sway bar. Set the car back on the ground. Fill the engine up with oil. Put the distributor back in. Put the plugs back in. Attach the wires. Hit the starter switch and hope for the best.
Now I wonder what else they screwed up.
I found out why my brand-new engine won't start.
The guys at Vintage Thunder in Arvada didn't get the oil pump shaft aligned properly at TDC, which puts the distributor's rotor in the wrong place and the plugs fire too soon.
The "tang" on the shaft should almost be parallel with the yellow line.
The solution isn't fun. Drain the oil. Jack the car up. Remove the sway bar. Remove the oil pump. Remove the oil pump shaft. Reinstall the shaft with it correctly aligned. Put the pump back in. Attach the sway bar. Set the car back on the ground. Fill the engine up with oil. Put the distributor back in. Put the plugs back in. Attach the wires. Hit the starter switch and hope for the best.
Now I wonder what else they screwed up.
September 2nd, 2022
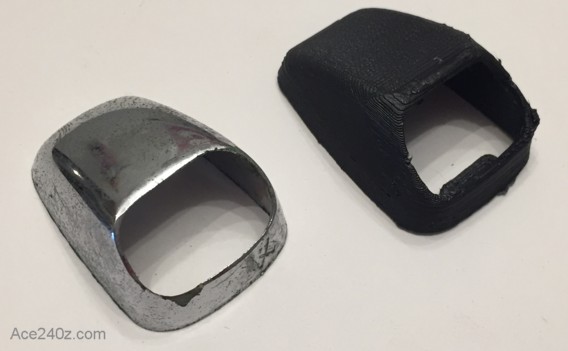 These are the little pieces that cover the mounting hardware for the pull strap on the inside of the passenger door.
They're extremely rare but I found a 3D printer file to make replacements. The one on the left is an original and the one on the right is the reproduction. It needs a little trim and perhaps a little sanding, but otherwise I'm very pleased with them, especially the cheap price.
Click here to see more and download the file to make a set yourself.
These are the little pieces that cover the mounting hardware for the pull strap on the inside of the passenger door.
They're extremely rare but I found a 3D printer file to make replacements. The one on the left is an original and the one on the right is the reproduction. It needs a little trim and perhaps a little sanding, but otherwise I'm very pleased with them, especially the cheap price.
Click here to see more and download the file to make a set yourself.
August 28th, 2022
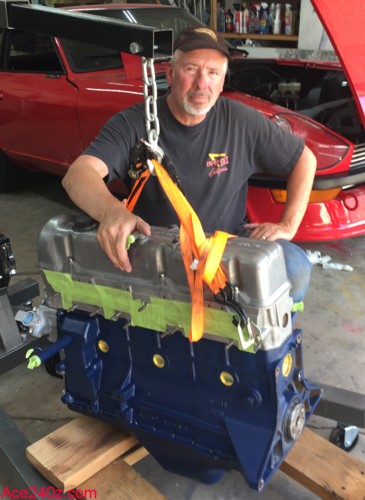 I finally got the engine back. It's been gone for over four months.
It's an L26, which is really just an L24 with a stroker crank. New pistons and rings and bearings and all that good stuff. The head is slightly-less modified than the previous one, but has the same cam so I hope performance doesn't suffer. The intake openings were matched to the manifold and the casting flash inside the ports was removed. I added a high-volume oil pump, a new water pump and timing chain. The only things reused from the old engine is the cam, the valve cover and the oil pan.
I'm keeping the stock SU round-top carbs. There were recently rebuilt but need to be adjusted for the larger displacement. It's pretty easy. A few months back I installed an electric fuel pump next to the tank for a dependable supply to the carbs. I'm also keeping the stock air cleaner. The new engine might run clean enough to qualify for a standard license plate instead of the collector version, which I really dislike. They look awful
Added is a 123 programmable distributor. It has an app to adjust the power and torque curve to suit your needs. They claim up to 10-15 extra horsepower but I'm skeptical. It would be interesting to run the engine on a dyno with my stock distributor, then switch to the 123 and see what the actual change is. Aside from the tach, the rest of the wiring hasn't changed.
But... there's a roadblock to the installation: the flywheel bolts were missing. Naturally a grade-8 M12 x 1.25 bolt can't be sourced locally (especially on a Saturday) so I ordered a set online, along with a race-quality oil filter and some NGK BP6ES plugs. Being a member of the local Z-car club, I got enough of a discount to upgrade from ground shipping to 2nd-day air.
Putting the engine into the bay is only half the battle. There's a lot of ancillary stuff that has to attached and adjusted and fussed with, such as the radiator, fan and belt, alternator, intake manifolds, exhaust manifold, carbs, ignition, water hoses, heater hoses, fuel hoses, throttle linkage, choke cables, all of the control wiring, distributor, plugs and plug wires, speedometer cable, clutch hydraulic hose and cylinder, and more. Two guys working together could have it assembled and running in one day, but it'll mostly be just me for a couple hours every night after work. It's like the old joke "How do you eat an elephant? One bite at a time."
When I finally get to start driving it, the builder said the engine needs 1000 miles for a proper break-in. It's gonna take a lot patience for me to go that long without really winding it out because that's how I intend to drive it. What's the point of having a sports car if you're not going to really enjoy it? I don't understand guys who build beautiful muscle cars and hot rods but only drive them on the occasional Sunday.
For the cost-curious, the rebuild was a little under $7k, which brings my restoration expenditure to $32,841 which is more than three times the orginal budget.
I finally got the engine back. It's been gone for over four months.
It's an L26, which is really just an L24 with a stroker crank. New pistons and rings and bearings and all that good stuff. The head is slightly-less modified than the previous one, but has the same cam so I hope performance doesn't suffer. The intake openings were matched to the manifold and the casting flash inside the ports was removed. I added a high-volume oil pump, a new water pump and timing chain. The only things reused from the old engine is the cam, the valve cover and the oil pan.
I'm keeping the stock SU round-top carbs. There were recently rebuilt but need to be adjusted for the larger displacement. It's pretty easy. A few months back I installed an electric fuel pump next to the tank for a dependable supply to the carbs. I'm also keeping the stock air cleaner. The new engine might run clean enough to qualify for a standard license plate instead of the collector version, which I really dislike. They look awful
Added is a 123 programmable distributor. It has an app to adjust the power and torque curve to suit your needs. They claim up to 10-15 extra horsepower but I'm skeptical. It would be interesting to run the engine on a dyno with my stock distributor, then switch to the 123 and see what the actual change is. Aside from the tach, the rest of the wiring hasn't changed.
But... there's a roadblock to the installation: the flywheel bolts were missing. Naturally a grade-8 M12 x 1.25 bolt can't be sourced locally (especially on a Saturday) so I ordered a set online, along with a race-quality oil filter and some NGK BP6ES plugs. Being a member of the local Z-car club, I got enough of a discount to upgrade from ground shipping to 2nd-day air.
Putting the engine into the bay is only half the battle. There's a lot of ancillary stuff that has to attached and adjusted and fussed with, such as the radiator, fan and belt, alternator, intake manifolds, exhaust manifold, carbs, ignition, water hoses, heater hoses, fuel hoses, throttle linkage, choke cables, all of the control wiring, distributor, plugs and plug wires, speedometer cable, clutch hydraulic hose and cylinder, and more. Two guys working together could have it assembled and running in one day, but it'll mostly be just me for a couple hours every night after work. It's like the old joke "How do you eat an elephant? One bite at a time."
When I finally get to start driving it, the builder said the engine needs 1000 miles for a proper break-in. It's gonna take a lot patience for me to go that long without really winding it out because that's how I intend to drive it. What's the point of having a sports car if you're not going to really enjoy it? I don't understand guys who build beautiful muscle cars and hot rods but only drive them on the occasional Sunday.
For the cost-curious, the rebuild was a little under $7k, which brings my restoration expenditure to $32,841 which is more than three times the orginal budget.
August 16th, 2022
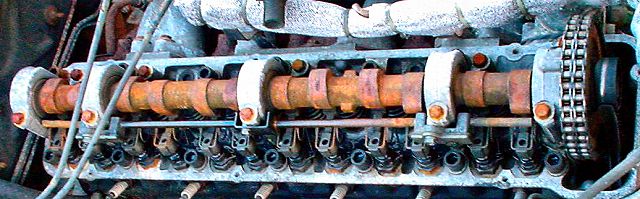 When the car was on the dyno it put out some great horsepower and one of the possible reasons was an aftermarket camshaft. However, the cam doesn't have any markings, so nobody knows what the lift and duration might be. I decided this might be a good opportunity to go for a better cam, so I gave the shop the green light.
One week later they haven't even decided which one to buy.
So... after another delay they're going to use the existing cam and get the engine finished... but they can't promise any date because now they're shorthanded. They've had the engine for two months but it's barely half-built and apparently they're not in a hurry to finish it despite a signed contract.
I'm in a tough jam. Either I continue to bite my tongue and hope for the best or I lose my patience and bring the parts home and finish the build myself, which I don't want to do.
Good work that never gets done is no bargain.
When the car was on the dyno it put out some great horsepower and one of the possible reasons was an aftermarket camshaft. However, the cam doesn't have any markings, so nobody knows what the lift and duration might be. I decided this might be a good opportunity to go for a better cam, so I gave the shop the green light.
One week later they haven't even decided which one to buy.
So... after another delay they're going to use the existing cam and get the engine finished... but they can't promise any date because now they're shorthanded. They've had the engine for two months but it's barely half-built and apparently they're not in a hurry to finish it despite a signed contract.
I'm in a tough jam. Either I continue to bite my tongue and hope for the best or I lose my patience and bring the parts home and finish the build myself, which I don't want to do.
Good work that never gets done is no bargain.
August 8th, 2022
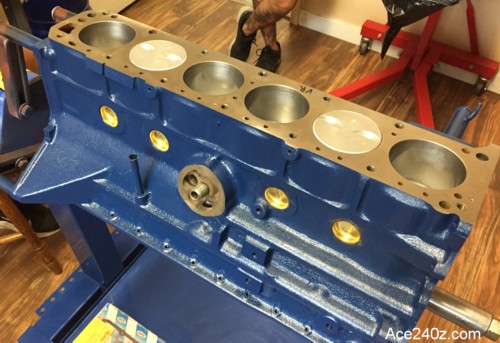 The engine isn't finished, even though I gave them an extra week.
When you have an engine for 6 weeks, you shouldn't wait until the last minute to buy rings or a water pump or an oil pump.
I talked to them on Monday and was told it would be ready by Friday. I called at noon on Friday and left a message but they didn't call back. I went there after work to pick it up, but instead of giving me a finished engine, they gave me a variety of excuses why it was still only a short block. They haven't even put the head together. They knew mid-week it wasn't going to be done so they should have called to let me know. I would have been annoyed but now I'm angry.
They've also done some things that weren't authorized and a few other things I specifically said I didn't want, such as stripping the orange paint off the oil pan.
Worst of all, they keep interrupting when I'm trying to talk.
The engine isn't finished, even though I gave them an extra week.
When you have an engine for 6 weeks, you shouldn't wait until the last minute to buy rings or a water pump or an oil pump.
I talked to them on Monday and was told it would be ready by Friday. I called at noon on Friday and left a message but they didn't call back. I went there after work to pick it up, but instead of giving me a finished engine, they gave me a variety of excuses why it was still only a short block. They haven't even put the head together. They knew mid-week it wasn't going to be done so they should have called to let me know. I would have been annoyed but now I'm angry.
They've also done some things that weren't authorized and a few other things I specifically said I didn't want, such as stripping the orange paint off the oil pan.
Worst of all, they keep interrupting when I'm trying to talk.
July 23rd, 2022
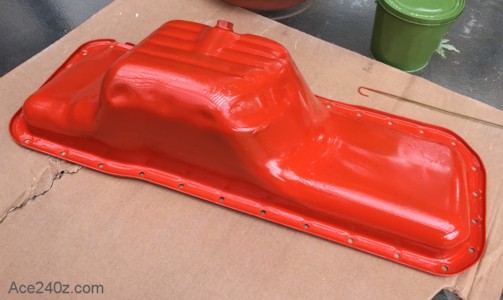 It's been nearly 4 months since I pulled the engine and the prognosis isn't great.
It looks like the only parts I'll be able to reuse are the cam & rockers, the valve cover, the water pump and that bright orange oil pan. The rest is pretty much worthless. I might use the block for yard art.
The shop took the head apart to give it a good cleaning and one of the valve guides fell out. Two others were so loose they could be pushed out with a finger. That's not something that can be fixed with JB Weld. If they can find some oversized guides, they'll be able to salvage the head. If not, they have a few heads on a shelf and can use one of them.
If all goes well, the brand-new engine will be done in two weeks. Once I get it, my friend Eddie and I can have it installed and running in one day. It's relatively simple.
At this point, everything on the car has been rebuilt except for the transmission and differential, and I hope it stays that way. I don't want my wife watching me cry.
It's been nearly 4 months since I pulled the engine and the prognosis isn't great.
It looks like the only parts I'll be able to reuse are the cam & rockers, the valve cover, the water pump and that bright orange oil pan. The rest is pretty much worthless. I might use the block for yard art.
The shop took the head apart to give it a good cleaning and one of the valve guides fell out. Two others were so loose they could be pushed out with a finger. That's not something that can be fixed with JB Weld. If they can find some oversized guides, they'll be able to salvage the head. If not, they have a few heads on a shelf and can use one of them.
If all goes well, the brand-new engine will be done in two weeks. Once I get it, my friend Eddie and I can have it installed and running in one day. It's relatively simple.
At this point, everything on the car has been rebuilt except for the transmission and differential, and I hope it stays that way. I don't want my wife watching me cry.
June 16th, 2022
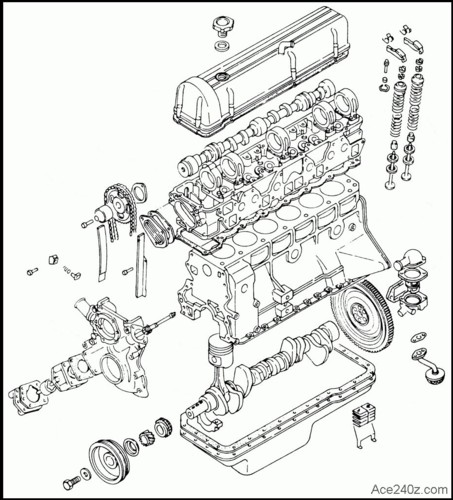 It's been two and a half months since I pulled the engine out of my car and it's still in pieces.
The first place I went to waited a month before taking it apart. Over a month later nothing had been done. They said it might take another two months before the block could get machined, and no definate time for assembly. I picked up the parts and took it home.
I found another place in Arvada. They've done quite a few Zs (as well as 70s muscle cars and Porches) and it's quality work. We worked out some options and some prices and I signed a contract for a stroked L26 (2600cc) engine ready to install in 6-7 weeks.
It's gonna be a tough wait.
The previous engine, with a flawed block, modified head and stock distributor generated 137 horsepower at the wheel here in Denver (5280 feet of elevation), which would be approximately 155 horsepower at sea level. Dynos vary, so those numbers are approximations. Once the new engine has been broken in, I'll take it back to the same dyno to see the difference. With the larger displacement, rebuilt head, ported & matched intakes, and a modern electronic tach, I might see as much as 185 horsepower which is pretty damn good for a 2200 lbs car.
By comparison, the same year Porsche 911 weighed 2250 lbs with a mere 125 hp.
It's been two and a half months since I pulled the engine out of my car and it's still in pieces.
The first place I went to waited a month before taking it apart. Over a month later nothing had been done. They said it might take another two months before the block could get machined, and no definate time for assembly. I picked up the parts and took it home.
I found another place in Arvada. They've done quite a few Zs (as well as 70s muscle cars and Porches) and it's quality work. We worked out some options and some prices and I signed a contract for a stroked L26 (2600cc) engine ready to install in 6-7 weeks.
It's gonna be a tough wait.
The previous engine, with a flawed block, modified head and stock distributor generated 137 horsepower at the wheel here in Denver (5280 feet of elevation), which would be approximately 155 horsepower at sea level. Dynos vary, so those numbers are approximations. Once the new engine has been broken in, I'll take it back to the same dyno to see the difference. With the larger displacement, rebuilt head, ported & matched intakes, and a modern electronic tach, I might see as much as 185 horsepower which is pretty damn good for a 2200 lbs car.
By comparison, the same year Porsche 911 weighed 2250 lbs with a mere 125 hp.
May 4th, 2022
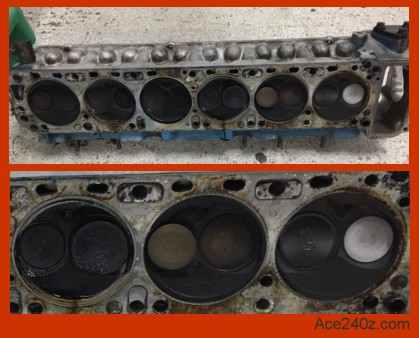 The engine is apart and it's a mixed bag.
Whoever built the engine was an idiot. The cylinders look like they were (badly) honed by hand. There's some vertical scoring on the walls and the cross-hatching, which is important, doesn't exist in some places. The pistons are the wrong diameter and barely fit inside the cylinders, and a few of them are scuffed and scored. All of them were carbon-covered from burning so much oil. The guys at Ignite were a little amazed it ran at all. The block has been sent out to have the cylinders properly bored and hopefully it can be saved. The pistons might be salvageable but definitely need new rings.
On the plus side, the head is in pretty good shape. It was milled in the past for higher compression and the camshaft tower shimmed to keep the timing chain synchronized. The camshaft itself, as expected, is an aftermarket version but no idea what the lift and duration are. The valves are slightly larger than stock. All of that is why engine had better-than-stock horsepower as shown at the dyno.
Cylinder #1 was running so lean that the exhaust valve is white. Cylinder #2 looks nearly perfect. The remaining cylinders are virtually choked from burning a lot of oil, which is thanks to the ill-fitting pistons and ruined rings. I'm surprised there wasn't a lot more smoke out the tailpipe. Luckily the burned oil and carbon can be cleaned without having to take anything apart. I'm not sure what can be done with the white exhaust valve. I'll have to leave that to the professionals.
The last thing is the header. It seems the mounting flange is slightly warped, which led to an annoying exhaust leak. It'll get milled flat for a tight seal.
All things considered, it could have been a lot worse.
The engine is apart and it's a mixed bag.
Whoever built the engine was an idiot. The cylinders look like they were (badly) honed by hand. There's some vertical scoring on the walls and the cross-hatching, which is important, doesn't exist in some places. The pistons are the wrong diameter and barely fit inside the cylinders, and a few of them are scuffed and scored. All of them were carbon-covered from burning so much oil. The guys at Ignite were a little amazed it ran at all. The block has been sent out to have the cylinders properly bored and hopefully it can be saved. The pistons might be salvageable but definitely need new rings.
On the plus side, the head is in pretty good shape. It was milled in the past for higher compression and the camshaft tower shimmed to keep the timing chain synchronized. The camshaft itself, as expected, is an aftermarket version but no idea what the lift and duration are. The valves are slightly larger than stock. All of that is why engine had better-than-stock horsepower as shown at the dyno.
Cylinder #1 was running so lean that the exhaust valve is white. Cylinder #2 looks nearly perfect. The remaining cylinders are virtually choked from burning a lot of oil, which is thanks to the ill-fitting pistons and ruined rings. I'm surprised there wasn't a lot more smoke out the tailpipe. Luckily the burned oil and carbon can be cleaned without having to take anything apart. I'm not sure what can be done with the white exhaust valve. I'll have to leave that to the professionals.
The last thing is the header. It seems the mounting flange is slightly warped, which led to an annoying exhaust leak. It'll get milled flat for a tight seal.
All things considered, it could have been a lot worse.
March 29th, 2022
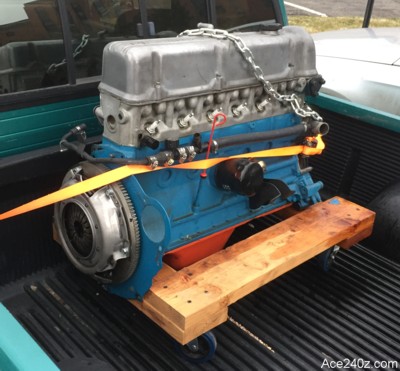 Even though the engine had been rebuilt before I bought the car, there were little puffs of smoke coming out of the exhaust when I pulled away from stoplights. A classic car that looks great shouldn't leave a trail behind it.
The diagnosis was bad rings. Either the builder used cheap ones or didn't take the time to properly break them in, but the only solution was to yank the motor (for the 3rd time) and let the guys at Ignite Performance fix it. They specialize in 240z track cars so I can trust their judgement. They'll pull it apart, hone the cylinders, replace the rings and put it all back together with new bearings and gaskets. After I stuff it back in the car, I'll trailer it to them for the initial start-up and tweaks and adjustments, and I'll make certain that this time it gets broken in the right way.
Of course... while it's apart they're going to shave the head for a little more compression, lightly polish the inside of the intake manifolds and port-match them to the head, then add a higher-flow oil pump and whatever else they think might be a good addition. The stock dual-points distributor will be replaced by a modern digital version. The carbs will get a little attention in the hopes of being able to pass an emissions test, which means getting standard license plates instead of the ugly "collector car" versions.
When the break-in period is done, I'll take it back to the same dyno and see how many horsepower I've gained.
Even though the engine had been rebuilt before I bought the car, there were little puffs of smoke coming out of the exhaust when I pulled away from stoplights. A classic car that looks great shouldn't leave a trail behind it.
The diagnosis was bad rings. Either the builder used cheap ones or didn't take the time to properly break them in, but the only solution was to yank the motor (for the 3rd time) and let the guys at Ignite Performance fix it. They specialize in 240z track cars so I can trust their judgement. They'll pull it apart, hone the cylinders, replace the rings and put it all back together with new bearings and gaskets. After I stuff it back in the car, I'll trailer it to them for the initial start-up and tweaks and adjustments, and I'll make certain that this time it gets broken in the right way.
Of course... while it's apart they're going to shave the head for a little more compression, lightly polish the inside of the intake manifolds and port-match them to the head, then add a higher-flow oil pump and whatever else they think might be a good addition. The stock dual-points distributor will be replaced by a modern digital version. The carbs will get a little attention in the hopes of being able to pass an emissions test, which means getting standard license plates instead of the ugly "collector car" versions.
When the break-in period is done, I'll take it back to the same dyno and see how many horsepower I've gained.
January 30th, 2022
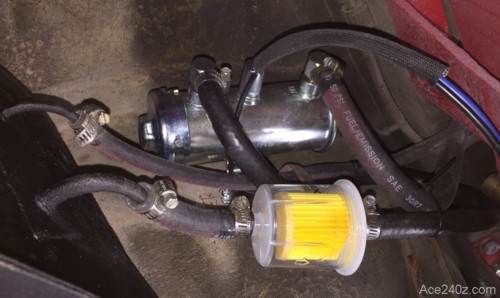 I installed an electric fuel pump to (hopefully) solve the ongoing gas starvation problem. Replacing the tank didn't do the trick.
It's located next to the tank, tucked up as high as possible and bolted to the spare tire well. It came with rubber isolators to reduce any vibration being transmitted to the body and I doubt I'll hear it when the engine is running. I added a filter between it and the tank to prevent any crud from clogging it, and kept the stock filter in the engine bay for extra protection. I ran power to it, then blocked off the opening on the engine where the mechanical pump used to be. Snow is in the forecast for the next few days so I won't know how well it works until the roads are dry.
I also fixed the wiring for the water temp / oil pressure gauge, but I won't know for certain until I can let the engine run long enough to heat up. The ancient Datsun diagrams are awful and I based my design on their mistakes. After doing a little research online I figured out what the problem was and pulled the guage out to make the changes, but getting the thing back into the dash was incredbly difficult.
I installed an electric fuel pump to (hopefully) solve the ongoing gas starvation problem. Replacing the tank didn't do the trick.
It's located next to the tank, tucked up as high as possible and bolted to the spare tire well. It came with rubber isolators to reduce any vibration being transmitted to the body and I doubt I'll hear it when the engine is running. I added a filter between it and the tank to prevent any crud from clogging it, and kept the stock filter in the engine bay for extra protection. I ran power to it, then blocked off the opening on the engine where the mechanical pump used to be. Snow is in the forecast for the next few days so I won't know how well it works until the roads are dry.
I also fixed the wiring for the water temp / oil pressure gauge, but I won't know for certain until I can let the engine run long enough to heat up. The ancient Datsun diagrams are awful and I based my design on their mistakes. After doing a little research online I figured out what the problem was and pulled the guage out to make the changes, but getting the thing back into the dash was incredbly difficult.
January 9th, 2022
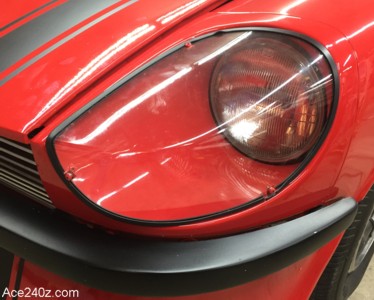 I installed the headlight covers. They should have been standard equipment.
It's an easy upgrade that only takes about an hour. The kit came with little brackets and screws and double-sided tape which eliminates the need to drill any holes. I painted the brackets and screws to match the car and I'm very happy with how it turned out. It's the little things that can make a big difference.
Unfortunately I have to take the cover back off to clean the fingerprints on the inside.
I installed the headlight covers. They should have been standard equipment.
It's an easy upgrade that only takes about an hour. The kit came with little brackets and screws and double-sided tape which eliminates the need to drill any holes. I painted the brackets and screws to match the car and I'm very happy with how it turned out. It's the little things that can make a big difference.
Unfortunately I have to take the cover back off to clean the fingerprints on the inside.
December 20th, 2021
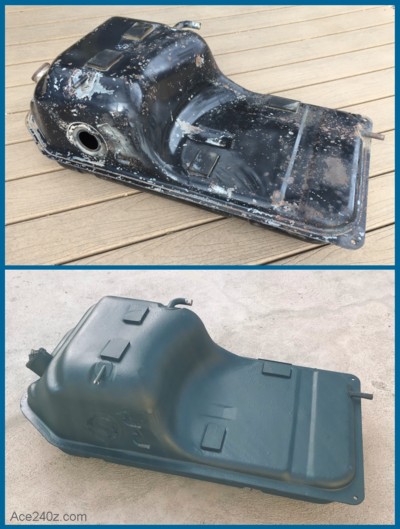 When I finally began driving the car, the engine would occasionally stop running and I'd be stranded on the side of the road. When I opened the carbs, they were dry as if I ran out of gas even though the tank was full. I'd have to walk to a gas station, buy a can and fill it, then walk back to the car and get it started and head straight home. The hoses weren't clogged and the filter was clean and I even replaced the fuel pump but the problem persisted. What a nightmare.
I eventually stuck my borescope down the filler neck and was horrified to see the tank's liner (also known as a sealer) was peeling away from the metal and pieces of it were floating around like tree leaves in a bucket of water.
Sealers are a common fix for a rusty old tank. First you remove the rust, then you pour an epoxy-like liquid inside the tank and swish it all around to coat all of the surfaces and let it cure, thus "sealing" the tank from future corrosion. It's a great idea but not all sealers work the same and not everybody does the right amount of prep, or follows the instructions, and this tank was the perfect example of how things can go wrong.
Think about a drinking something with a straw. Occasionally a piece of ice gets stuck at the end of the straw and it clogs and now nothing comes out. That was the problem - pieces of the sealer would get sucked up against the supply tube and cut off the gas to the carbs and the engine would die.
I ended up dropping the tank. One solution was cut a hole in the tank and clean out every speck of the sealer, then weld the hole shut and let a professional properly install a new sealer. My lower-cost solution was to find another tank with a clean interior and no sealer. Junkyard Jenny (see my suppliers page) had several tanks and one of them was perfect. I used a wire brush on my grinder to remove the rust and old paint from the exterior, then took it to a local spray wash to clean out the inside. Once everything was dry I used a few cans of 3M Undercoat (the best) to cover the entire thing. It looks like new and will probably outlive me.
With the tank back in place, I filtered the old gas thru a couple of towels to catch any traces of the old sealer, then filled the tank back up and the problem was solved.
This was the fourth time I've removed and reinstalled the tank and hopefully I'll never have to do it again because it's a total pain in the ass. For anyone reading this, if you ever have to drop the tank, learn from my experiences and do all of the refurbishments and upgrades you can and don't cut any corners.
When I finally began driving the car, the engine would occasionally stop running and I'd be stranded on the side of the road. When I opened the carbs, they were dry as if I ran out of gas even though the tank was full. I'd have to walk to a gas station, buy a can and fill it, then walk back to the car and get it started and head straight home. The hoses weren't clogged and the filter was clean and I even replaced the fuel pump but the problem persisted. What a nightmare.
I eventually stuck my borescope down the filler neck and was horrified to see the tank's liner (also known as a sealer) was peeling away from the metal and pieces of it were floating around like tree leaves in a bucket of water.
Sealers are a common fix for a rusty old tank. First you remove the rust, then you pour an epoxy-like liquid inside the tank and swish it all around to coat all of the surfaces and let it cure, thus "sealing" the tank from future corrosion. It's a great idea but not all sealers work the same and not everybody does the right amount of prep, or follows the instructions, and this tank was the perfect example of how things can go wrong.
Think about a drinking something with a straw. Occasionally a piece of ice gets stuck at the end of the straw and it clogs and now nothing comes out. That was the problem - pieces of the sealer would get sucked up against the supply tube and cut off the gas to the carbs and the engine would die.
I ended up dropping the tank. One solution was cut a hole in the tank and clean out every speck of the sealer, then weld the hole shut and let a professional properly install a new sealer. My lower-cost solution was to find another tank with a clean interior and no sealer. Junkyard Jenny (see my suppliers page) had several tanks and one of them was perfect. I used a wire brush on my grinder to remove the rust and old paint from the exterior, then took it to a local spray wash to clean out the inside. Once everything was dry I used a few cans of 3M Undercoat (the best) to cover the entire thing. It looks like new and will probably outlive me.
With the tank back in place, I filtered the old gas thru a couple of towels to catch any traces of the old sealer, then filled the tank back up and the problem was solved.
This was the fourth time I've removed and reinstalled the tank and hopefully I'll never have to do it again because it's a total pain in the ass. For anyone reading this, if you ever have to drop the tank, learn from my experiences and do all of the refurbishments and upgrades you can and don't cut any corners.
November 18th, 2021
 The windows required a lot of time and effort (and wailing and gnashing of teeth) but they finally roll up and down. My original plan was to use power window motors from a Honda Civic but couldn't get them to work very well so I ended up using the stock regulators. Even so, it still took a fair amount of fussing and adjusting and cussing. Hopefully I'll never have to touch them again.
Eventually I'll add a page on how to install and adjust them in the Tips & Tricks section.
Click on the pic to see the results.
Note: for the moment, you'll need Active-X enabled to watch the video, or you can download it and watch in your browser. I'll update that so you can watch it directly here, but I'm better at working on cars than I am with this website, so bear with me for a few days.
The windows required a lot of time and effort (and wailing and gnashing of teeth) but they finally roll up and down. My original plan was to use power window motors from a Honda Civic but couldn't get them to work very well so I ended up using the stock regulators. Even so, it still took a fair amount of fussing and adjusting and cussing. Hopefully I'll never have to touch them again.
Eventually I'll add a page on how to install and adjust them in the Tips & Tricks section.
Click on the pic to see the results.
Note: for the moment, you'll need Active-X enabled to watch the video, or you can download it and watch in your browser. I'll update that so you can watch it directly here, but I'm better at working on cars than I am with this website, so bear with me for a few days.
October 10th, 2021
October 9th, 2021
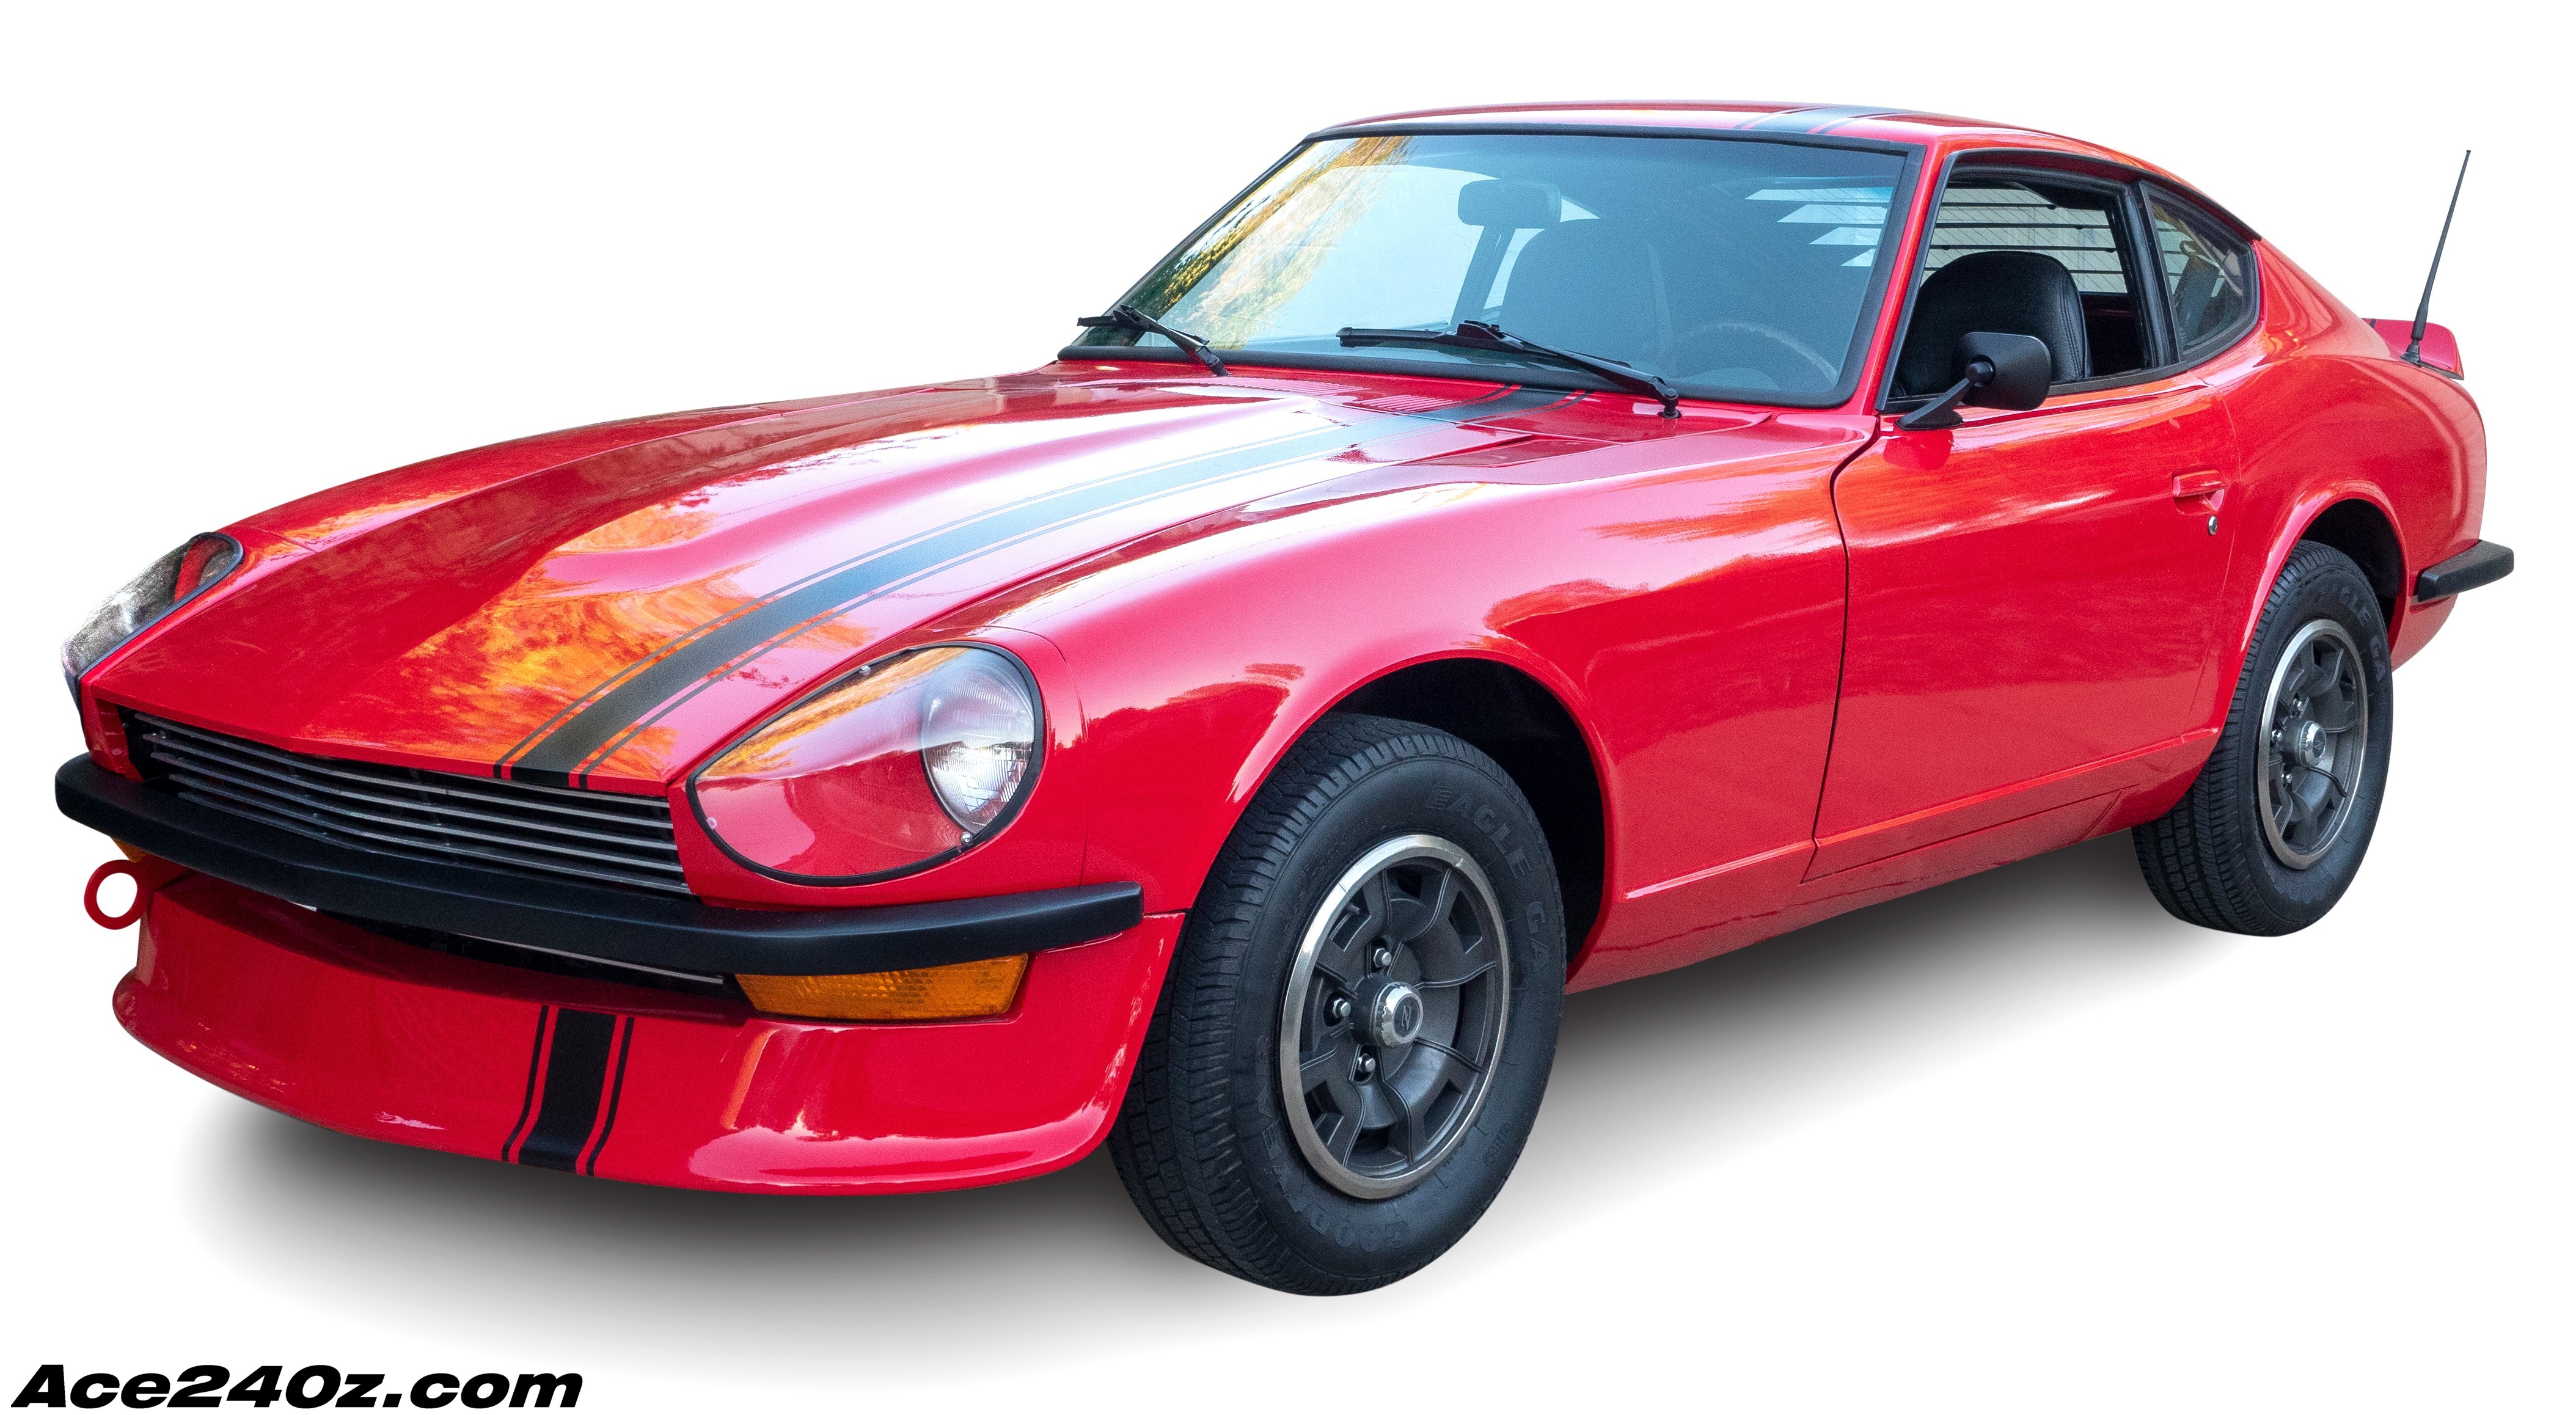 This beautiful new photo for the site was taken by famed Santa Fe graphic artist Tomas Rodriguez and I'm eternally grateful for his effort. It's amazing.
Click on it to see a super-high resolution version.
This beautiful new photo for the site was taken by famed Santa Fe graphic artist Tomas Rodriguez and I'm eternally grateful for his effort. It's amazing.
Click on it to see a super-high resolution version.
October 2nd, 2021
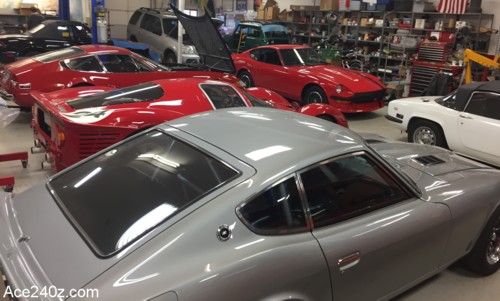 I was able to drive the car to Ignite Performance in Arvada for the final tuning and a few little fixes. They specialize in vintage and high performance race cars, and have done several very capable 240z track conversions.
There's my car in the background. In the foreground is a track-capable 240z, next to that is a Ferrari 330 P4 and a Ferrari Daytona, with more cars behind me and on the other side of the wall. It feels strange to see my Z surrounded by such glory. Even so, it seems to fit in quite well.
The plan is to put my car on a dyno to get the timing and carbs set for the best performance, which is something I can't do on my own. Not only will the engine run at its peak, I'll know exactly how many horsepower and foot-pounds of torque it actually produces in Denver's thin atmosphere.
You can find the contact information for Ignite Performance on my Contributors & Suppliers page here.
I was able to drive the car to Ignite Performance in Arvada for the final tuning and a few little fixes. They specialize in vintage and high performance race cars, and have done several very capable 240z track conversions.
There's my car in the background. In the foreground is a track-capable 240z, next to that is a Ferrari 330 P4 and a Ferrari Daytona, with more cars behind me and on the other side of the wall. It feels strange to see my Z surrounded by such glory. Even so, it seems to fit in quite well.
The plan is to put my car on a dyno to get the timing and carbs set for the best performance, which is something I can't do on my own. Not only will the engine run at its peak, I'll know exactly how many horsepower and foot-pounds of torque it actually produces in Denver's thin atmosphere.
You can find the contact information for Ignite Performance on my Contributors & Suppliers page here.
August 23rd, 2021
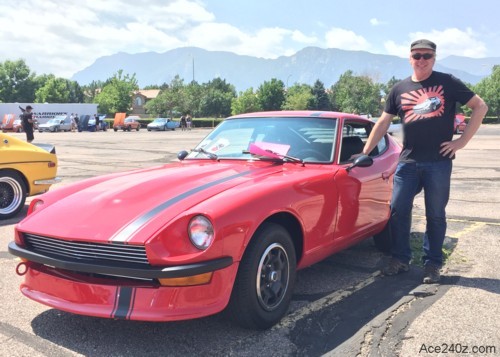 I was able to make it to the 2021 National Zcon (Z Convention) in Colorado Springs and entered my car in the People's Choice show but sadly didn't bring home a trophy. I guess there's no accounting for taste.
It was quite an adventure at 81 miles each way. The car felt good (despite slightly vague steering) and the engine ran good but some of the electrical stuff (blinkers & wipers) didn't work and the brakes are still marginal, and getting caught in the rain without glass in the doors was dismaying, but the day was still a big win and worth all the effort.
There were about 40 of the S30 series, another two dozen of the ZX cars and quite a few 300 series, and to top it off they even had a 400z Proto on display behind velvet ropes. It was a big event and I'm damn pleased to have been part of it. I met a lot of really nice people, saw some great cars, brought home some swag and a lot of pics and an ugly sunburn.
On the tech side, cylinders 1-3 were lean and 4-6 are about right. My friend Eddie followed me and said there was still a little exhaust smoke, especially when decelerating, which likely means the valve seals need to be replaced. It's not a difficult fix - just time consuming. The trans shifted fine. The suspension was a little smoother than expected. The engine didn't overheat. I didn't hear any pinging, so I guess the timing is set right. The carbs need a little more synchronizing (it runs slightly rough at idle) and I want to go thru the valve adjustment one last time. I also want to crawl around and double-check every nut and bolt on the suspension - I kept wondering (at 70 mph) if I'd really tightened the lug nuts. Lastly I need to download the stereo's manual so that I can make it work.
Overall I'm very pleased. It's a car again.
I was able to make it to the 2021 National Zcon (Z Convention) in Colorado Springs and entered my car in the People's Choice show but sadly didn't bring home a trophy. I guess there's no accounting for taste.
It was quite an adventure at 81 miles each way. The car felt good (despite slightly vague steering) and the engine ran good but some of the electrical stuff (blinkers & wipers) didn't work and the brakes are still marginal, and getting caught in the rain without glass in the doors was dismaying, but the day was still a big win and worth all the effort.
There were about 40 of the S30 series, another two dozen of the ZX cars and quite a few 300 series, and to top it off they even had a 400z Proto on display behind velvet ropes. It was a big event and I'm damn pleased to have been part of it. I met a lot of really nice people, saw some great cars, brought home some swag and a lot of pics and an ugly sunburn.
On the tech side, cylinders 1-3 were lean and 4-6 are about right. My friend Eddie followed me and said there was still a little exhaust smoke, especially when decelerating, which likely means the valve seals need to be replaced. It's not a difficult fix - just time consuming. The trans shifted fine. The suspension was a little smoother than expected. The engine didn't overheat. I didn't hear any pinging, so I guess the timing is set right. The carbs need a little more synchronizing (it runs slightly rough at idle) and I want to go thru the valve adjustment one last time. I also want to crawl around and double-check every nut and bolt on the suspension - I kept wondering (at 70 mph) if I'd really tightened the lug nuts. Lastly I need to download the stereo's manual so that I can make it work.
Overall I'm very pleased. It's a car again.
August 17th, 2021
 Finally got the racing stripes added. On the left is me in the mid-90's with my '72, and when you compare it with the new car you'll see I still love narrow, offset stripes. They're a vintage, classic style that really sets the car apart.
I did the original ones with cheap masking tape and a couple layers of rattle-can black and they turned out better than I'd expected. This time I relied on Chris Stevenson and the results are perfect.
I've been cautiously driving it around. None of the gauges work and the speedometer reads about 20% too high and the brakes are (still) a little iffy. The carbs need a little more adjusting. The rest of it, however, works great. The engine pulls hard and the transmission shifts neatly. The suspension feels good but not having power steering seems odd.
Hopefully it'll pass that pesky emissions test.
This weekend is the national Z Convention in Colorado Springs (a mere 90 minutes south of me) and this car will be at the People's Choice Car Show. I probably won't come back with any awards but I'm certainly going to have a fun time. If you're there and spot the car, stop and say hi.
Finally got the racing stripes added. On the left is me in the mid-90's with my '72, and when you compare it with the new car you'll see I still love narrow, offset stripes. They're a vintage, classic style that really sets the car apart.
I did the original ones with cheap masking tape and a couple layers of rattle-can black and they turned out better than I'd expected. This time I relied on Chris Stevenson and the results are perfect.
I've been cautiously driving it around. None of the gauges work and the speedometer reads about 20% too high and the brakes are (still) a little iffy. The carbs need a little more adjusting. The rest of it, however, works great. The engine pulls hard and the transmission shifts neatly. The suspension feels good but not having power steering seems odd.
Hopefully it'll pass that pesky emissions test.
This weekend is the national Z Convention in Colorado Springs (a mere 90 minutes south of me) and this car will be at the People's Choice Car Show. I probably won't come back with any awards but I'm certainly going to have a fun time. If you're there and spot the car, stop and say hi.
June 20th, 2021
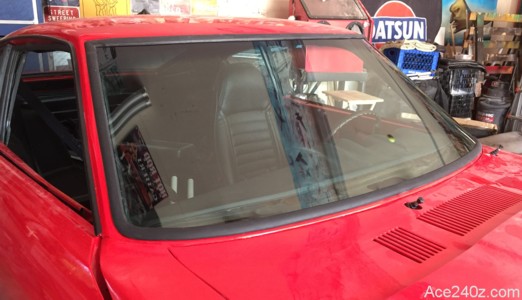 I got quotes to have the windshield installed, but the cheapest was $155 so I did the job myself.
The hardest part was stretching the rubber over the glass - it took about half an hour of straining with the aid of my friend Tomas. If you're going to do it, don't use any lubricant on the glass because the rubber kept slipping off. I had to completely clean the glass and rubber before trying it again. I can't imagine getting it to fit by myself. Putting a pull-string inside the groove took another 15 minutes.
My friends Mac and Adolpho held the glass on the outside of the frame while I sat inside and slowly tugged the string to pull the seal up and over the metal lip. It was easier than I'd hoped. When the windshield was finally in place, the rubber needed a little "massaging" (aka pushing and shoving) to get the upper corners lined up but I'm really happy with the results.
I opted for the no-trim "California-Style" rubber which gives it a cleaner appearance.
I got quotes to have the windshield installed, but the cheapest was $155 so I did the job myself.
The hardest part was stretching the rubber over the glass - it took about half an hour of straining with the aid of my friend Tomas. If you're going to do it, don't use any lubricant on the glass because the rubber kept slipping off. I had to completely clean the glass and rubber before trying it again. I can't imagine getting it to fit by myself. Putting a pull-string inside the groove took another 15 minutes.
My friends Mac and Adolpho held the glass on the outside of the frame while I sat inside and slowly tugged the string to pull the seal up and over the metal lip. It was easier than I'd hoped. When the windshield was finally in place, the rubber needed a little "massaging" (aka pushing and shoving) to get the upper corners lined up but I'm really happy with the results.
I opted for the no-trim "California-Style" rubber which gives it a cleaner appearance.
May 26th, 2021
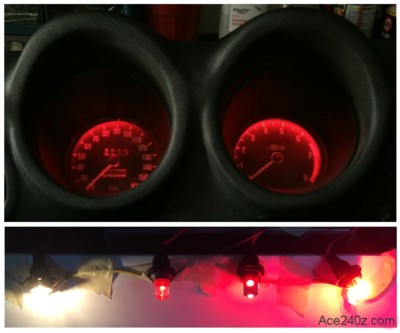 The dashboard is finally back in after some fixes and upgrades. The red LEDs turned out great - click the upper pic to see a video of how they work with a dimmer.
All LEDs are not the same. I bought a set on Ebay that claimed they were "extra bright" but in reality were so dim I needed a flashlight to see if they were on. I bought a second set that was supposed to be "brighter than stock" but they were just as worthless. Then I found a place called Marine Beam that sells ultra-rugged, saltwater-resistant and amazingly-bright LEDs. They're not cheap but you get what you pay for - they're well worth the extra cost.
In the lower pic you can see the comparison test. At left is the stock bulb, then the two awful ones, and the best bulb is on the right. The difference is obvious. Keep that in mind when you look at LEDs on eBay. I'm adding a page on swapping the lights to this site, but at the moment it's not ready. In the meantime, if you want those great LEDs, visit Marine Beam. They also carry an LED dimmer but it won't work with an automotive system. Fortunately I found a substitute at Amazon. It's tiny, works great and is made in the USA. Click here.
The dashboard is finally back in after some fixes and upgrades. The red LEDs turned out great - click the upper pic to see a video of how they work with a dimmer.
All LEDs are not the same. I bought a set on Ebay that claimed they were "extra bright" but in reality were so dim I needed a flashlight to see if they were on. I bought a second set that was supposed to be "brighter than stock" but they were just as worthless. Then I found a place called Marine Beam that sells ultra-rugged, saltwater-resistant and amazingly-bright LEDs. They're not cheap but you get what you pay for - they're well worth the extra cost.
In the lower pic you can see the comparison test. At left is the stock bulb, then the two awful ones, and the best bulb is on the right. The difference is obvious. Keep that in mind when you look at LEDs on eBay. I'm adding a page on swapping the lights to this site, but at the moment it's not ready. In the meantime, if you want those great LEDs, visit Marine Beam. They also carry an LED dimmer but it won't work with an automotive system. Fortunately I found a substitute at Amazon. It's tiny, works great and is made in the USA. Click here.
April 18th, 2021
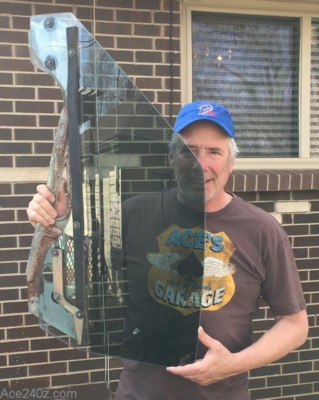 I got the roll-up windows tinted. It's really light, just enough to add a little style. When the car is actually running (which seems like years from now) I'll take it to the same place and have the quarter windows and hatch done to match.
The car came with both windows but the lower frame on one was missing a plastic slider. I was able to make a deal with Junkyard Jen (see the suppliers page) and bought a replacement window that came with everything. Both windows were taken apart and cleaned. I didn't paint the frames because they won't be seen.
There are some tiny scratches on both panes, which is to be expected for 50-year-old glass. I did some online research for buffing them out. Several people recommended ordinary white toothpaste mixed with baking soda. After some hand rubbing, followed with a rotary wheel, the scratches are still there but the glass smells minty-fresh.
I got the roll-up windows tinted. It's really light, just enough to add a little style. When the car is actually running (which seems like years from now) I'll take it to the same place and have the quarter windows and hatch done to match.
The car came with both windows but the lower frame on one was missing a plastic slider. I was able to make a deal with Junkyard Jen (see the suppliers page) and bought a replacement window that came with everything. Both windows were taken apart and cleaned. I didn't paint the frames because they won't be seen.
There are some tiny scratches on both panes, which is to be expected for 50-year-old glass. I did some online research for buffing them out. Several people recommended ordinary white toothpaste mixed with baking soda. After some hand rubbing, followed with a rotary wheel, the scratches are still there but the glass smells minty-fresh.
April 3rd, 2021
 Two steps back.
Some of the wiring in the dash wasn't working right so I pulled it out (again). Every bolt came out except for one that was between the dash and glass. Despite my best efforts, the only way to remove the bolt was removing the windshield. I've already bought the replacement rubber and I'll have to pay to have the glass put back in, but I didn't really have a choice.
With the dash on the workbench, it was fairly easy to find the problems. The bulbs for the flasher indicators had somehow come loose, and two other bulbs were in the wrong holes. I also spotted a couple of wires that weren't protected well enough against chaffing. I'll do another round of checking before it gets stuffed back into place.
Another electrical-related problem was when I connected everything to the fuse block. I hadn't given it enough thought and ended up with jumpers and extra splices, all of which looked like crap. I bought new connectors and additional wire and this time it'll go together much better.
Two steps back.
Some of the wiring in the dash wasn't working right so I pulled it out (again). Every bolt came out except for one that was between the dash and glass. Despite my best efforts, the only way to remove the bolt was removing the windshield. I've already bought the replacement rubber and I'll have to pay to have the glass put back in, but I didn't really have a choice.
With the dash on the workbench, it was fairly easy to find the problems. The bulbs for the flasher indicators had somehow come loose, and two other bulbs were in the wrong holes. I also spotted a couple of wires that weren't protected well enough against chaffing. I'll do another round of checking before it gets stuffed back into place.
Another electrical-related problem was when I connected everything to the fuse block. I hadn't given it enough thought and ended up with jumpers and extra splices, all of which looked like crap. I bought new connectors and additional wire and this time it'll go together much better.
March 7th, 2021
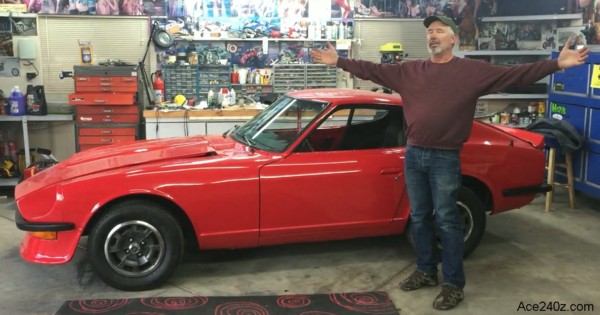 A major milestone: the engine runs! Click on the pic to see and hear it.
Not only does it run, I was able to drive it for the first time in 5 years!
It's not roadworthy (yet). The brakes are still awful and the clutch needs adjusting and a big checklist remains, but at the moment I could cautiously drive it four blocks to the local liquor store to pick up a cold 6-pack.
A major milestone: the engine runs! Click on the pic to see and hear it.
Not only does it run, I was able to drive it for the first time in 5 years!
It's not roadworthy (yet). The brakes are still awful and the clutch needs adjusting and a big checklist remains, but at the moment I could cautiously drive it four blocks to the local liquor store to pick up a cold 6-pack.
January 11th, 2021
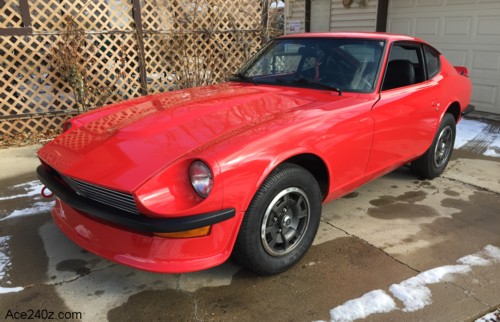 It's still not finished but sure looks good.
The door lock mechanisms, like so many other things, were a pain in the ass. The locks have a little arm on the inside that connects with the mechanism, which allows you to lock or unlock the door from the outside. The arms with the aftermarket ones needed to be cut and bent to work properly. Plastic clips needed to be replaced. The mechanisms themselves needed cleaning and oiling. It took hours to get things sorted out but now it all works.
It's still not finished but sure looks good.
The door lock mechanisms, like so many other things, were a pain in the ass. The locks have a little arm on the inside that connects with the mechanism, which allows you to lock or unlock the door from the outside. The arms with the aftermarket ones needed to be cut and bent to work properly. Plastic clips needed to be replaced. The mechanisms themselves needed cleaning and oiling. It took hours to get things sorted out but now it all works.
January 6th, 2021
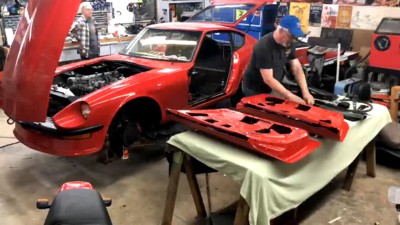 I failed to meet the Christmas goal.
The current problem is the brakes. Despite the best efforts of myself and an equally-talented friend, Ed Case, we can't get them to work. A new master cylinder didn't help, nor did extensive bleeding. The calipers and rear wheel cylinders are also new. The booster was recently rebuilt and carefully adjusted. There are no leaks. All four wheels will lock up after pumping the brake pedal 10-12 times, but once the pedal is released all pressure goes away. I might have to lure a specialist to the house to help figure it out.
My friend Tomas came up from Santa Fe to stay with us for a few days and we spent several evenings and a full Saturday working on various things. The heater controls and center console were installed, which finished the interior. The final electrical connections were made but (at the moment) the blinkers and brake lights don't work. The doors are about halfway assembled with two layers of sound deadening inside. The custom grill was assembled and painted. A lot of little stuff got crossed off the list but it seems like it'll never end.
We did a time lapse video of Tomas, Eddy and myself at work, and two hours were condensed into 50 seconds. Click on the pic to watch it.
I failed to meet the Christmas goal.
The current problem is the brakes. Despite the best efforts of myself and an equally-talented friend, Ed Case, we can't get them to work. A new master cylinder didn't help, nor did extensive bleeding. The calipers and rear wheel cylinders are also new. The booster was recently rebuilt and carefully adjusted. There are no leaks. All four wheels will lock up after pumping the brake pedal 10-12 times, but once the pedal is released all pressure goes away. I might have to lure a specialist to the house to help figure it out.
My friend Tomas came up from Santa Fe to stay with us for a few days and we spent several evenings and a full Saturday working on various things. The heater controls and center console were installed, which finished the interior. The final electrical connections were made but (at the moment) the blinkers and brake lights don't work. The doors are about halfway assembled with two layers of sound deadening inside. The custom grill was assembled and painted. A lot of little stuff got crossed off the list but it seems like it'll never end.
We did a time lapse video of Tomas, Eddy and myself at work, and two hours were condensed into 50 seconds. Click on the pic to watch it.
December 15th, 2020
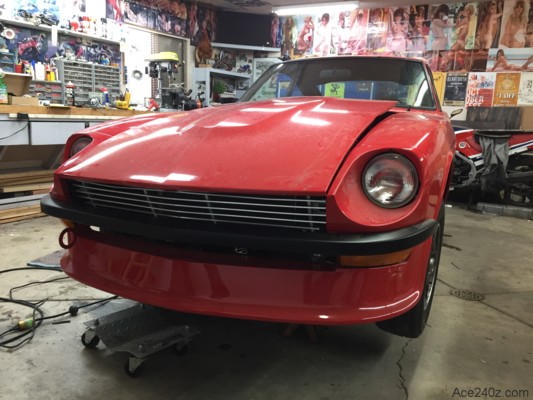 It's a race to have this beast finished by Christmas.
This weekend (with the help of some friends) the hood was attached, seats assembled, door seals installed, wheels and hubcaps mounted, the seat belt kit was adapted, rear view mirror and sun visor mounts screwed into place, carpet was glued down, door panels were repaired and painted, door sills placed, the emergency brake boot was added and a lot of small parts were sandblasted and painted. There were probably a few more things but they got lost in the blur.
It's a race to have this beast finished by Christmas.
This weekend (with the help of some friends) the hood was attached, seats assembled, door seals installed, wheels and hubcaps mounted, the seat belt kit was adapted, rear view mirror and sun visor mounts screwed into place, carpet was glued down, door panels were repaired and painted, door sills placed, the emergency brake boot was added and a lot of small parts were sandblasted and painted. There were probably a few more things but they got lost in the blur.
December 1st, 2020
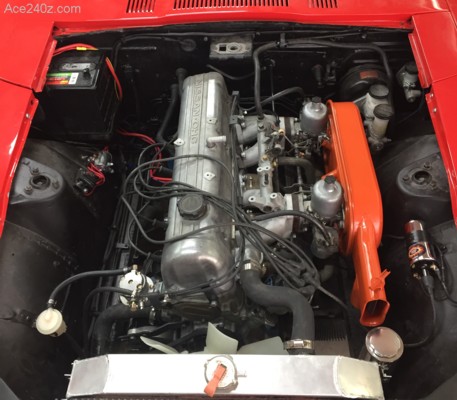 The engine wiring is finally done. Like with everything else, it took longer than expected but certainly turned out nice with everything (aside from the spark plug wires) tucked out of sight.
If the brakes were finished and I had a seat, I could actually drive it around the block. It still doesn't have doors, but if those Jeep guys can drive without them, so can I.
I had a slight setback when one of the rear strut insulator/mounts abruptly fell apart. You'd think highly-stressed rubber would last more than 50 years, right? Just to be safe, I replaced both sides.
My goal is to have it on the road by Christmas and the checklist is steadily shrinking. Several friends are coming over this weekend to help with the final stretch. Keep your fingers crossed.
The engine wiring is finally done. Like with everything else, it took longer than expected but certainly turned out nice with everything (aside from the spark plug wires) tucked out of sight.
If the brakes were finished and I had a seat, I could actually drive it around the block. It still doesn't have doors, but if those Jeep guys can drive without them, so can I.
I had a slight setback when one of the rear strut insulator/mounts abruptly fell apart. You'd think highly-stressed rubber would last more than 50 years, right? Just to be safe, I replaced both sides.
My goal is to have it on the road by Christmas and the checklist is steadily shrinking. Several friends are coming over this weekend to help with the final stretch. Keep your fingers crossed.
November 26th, 2020
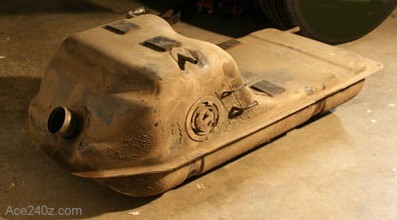 Cleaning out the rust on the inside of a fuel tank can be a real chore, so I added a great way to make it easier on my Tips & Tricks page. Click on the pic to take a look.
November 23rd, 2020
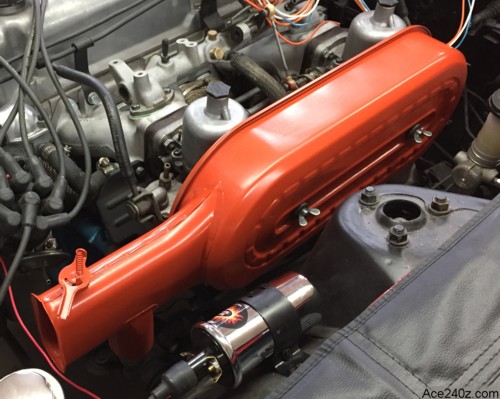 My air cleaner was faded and scraped and scratched but no dents or cracks. All it needed was a good cleaning and some sanding to get it ready for new paint.
On one of the Z forums a few years back, somebody had tried several different brands of paint to get the "just right" shade of orange. One of the online specialty stores has what they describe as being the exact stock color, but $30 for a can (plus shipping) is a little steep unless you're aiming for a show-quality restoration.
For a mere $8, Dupli-Color's "Chrysler Hemi Orange" (DE1652) is good enough for me.
About two hours of labor and five carefully-applied coats gave it a great appearance that should last for years. Another item off the checklist.
My air cleaner was faded and scraped and scratched but no dents or cracks. All it needed was a good cleaning and some sanding to get it ready for new paint.
On one of the Z forums a few years back, somebody had tried several different brands of paint to get the "just right" shade of orange. One of the online specialty stores has what they describe as being the exact stock color, but $30 for a can (plus shipping) is a little steep unless you're aiming for a show-quality restoration.
For a mere $8, Dupli-Color's "Chrysler Hemi Orange" (DE1652) is good enough for me.
About two hours of labor and five carefully-applied coats gave it a great appearance that should last for years. Another item off the checklist.
November 19th, 2020
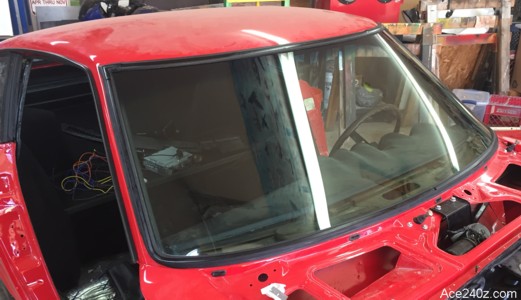 Brand-new windshield with brand-new rubber got installed. The existing rear glass (with new rubber) was also installed. Turned out nice.
The original stainless steel inserts had been previously powder-coated black to blend in with the rubber, but one of them got bent so the rubber seal doesn't fit right at that point. I think it can be fixed. The installer didn't understand how the corner pieces overlapped so they'll need some fussing.
It looks strange to see glass after a five year absence.
Brand-new windshield with brand-new rubber got installed. The existing rear glass (with new rubber) was also installed. Turned out nice.
The original stainless steel inserts had been previously powder-coated black to blend in with the rubber, but one of them got bent so the rubber seal doesn't fit right at that point. I think it can be fixed. The installer didn't understand how the corner pieces overlapped so they'll need some fussing.
It looks strange to see glass after a five year absence.
November 15th, 2020
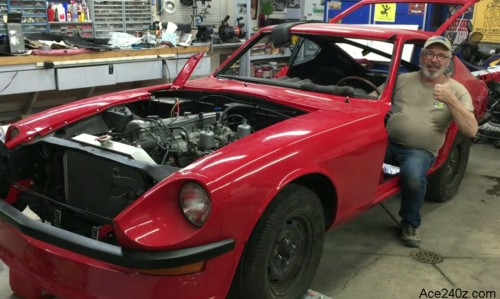 After 5 years of slumber, the engine came back to life.
It took a little time to get the redesigned wiring straightened out, plus it needed a new fuel pump and coil. Several generous doses of starter spray got it coughing until gas (finally) started to flow, and a little tweak to the distributor made it purr. No smoke out the exhaust but plenty of fumes in the closed garage.
In theory I could drive it, but it still lacks doors, a windshield, the hood and most of all, a seat.
After 5 years of slumber, the engine came back to life.
It took a little time to get the redesigned wiring straightened out, plus it needed a new fuel pump and coil. Several generous doses of starter spray got it coughing until gas (finally) started to flow, and a little tweak to the distributor made it purr. No smoke out the exhaust but plenty of fumes in the closed garage.
In theory I could drive it, but it still lacks doors, a windshield, the hood and most of all, a seat.
October 30th, 2020
 Got the carpet and middle console installed. All it took was a little trimming and some industrial-strength adhesive. Carpet kits these days are pretty good and typically easy to install. This one was no exception.
The piece on the tunnel was glued and the rest is just laying in place but I might use a couple of little screws to hold to the footwell parts securely.
My very first car (in 1978) was a '64 Beetle. Dad and I did some basic restoration in his backyard. There were no upholstery kits back then, so we took the seats and what remained of the original carpet down to Tijuana. The seats turned out good but the carpet needed work to fit properly. The rest of the car was bright and shining, so nobody noticed the crooked seams.
My previous Z (a '72) needed new carpet and the kit I bought from JC Whitney was better than the Tijuana version but still took some time to stretch and tuck. The lessons learned from my Bug came in handy, and the experience from the '72 made me appreciate what I have now.
Got the carpet and middle console installed. All it took was a little trimming and some industrial-strength adhesive. Carpet kits these days are pretty good and typically easy to install. This one was no exception.
The piece on the tunnel was glued and the rest is just laying in place but I might use a couple of little screws to hold to the footwell parts securely.
My very first car (in 1978) was a '64 Beetle. Dad and I did some basic restoration in his backyard. There were no upholstery kits back then, so we took the seats and what remained of the original carpet down to Tijuana. The seats turned out good but the carpet needed work to fit properly. The rest of the car was bright and shining, so nobody noticed the crooked seams.
My previous Z (a '72) needed new carpet and the kit I bought from JC Whitney was better than the Tijuana version but still took some time to stretch and tuck. The lessons learned from my Bug came in handy, and the experience from the '72 made me appreciate what I have now.
October 25th, 2020
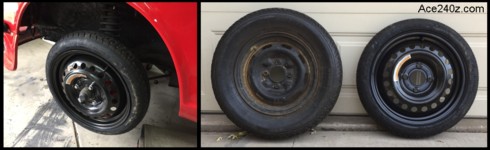 I verified the emergency spare from an '07-'12 Nissan Sentra will fit a 240z. Tire size is 125/70/16 and it weighs 27 lbs compared to 40 lbs. It also leaves just enough room in the well for a tiny scissor jack and wrench, which is important because my '71 doesn't have storage compartments behind the seats.
I snagged this brand-new one from a salvage yard for a mere $17.22
I verified the emergency spare from an '07-'12 Nissan Sentra will fit a 240z. Tire size is 125/70/16 and it weighs 27 lbs compared to 40 lbs. It also leaves just enough room in the well for a tiny scissor jack and wrench, which is important because my '71 doesn't have storage compartments behind the seats.
I snagged this brand-new one from a salvage yard for a mere $17.22
October 23rd, 2020
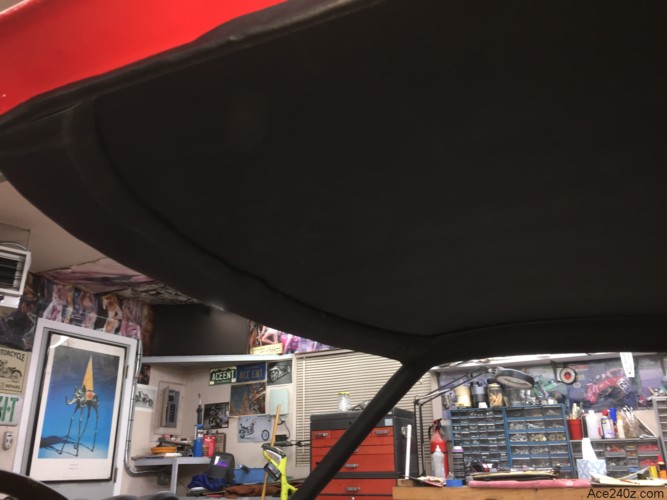 Got the headliner, vinyl trim and the carpet installed. A local upholsterer was willing to come to my house and do the work.
I've done a few carpet kits before and they're pretty easy, but the headliner and trim for the A-pillars & over the doors was something new so I found a pro and the result is beautiful. Even after watching some YouTube videos, I doubt I could have done it so well.
All that's left for the interior is the center console, the heater controls and the seats.
On the downside, the engine won't start. It turns over and it's getting fuel but there's no spark. At first I suspected the Pertronix ignition was to blame, but after going back to points and a condensor I'm not so sure. It's just a matter of tracing thru the new wiring to find out the problem, but at the moment the interior is taking priority.
Got the headliner, vinyl trim and the carpet installed. A local upholsterer was willing to come to my house and do the work.
I've done a few carpet kits before and they're pretty easy, but the headliner and trim for the A-pillars & over the doors was something new so I found a pro and the result is beautiful. Even after watching some YouTube videos, I doubt I could have done it so well.
All that's left for the interior is the center console, the heater controls and the seats.
On the downside, the engine won't start. It turns over and it's getting fuel but there's no spark. At first I suspected the Pertronix ignition was to blame, but after going back to points and a condensor I'm not so sure. It's just a matter of tracing thru the new wiring to find out the problem, but at the moment the interior is taking priority.
October 4th, 2020
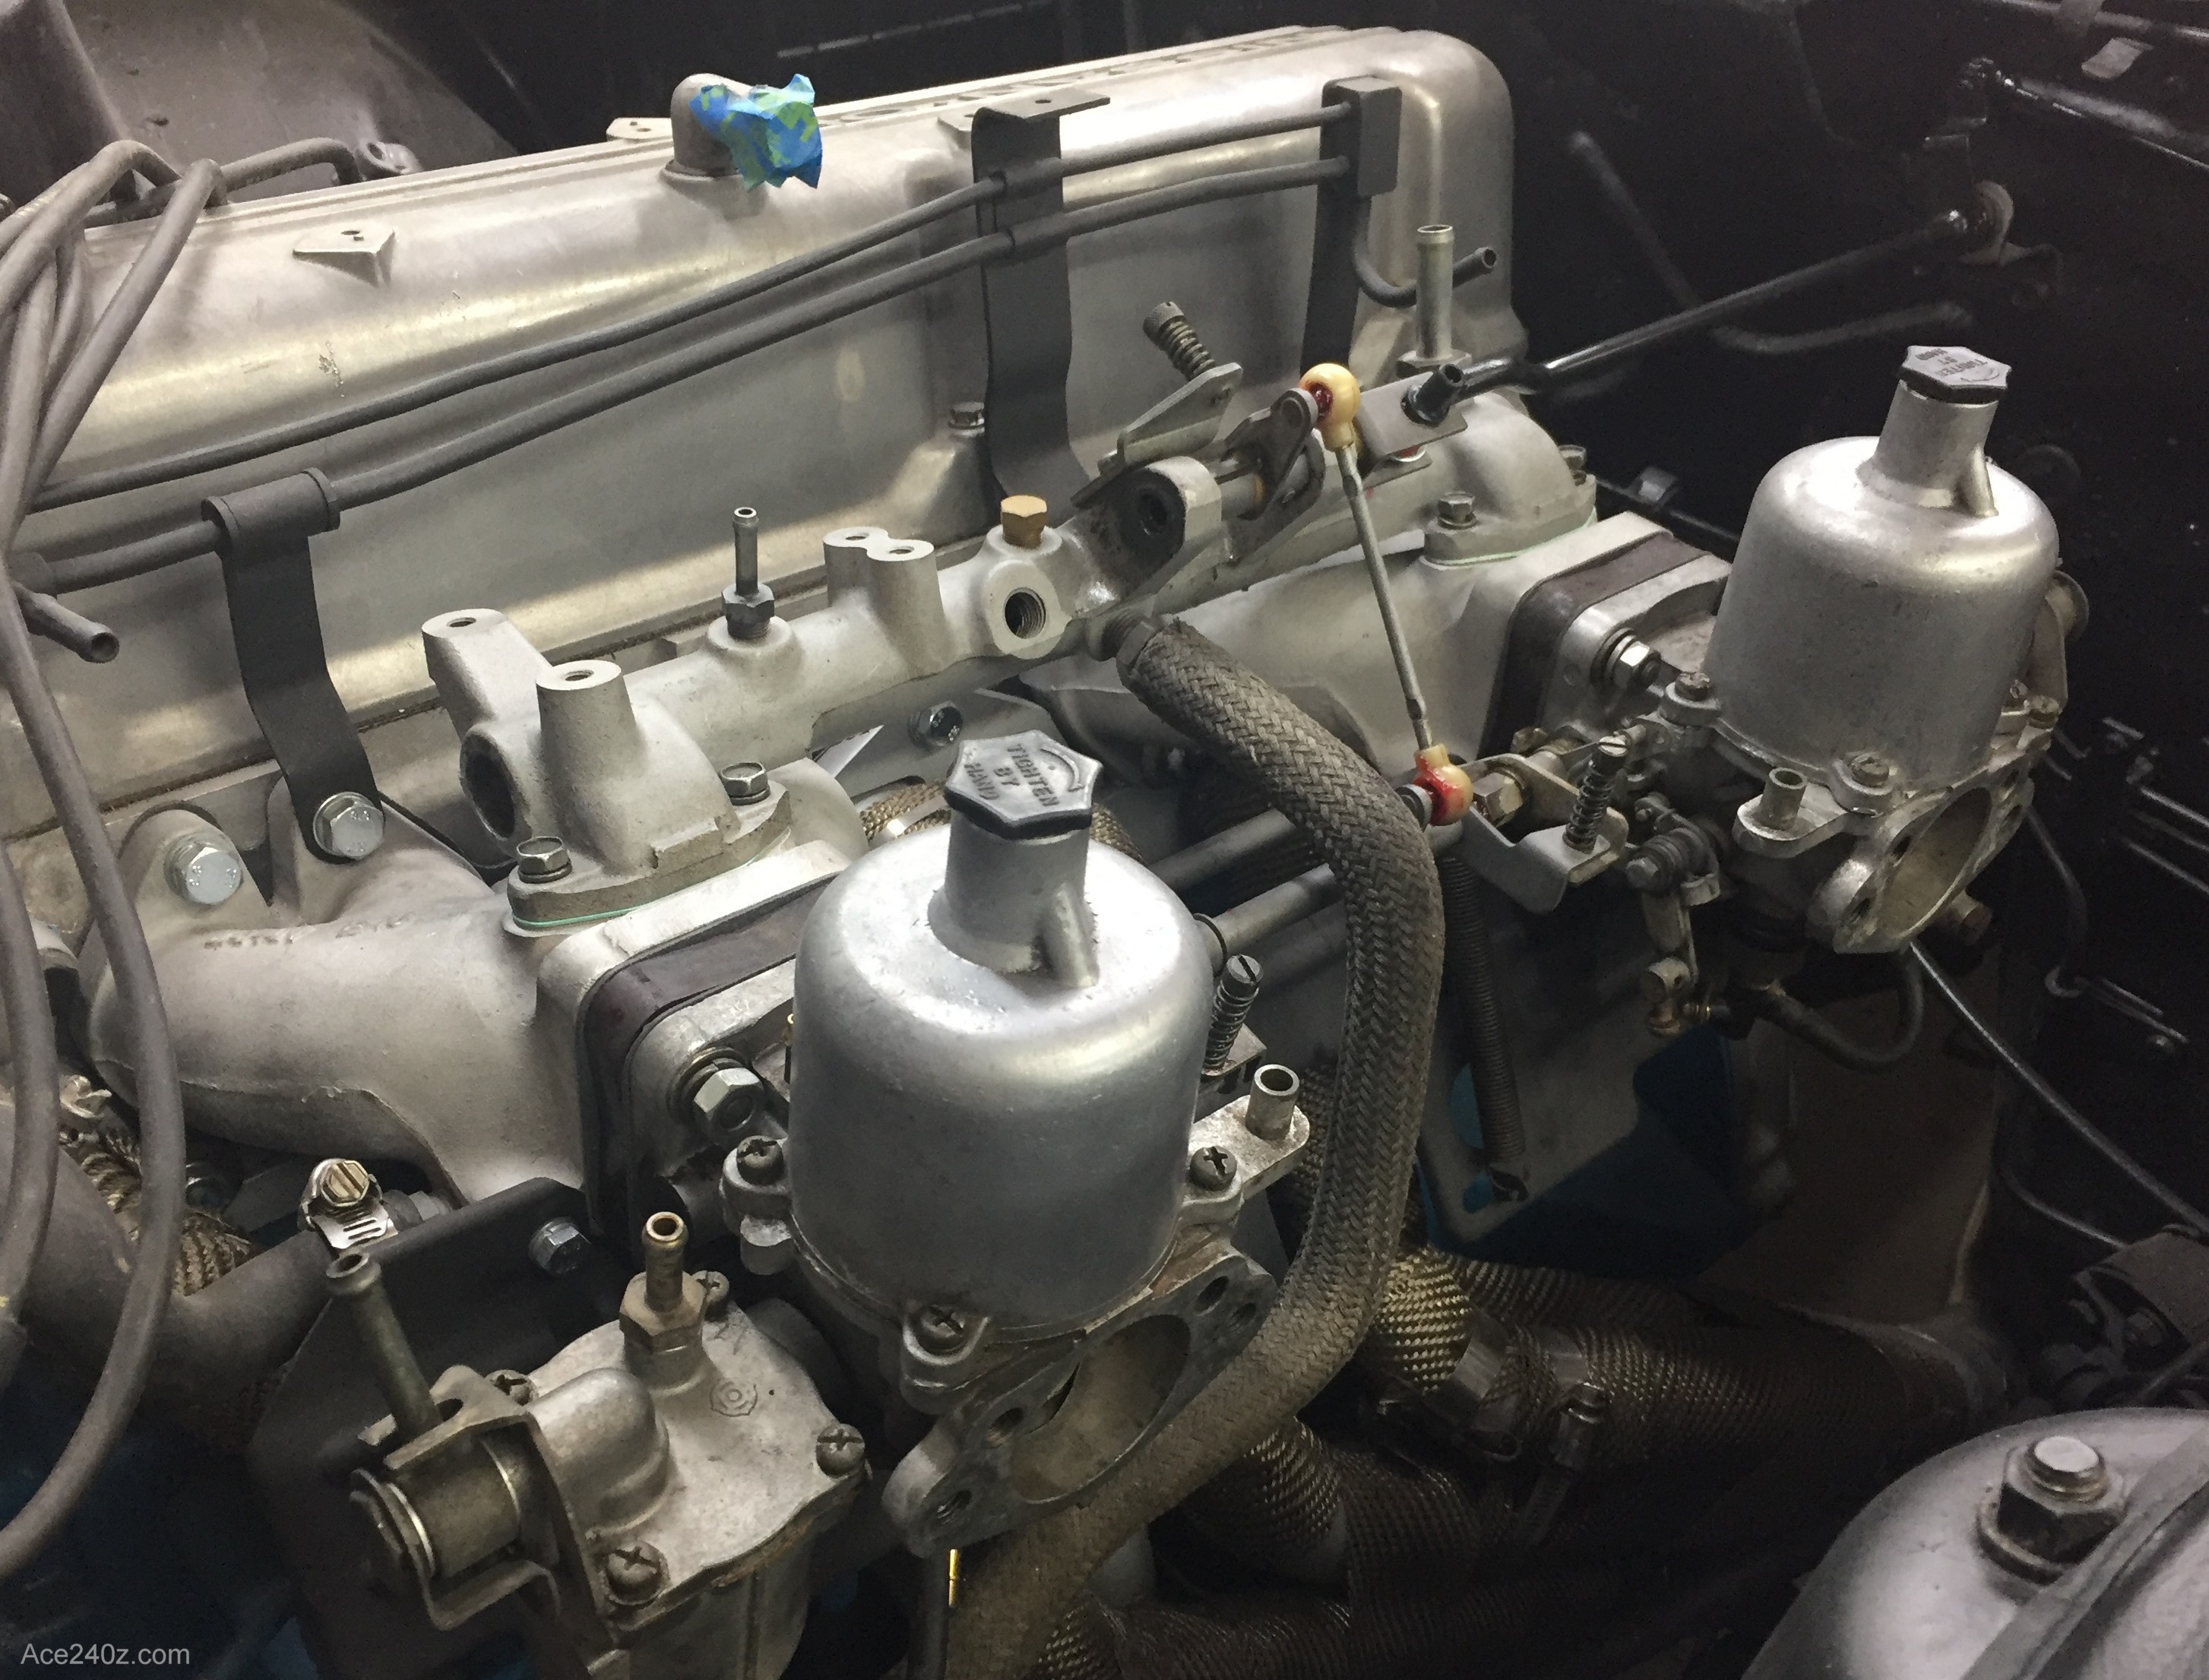 I want the engine running by the end of this week (October 11th) so I'm taking a shortcut with the carbs. I planned on rebuilding them, and have the various parts, but the engine ran pretty good when I bought the car so I put the carbs back on as-is and hopefully they're still in decent shape.
If the engine runs ragged, at least I'll know where to start.
I want the engine running by the end of this week (October 11th) so I'm taking a shortcut with the carbs. I planned on rebuilding them, and have the various parts, but the engine ran pretty good when I bought the car so I put the carbs back on as-is and hopefully they're still in decent shape.
If the engine runs ragged, at least I'll know where to start.
September 11th, 2020
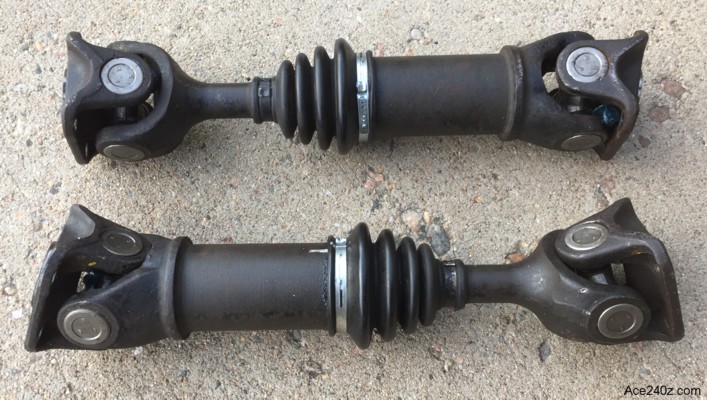 New u-joints for the rear half-shafts. Judging by the clean boots and clips, they seem to have been rebuilt at some point before I bought the car but I don't want to take any chances so I replaced the u-joints with a heavy-duty set from Moog.
Mid-October marks the 5-year anniversary of buying this car so I've set myself a goal of having it finished and driveable by Thanksgiving, which gives me approximately 10 weeks. I made a timeline with dates of when certain things need to be started and done, and judging by that I think I can actually make it happen.
This isn't like one of those stupid reality shows where they mumble "The owner's gonna be pretty pissed if we don't get this done in time," then proceed to send up showers of sparks from a cheap grinder.
Stay tuned.
New u-joints for the rear half-shafts. Judging by the clean boots and clips, they seem to have been rebuilt at some point before I bought the car but I don't want to take any chances so I replaced the u-joints with a heavy-duty set from Moog.
Mid-October marks the 5-year anniversary of buying this car so I've set myself a goal of having it finished and driveable by Thanksgiving, which gives me approximately 10 weeks. I made a timeline with dates of when certain things need to be started and done, and judging by that I think I can actually make it happen.
This isn't like one of those stupid reality shows where they mumble "The owner's gonna be pretty pissed if we don't get this done in time," then proceed to send up showers of sparks from a cheap grinder.
Stay tuned.
August 30th, 2020
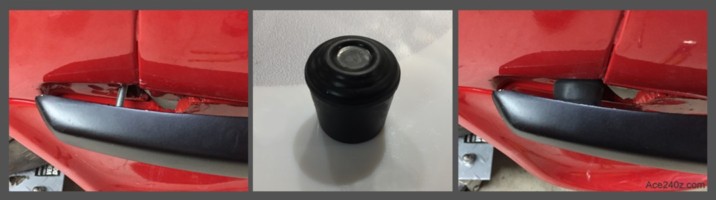 The front bumper took hours to get mounted.
There was a lot of tweaking and bending and cussing before it fit right. There are bolts at each end that attach to the body to keep the bumper level. I didn't like the way the bare bolts looked so I found some rubber cups (used at the bottom of chair legs) and did some trimming and the result looks like something from the factory.
The front bumper took hours to get mounted.
There was a lot of tweaking and bending and cussing before it fit right. There are bolts at each end that attach to the body to keep the bumper level. I didn't like the way the bare bolts looked so I found some rubber cups (used at the bottom of chair legs) and did some trimming and the result looks like something from the factory.
August 9th, 2020
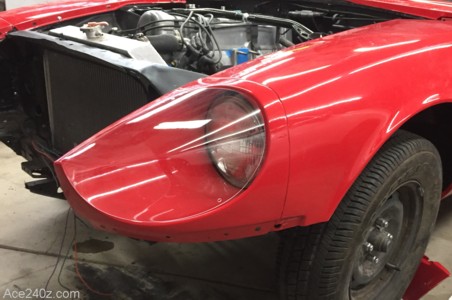 The front fenders are finally in place.
As I've said before, the car fights me every step of the way. These are the fenders that came with it but they're not the original ones from the factory - there's too much evidence of crash damage underneath. They might not even be the second set. I don't think the various bodyshops did their best work because not all of the holes lined up. This one was on & off a dozen times before it fit right, and even with that I had to do some bending and tweaking to get the headlight buckets in place. The other fender wasn't as bad but it sure wan't perfect. The pair took about 5 hours, plus a couple trips to the hardware store for bolts and screws.
By contrast, the headlight covers took almost no time and look great.
The front fenders are finally in place.
As I've said before, the car fights me every step of the way. These are the fenders that came with it but they're not the original ones from the factory - there's too much evidence of crash damage underneath. They might not even be the second set. I don't think the various bodyshops did their best work because not all of the holes lined up. This one was on & off a dozen times before it fit right, and even with that I had to do some bending and tweaking to get the headlight buckets in place. The other fender wasn't as bad but it sure wan't perfect. The pair took about 5 hours, plus a couple trips to the hardware store for bolts and screws.
By contrast, the headlight covers took almost no time and look great.
August 4th, 2020
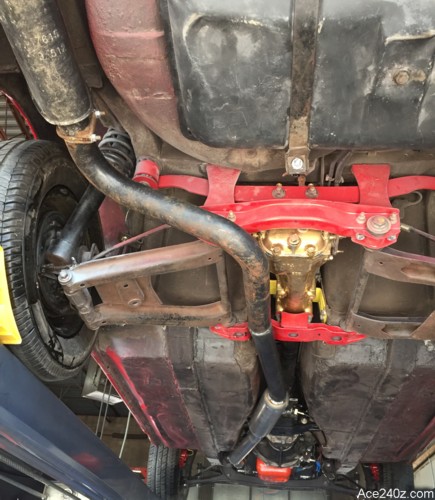 The exhaust system is done.
A few years back I bought a nice kit with a muffler and mandrel-bent pipes. A friend and I hung it underneath as best we could in order to pass the vehicle inspection required to replace the lost title. With that done, it was removed and sat in the weeds behind my shed for about three years.
During that time I replaced the original 6-into-1 header with a 3-into-2 header, which meant I now needed a y-pipe to connect the two outlets from the header to the single-pipe exhaust, and that's something beyond my skills.
I found a local shop that could not only fabricate the y-pipe, they also added a resonator and hung everything into place nice & tight and welded it all together. It has a little surface rust but it fits great and I'll bet it's going to sound terrific.
The hard part, as always, is the cost. $185 for the original kit, another $400 for the shop... and $99 each way for towing, resulting in a grand total of $774. Ouch.
As of today, the official cost for the car is $20,314.05.
The exhaust system is done.
A few years back I bought a nice kit with a muffler and mandrel-bent pipes. A friend and I hung it underneath as best we could in order to pass the vehicle inspection required to replace the lost title. With that done, it was removed and sat in the weeds behind my shed for about three years.
During that time I replaced the original 6-into-1 header with a 3-into-2 header, which meant I now needed a y-pipe to connect the two outlets from the header to the single-pipe exhaust, and that's something beyond my skills.
I found a local shop that could not only fabricate the y-pipe, they also added a resonator and hung everything into place nice & tight and welded it all together. It has a little surface rust but it fits great and I'll bet it's going to sound terrific.
The hard part, as always, is the cost. $185 for the original kit, another $400 for the shop... and $99 each way for towing, resulting in a grand total of $774. Ouch.
As of today, the official cost for the car is $20,314.05.
July 31st, 2020
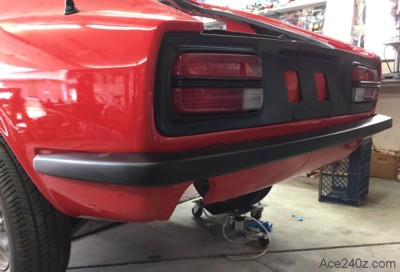 Stock bumpers look good when they're not bent and the chrome is still shiney. Mine were pretty straight but the surface was rusty and I don't like the overriders, so last year I spent a day and turned the bumpers into something custom.
You can buy bumpers that have already been smoothed and painted, but they're not cheap, so I added a page to show how you can do it yourself and save some cash.
Here's a link to the Build Page. Click on "Custom Bumpers" to check it out.
Stock bumpers look good when they're not bent and the chrome is still shiney. Mine were pretty straight but the surface was rusty and I don't like the overriders, so last year I spent a day and turned the bumpers into something custom.
You can buy bumpers that have already been smoothed and painted, but they're not cheap, so I added a page to show how you can do it yourself and save some cash.
Here's a link to the Build Page. Click on "Custom Bumpers" to check it out.
July 26th, 2020
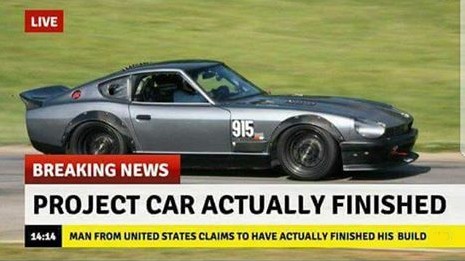 Unfortunately, that's not mine.
Big addition to the site. Go back the home page and click on "Easy Upgrades" to see some great upgrades for your Z that are cheap and easy to do, complete with with instructions. These are just a start - more will be added in the future.
If you know of any other easy upgrades, email me and I'll add them to the next update.
Unfortunately, that's not mine.
Big addition to the site. Go back the home page and click on "Easy Upgrades" to see some great upgrades for your Z that are cheap and easy to do, complete with with instructions. These are just a start - more will be added in the future.
If you know of any other easy upgrades, email me and I'll add them to the next update.
June 29th, 2020
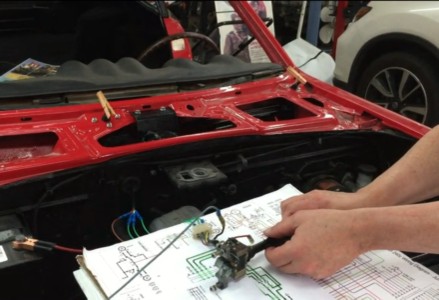 I finally finished the Honda Civic wiper motor upgrade. It was well worth the time and effort. You can replace just the motor about $25 or restore the entire mechanism for about $75 which is pretty cheap for something that will be trouble-free for decades.
I temporarily connected it to a spare switch for a quick test and put clothespins on the shafts to make sure it moves in the right direction. Low speed, high speed, and it parks in the right spot. What a thrill.
Click here to see how it's done.
I finally finished the Honda Civic wiper motor upgrade. It was well worth the time and effort. You can replace just the motor about $25 or restore the entire mechanism for about $75 which is pretty cheap for something that will be trouble-free for decades.
I temporarily connected it to a spare switch for a quick test and put clothespins on the shafts to make sure it moves in the right direction. Low speed, high speed, and it parks in the right spot. What a thrill.
Click here to see how it's done.
June 21st, 2020
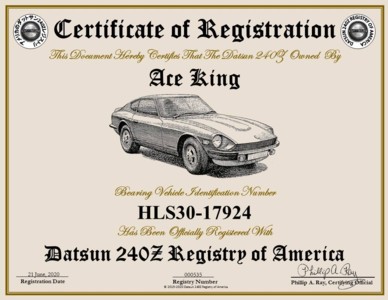 I'm not certain what the benefits are for being part of the registry, but the certificate looks pretty cool.
June 7th, 2020
 Finally got the front fenders back on after a year of collecting dust.
May 23rd, 2020
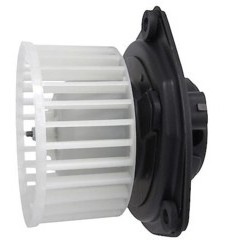 I did the Honda Civic heater blower swap. It's seriously the easiest upgrade ever, and you can buy one brand-new for $38.
Clip the wires off the stock motor and remove the three screws that hold it in place. The new motor bolts in without any modifications. Attach the wires (making sure the motor spins the right way) and you're done!
More air, less power and it's quieter. How can you say no?
Click the pic to see a little video.
I did the Honda Civic heater blower swap. It's seriously the easiest upgrade ever, and you can buy one brand-new for $38.
Clip the wires off the stock motor and remove the three screws that hold it in place. The new motor bolts in without any modifications. Attach the wires (making sure the motor spins the right way) and you're done!
More air, less power and it's quieter. How can you say no?
Click the pic to see a little video.
May 13th, 2020
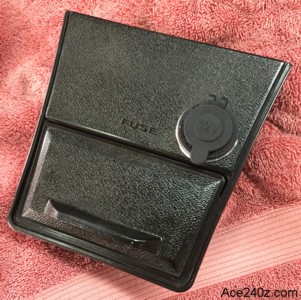 I replaced the broken cigarette lighter with a marine-grade 12v port, suitable for a GPS or USB adapter.
Not really exciting, but every little bit helps and it looks better than an empty hole.
I replaced the broken cigarette lighter with a marine-grade 12v port, suitable for a GPS or USB adapter.
Not really exciting, but every little bit helps and it looks better than an empty hole.
May 8th, 2020
 Just trying to keep my sense of humor during a horrible time.
May 3rd, 2020
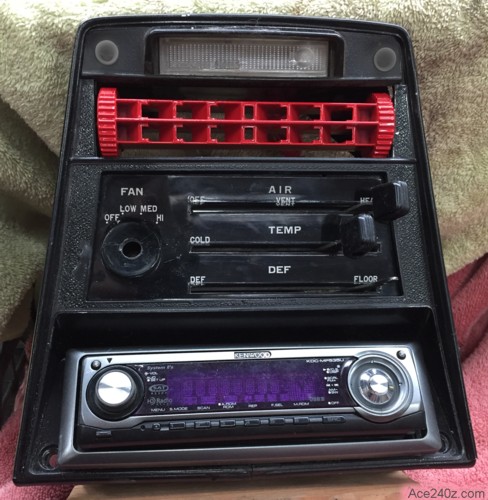 It's missing one of the slider tabs, but otherwise the console is ready to go.
Like so many other things on this car, it's a mix-and-match from different years. The frame itself needed some epoxy to put the pieces back together. I think the cover plate for the heater controls is from a later year but with a few dabs of hot glue it fits ok. The stereo is the only digital thing in an analog car, and the face needed some careful triming but it isn't as crooked as it looks. The air vent was painted years ago and has been collecting dust on a shelf since then. The map light actually works, which is a rarity. The controls themselves were cleaned and lubricated and the cables slide pretty easily.
I took a lot of pictures when it came apart so hopefully it'll go back together easily.
It's missing one of the slider tabs, but otherwise the console is ready to go.
Like so many other things on this car, it's a mix-and-match from different years. The frame itself needed some epoxy to put the pieces back together. I think the cover plate for the heater controls is from a later year but with a few dabs of hot glue it fits ok. The stereo is the only digital thing in an analog car, and the face needed some careful triming but it isn't as crooked as it looks. The air vent was painted years ago and has been collecting dust on a shelf since then. The map light actually works, which is a rarity. The controls themselves were cleaned and lubricated and the cables slide pretty easily.
I took a lot of pictures when it came apart so hopefully it'll go back together easily.
I want to take a moment to say THANKS to everyone who've sent advice and suggestions and comments over the years. I truly appreciate it. If you have any questions, please feel free to ask. I'm happy to help.
April 22nd, 2020
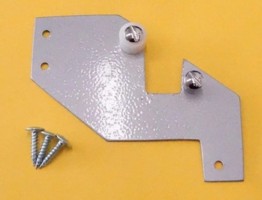 The choke lever mechanism for early Z-cars is mounted to the plastic center console. As the car ages, the cables get a little tougher to move, which often leads to the plastic breaking apart. A neat solution is an adapter plate that mounts the lever mechanism on the tunnel. I bought one a few years ago but in my ignorance paid no attention to the fact it only works for a '72 and above.
The mechanism that came with my car is for a '72 but even with the adapter it won't work. Making things even worse, the adapter itself is defective - the holes are slightly off. Damn.
The only solution is to use the stock mechanism and I was luck enough to find one on eBay for a very reasonable price. I'll sell the other mechanism but the $38 adapter plate was tossed in the trash because I'm not going to resell something I know is crap.
The choke lever mechanism for early Z-cars is mounted to the plastic center console. As the car ages, the cables get a little tougher to move, which often leads to the plastic breaking apart. A neat solution is an adapter plate that mounts the lever mechanism on the tunnel. I bought one a few years ago but in my ignorance paid no attention to the fact it only works for a '72 and above.
The mechanism that came with my car is for a '72 but even with the adapter it won't work. Making things even worse, the adapter itself is defective - the holes are slightly off. Damn.
The only solution is to use the stock mechanism and I was luck enough to find one on eBay for a very reasonable price. I'll sell the other mechanism but the $38 adapter plate was tossed in the trash because I'm not going to resell something I know is crap.
April 17th, 2020
 Nissan is supposedly coming out with a new Z featuring a longer hood to "pay tribute" to the 240z.
Good luck on that.
Nissan is supposedly coming out with a new Z featuring a longer hood to "pay tribute" to the 240z.
Good luck on that.
April 11th, 2020
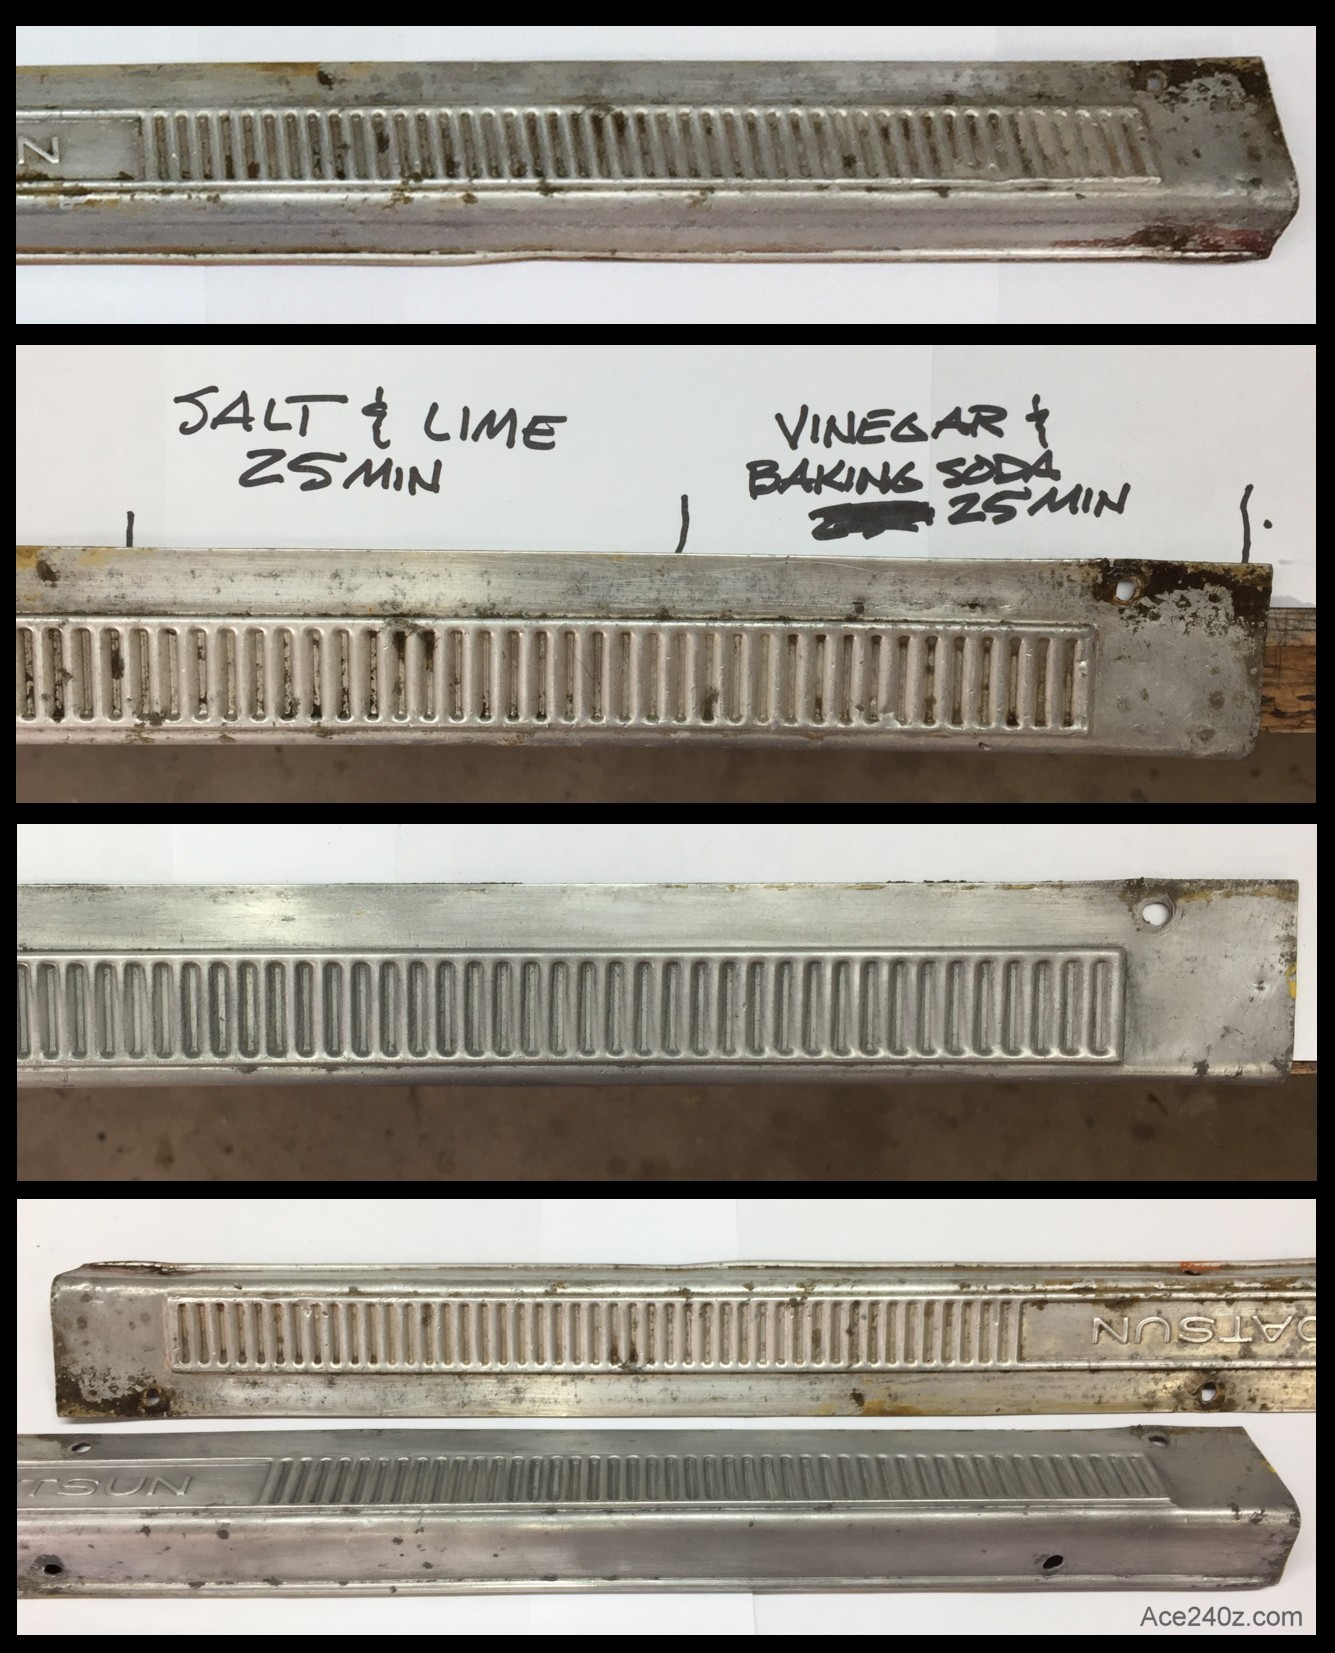 The 50-year-old door thresholds are made from aluminum and have suffered over the years. The surfaces were corroded, pitted and scratched. I considered black powder-coating but first I tried a few cleaning methods.
I started with a vigorous scrubbing using steel wool and dishwashing liquid. It got rid of the surface dirt but nothing else. Next I tried a pair of "traditional" methods. One was salt mixed with lime juice and the other was baking soda and white vinegar. I let that soak for about 25 minutes, then attacked it with a green kitchen scrubber. As I'd expected, the results weren't that great.
Fifteen seconds of glass-bead blasting took out everything. Look at the difference. An application of aluminum polish will make it glow. Grandma would be jealous.
Click to see a larger version.
The 50-year-old door thresholds are made from aluminum and have suffered over the years. The surfaces were corroded, pitted and scratched. I considered black powder-coating but first I tried a few cleaning methods.
I started with a vigorous scrubbing using steel wool and dishwashing liquid. It got rid of the surface dirt but nothing else. Next I tried a pair of "traditional" methods. One was salt mixed with lime juice and the other was baking soda and white vinegar. I let that soak for about 25 minutes, then attacked it with a green kitchen scrubber. As I'd expected, the results weren't that great.
Fifteen seconds of glass-bead blasting took out everything. Look at the difference. An application of aluminum polish will make it glow. Grandma would be jealous.
Click to see a larger version.
April 9th, 2020
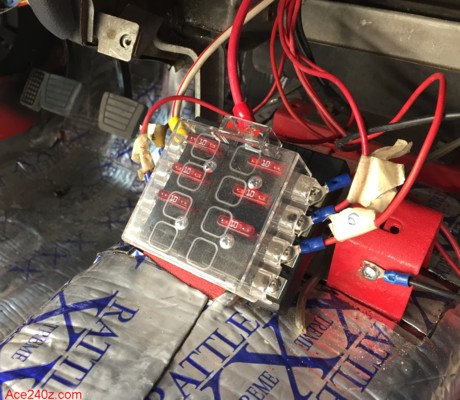 Here's the upgraded fuse box. The original had suffered the typical melting damage caused by corroded connections. This one has 8 circuits but I'm only using 6, and with 10A fuses as a starting point. It's about the same size as the stock box but without the fat cable.
With that installed, the car actually has power. If I had headlights connected, I could light 'em up, and I could honk the horn if it was connected, and so on.
The ignition key and the stereo are wired directly to power. When the key is turned, it energizes a 70A relay that provides power to everything else. One of the advantages of doing it that way is the headlights will turn off when the key is removed, something the car originally couldn't do. It also makes the car a little harder to steal.
At the upper-left of the box is a 12ga white wire with a red stripe. It takes power directly from the fuse box and out to the headlights thru a pair of relays. No more dim lights and it makes for an easy upgrade to brighter units in the future.
If you look beyond the box, you can see new rubber pads on the pedals.
Here's the upgraded fuse box. The original had suffered the typical melting damage caused by corroded connections. This one has 8 circuits but I'm only using 6, and with 10A fuses as a starting point. It's about the same size as the stock box but without the fat cable.
With that installed, the car actually has power. If I had headlights connected, I could light 'em up, and I could honk the horn if it was connected, and so on.
The ignition key and the stereo are wired directly to power. When the key is turned, it energizes a 70A relay that provides power to everything else. One of the advantages of doing it that way is the headlights will turn off when the key is removed, something the car originally couldn't do. It also makes the car a little harder to steal.
At the upper-left of the box is a 12ga white wire with a red stripe. It takes power directly from the fuse box and out to the headlights thru a pair of relays. No more dim lights and it makes for an easy upgrade to brighter units in the future.
If you look beyond the box, you can see new rubber pads on the pedals.
April 4th, 2020
 I neeeded a hose for the brake booster but the cheapest replacement was about $100. It has several bends and a twist for a nice, tight fit. I tried using a piece of ordinary fuel hose but it flopped around and looked awful.
After doing some poking around online, I found a site where a guy used 1/4" copper tubing inside the fuel line to make the bends. Pretty clever. Naturally, I had to try it myself and it worked pretty good. It's not as perfect as the stock one but good enough for my needs. It holds its shape and keeps it away from other parts and doesn't flop around like the hose by itself did.
There are actually two hoses, with a check valve in the middle. Both hoses together (with shipping) are $155 but I made mine for just $20, which is a huge savings.
You can see how I did it here
I neeeded a hose for the brake booster but the cheapest replacement was about $100. It has several bends and a twist for a nice, tight fit. I tried using a piece of ordinary fuel hose but it flopped around and looked awful.
After doing some poking around online, I found a site where a guy used 1/4" copper tubing inside the fuel line to make the bends. Pretty clever. Naturally, I had to try it myself and it worked pretty good. It's not as perfect as the stock one but good enough for my needs. It holds its shape and keeps it away from other parts and doesn't flop around like the hose by itself did.
There are actually two hoses, with a check valve in the middle. Both hoses together (with shipping) are $155 but I made mine for just $20, which is a huge savings.
You can see how I did it here
March 31st, 2020
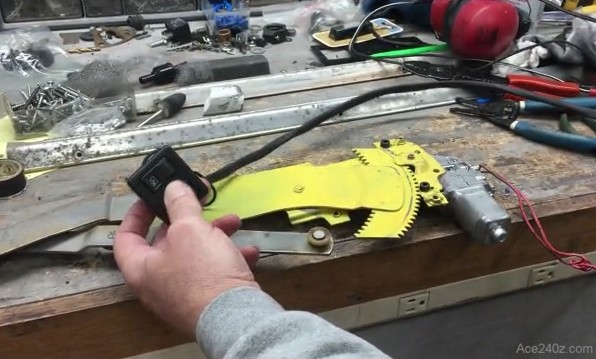 I've been working on the power windows using motors from a Honda Civic. There are some aftermarket kits which are relatively easy to install but this is a lot cheaper and I think it'll work better in the long run. The spur gear on the motor is the same size and pitch as the spur gear on the hand crank. Replace one with the other and you'll have power windows.
I temporarily wired the switch to a motor just to see if it worked. Success. Click the pic to watch. The switch itself got mounted on the center console and looks stock.
When the doors are finished I'll make a page to show the details of how it was done.
I've been working on the power windows using motors from a Honda Civic. There are some aftermarket kits which are relatively easy to install but this is a lot cheaper and I think it'll work better in the long run. The spur gear on the motor is the same size and pitch as the spur gear on the hand crank. Replace one with the other and you'll have power windows.
I temporarily wired the switch to a motor just to see if it worked. Success. Click the pic to watch. The switch itself got mounted on the center console and looks stock.
When the doors are finished I'll make a page to show the details of how it was done.
March 25th, 2020
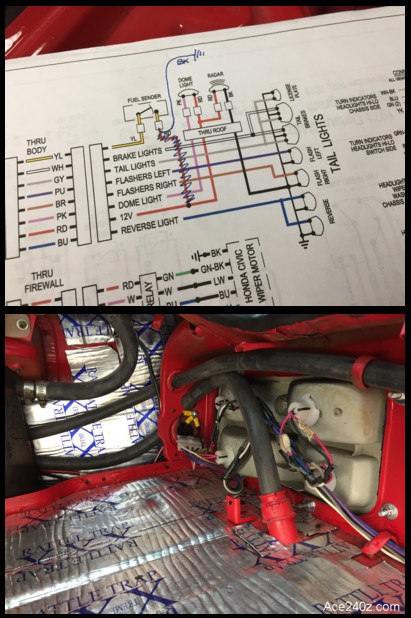 I made a little mistake the way I'd wired the fuel tank sensor. It took a few minutes to figure out the problem, about five seconds of scribbling on the diagram, and nearly an hour to make the actual change.
Somehow it was connected to power on both sides of the guage. Off came a few pieces of plastic, the offending wire was found and replaced, some heat-shrink tubing got added, everything was reconnected, the plastic popped back into place, and finally it was time for a cold beer.
I sure hope I got it right. It'll be a few months before I know for sure.
I made a little mistake the way I'd wired the fuel tank sensor. It took a few minutes to figure out the problem, about five seconds of scribbling on the diagram, and nearly an hour to make the actual change.
Somehow it was connected to power on both sides of the guage. Off came a few pieces of plastic, the offending wire was found and replaced, some heat-shrink tubing got added, everything was reconnected, the plastic popped back into place, and finally it was time for a cold beer.
I sure hope I got it right. It'll be a few months before I know for sure.
March 19th, 2020
 Got the fuel system finished.
Yeah, not the most exciting thing but definitely an important one. The hoses have to carry fuel for the engine without leaking and catching fire. I've seen cars on fire. It wasn't pretty.
You have to buy the right size hoses (three different diameters) and ten clamps. The fuel tank needs two different hoses and four more clamps. The pump needed a gasket. The filter is new. The fuel level sender needed new connectors. A bracket had to be painted. It never ends.
Part of the reason I'm showing this pic is because I wasn't sure how the hoses were routed and couldn't find anything that showed it. Hopefully this'll help somebody.
Got the fuel system finished.
Yeah, not the most exciting thing but definitely an important one. The hoses have to carry fuel for the engine without leaking and catching fire. I've seen cars on fire. It wasn't pretty.
You have to buy the right size hoses (three different diameters) and ten clamps. The fuel tank needs two different hoses and four more clamps. The pump needed a gasket. The filter is new. The fuel level sender needed new connectors. A bracket had to be painted. It never ends.
Part of the reason I'm showing this pic is because I wasn't sure how the hoses were routed and couldn't find anything that showed it. Hopefully this'll help somebody.
March 17th, 2020
 Out of morbid curiosity, I poked my endoscope down the intake manifolds and found this.
It seems the inside diameter of the manifold is slightly larger than the inside diameter of the head's ports. The result is a little ledge that blocks a tiny amount of airflow, which leads to turbulence, which in turn reduces power. Multiple that little ledge times six cylinders and the loss is probably 2-3 horsepower. If the exhaust ports are mismatched, subtract another 2-3.
Depending on who you listen to, a stock 240z produces anywhere from 130-160hp. For a car that weighs just 2300 pounds, 130hp isn't bad but having another 10hp wouldn't hurt.
Unfortunately, it's too late. The only way to smooth out that ledge is to take the engine apart and do some grinding and smoothing, which isn't going to happen. When I build the 3.0 replacement engine I can eliminate that sort of irritation but in the meantime I'll be happy with what I have.
Out of morbid curiosity, I poked my endoscope down the intake manifolds and found this.
It seems the inside diameter of the manifold is slightly larger than the inside diameter of the head's ports. The result is a little ledge that blocks a tiny amount of airflow, which leads to turbulence, which in turn reduces power. Multiple that little ledge times six cylinders and the loss is probably 2-3 horsepower. If the exhaust ports are mismatched, subtract another 2-3.
Depending on who you listen to, a stock 240z produces anywhere from 130-160hp. For a car that weighs just 2300 pounds, 130hp isn't bad but having another 10hp wouldn't hurt.
Unfortunately, it's too late. The only way to smooth out that ledge is to take the engine apart and do some grinding and smoothing, which isn't going to happen. When I build the 3.0 replacement engine I can eliminate that sort of irritation but in the meantime I'll be happy with what I have.
March 13th, 2020
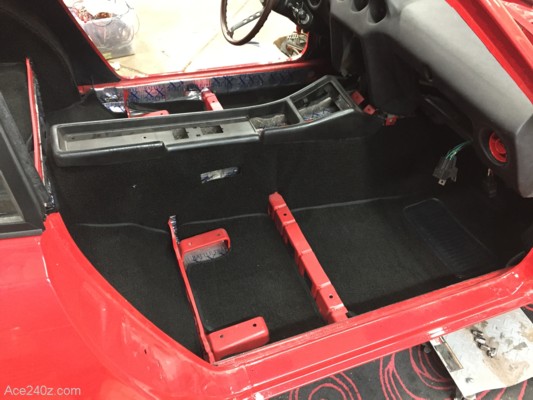 I did a test fit of the front carpet and it looks great. I bought it several years ago, so it's about time I checked.
Like in the rear, I replaced the cheap-looking diamond print vinyl with more carpet. On the driver's side is a piece of vinyl beneath the pedals to protect the carpet from your heels. For just $10 the manufacturer added the same piece to the passenger side. Makes sense to me. Total cost for the carpet (with shipping) was just $220, which is a fraction of what an upholsterer would charge. It even came with a can of spray adhesive.
I've done a few kits before and this one shouldn't take more than a couple of hours. Like anything, the key to a good fit is taking your time. The various pieces get trimmed, then glued into place. I've found the sections beneath your feet will hold better with a couple of little screws at the corners.
The carpet went right back in the box. It'll be one of the last things installed.
I did a test fit of the front carpet and it looks great. I bought it several years ago, so it's about time I checked.
Like in the rear, I replaced the cheap-looking diamond print vinyl with more carpet. On the driver's side is a piece of vinyl beneath the pedals to protect the carpet from your heels. For just $10 the manufacturer added the same piece to the passenger side. Makes sense to me. Total cost for the carpet (with shipping) was just $220, which is a fraction of what an upholsterer would charge. It even came with a can of spray adhesive.
I've done a few kits before and this one shouldn't take more than a couple of hours. Like anything, the key to a good fit is taking your time. The various pieces get trimmed, then glued into place. I've found the sections beneath your feet will hold better with a couple of little screws at the corners.
The carpet went right back in the box. It'll be one of the last things installed.
March 7th, 2020
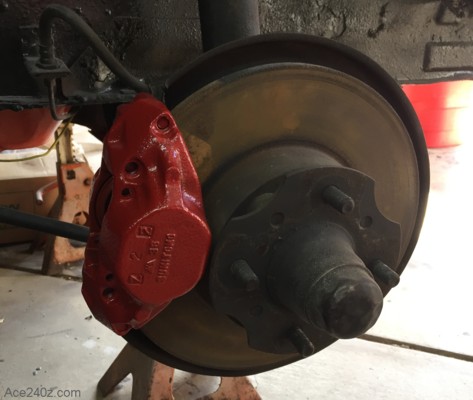 Few things say "budget build" as clearly as stock calipers painted red.
I thought I could get away with cracking the original calipers open and replacing the o-rings, but it turned out to be easier to buy a pair of remanufactured ones. I give them a quick spray of paint to kinda-sorta make them look professional instead of passive but it was really a waste of time because they'll never be seen behind the hubcaps.
I bought new hardline tubing and fittings because the hexes on the old fittings were so worn I had to use vise-grips. At the rear the stock '71 cylinders were insanely expensive, so I used ones for a '72. They bolt right in but the hardlines had to be bent a little bit. Despite several tries they never sealed completely. They do now.
A popular bolt-on upgrade is dual-piston calipers from a '79-'84 Toyota 4x4 pickup. The only modification needed is trimming the dust plate, and a larger master cylinder is advisable. However, for street use the stock calipers work fine. I was able to lock up the front wheels with my '72 so for me they're plenty strong.
Few things say "budget build" as clearly as stock calipers painted red.
I thought I could get away with cracking the original calipers open and replacing the o-rings, but it turned out to be easier to buy a pair of remanufactured ones. I give them a quick spray of paint to kinda-sorta make them look professional instead of passive but it was really a waste of time because they'll never be seen behind the hubcaps.
I bought new hardline tubing and fittings because the hexes on the old fittings were so worn I had to use vise-grips. At the rear the stock '71 cylinders were insanely expensive, so I used ones for a '72. They bolt right in but the hardlines had to be bent a little bit. Despite several tries they never sealed completely. They do now.
A popular bolt-on upgrade is dual-piston calipers from a '79-'84 Toyota 4x4 pickup. The only modification needed is trimming the dust plate, and a larger master cylinder is advisable. However, for street use the stock calipers work fine. I was able to lock up the front wheels with my '72 so for me they're plenty strong.
March 5th, 2020
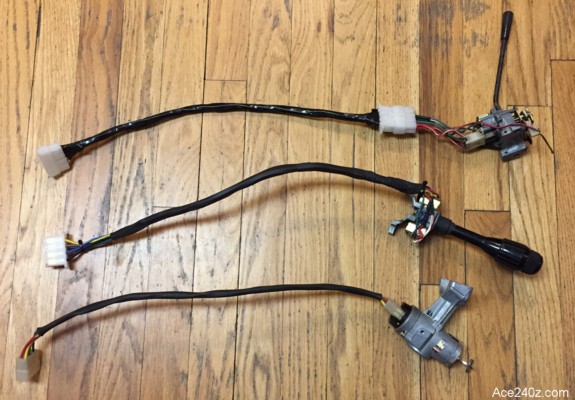 When I bought the car, the wiring was junk so I stripped it out and started from scratch and modernized the design. Part of that involved adding new connectors to the switchgear but at the time I didn't know how long the wires needed to be. Unfortunately, my estimates were wrong - they were way too short.
For the turn signal and ignition switches, I was able to make extension cables. For the headlight switch I had to cut off the connector and solder longer wires which connected to a replacement connector. It took a couple hours but I didn't really have a choice.
You can see the original wiring effort here.
When I bought the car, the wiring was junk so I stripped it out and started from scratch and modernized the design. Part of that involved adding new connectors to the switchgear but at the time I didn't know how long the wires needed to be. Unfortunately, my estimates were wrong - they were way too short.
For the turn signal and ignition switches, I was able to make extension cables. For the headlight switch I had to cut off the connector and solder longer wires which connected to a replacement connector. It took a couple hours but I didn't really have a choice.
You can see the original wiring effort here.
February 23rd, 2020
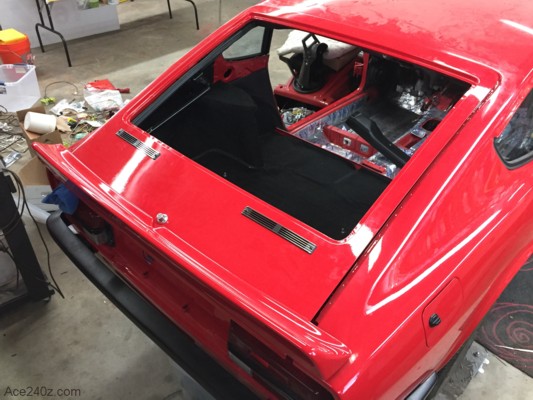 Aside from the glass, the rear hatch is fully assembled. It doesn't look complicated, but the '70-'71 cars have some ducting inside for ventilation which takes time to figure out. The chrome grilles have plastic pins that go thru the metal and hold the ducting together from behind, but they're prone to breaking. I cut the pins off and used some screws instead. Much better.
The latch mechanism and side guides were sandblasted and painted. The pushbutton assembly needed some fiddly adjustments to work properly. There's also a plastic panel that covers the ducting. If you add up all the time it was probably about 10 hours.
The engine is (mostly) wired, the fuel pump and distributor are in place, starter installed, oil and coolant have been added, battery is bolted in, various bits & pieces have been painted, and so on. Step by step, inch by inch.
Aside from the glass, the rear hatch is fully assembled. It doesn't look complicated, but the '70-'71 cars have some ducting inside for ventilation which takes time to figure out. The chrome grilles have plastic pins that go thru the metal and hold the ducting together from behind, but they're prone to breaking. I cut the pins off and used some screws instead. Much better.
The latch mechanism and side guides were sandblasted and painted. The pushbutton assembly needed some fiddly adjustments to work properly. There's also a plastic panel that covers the ducting. If you add up all the time it was probably about 10 hours.
The engine is (mostly) wired, the fuel pump and distributor are in place, starter installed, oil and coolant have been added, battery is bolted in, various bits & pieces have been painted, and so on. Step by step, inch by inch.
February 8th, 2020
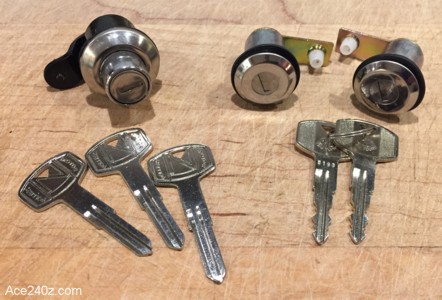 The car came with a key for the ignition but nothing else. I bought new locks for the doors but the pushbutton for the rear hatch was a problem.
I found a locksmith who was willing to make a key for the pushbutton (nobody wants to touch a 50-year-old car), then he re-keyed the door locks to match.
I bought a few blanks for the locks but the Taiwanese seller on eBay sent the wrong type. The cost of returning them was more than the refund itself. Bastard. Thankfully, the locksmith was able to find a pair and "donated" them to the project. Great guy.
The car came with a key for the ignition but nothing else. I bought new locks for the doors but the pushbutton for the rear hatch was a problem.
I found a locksmith who was willing to make a key for the pushbutton (nobody wants to touch a 50-year-old car), then he re-keyed the door locks to match.
I bought a few blanks for the locks but the Taiwanese seller on eBay sent the wrong type. The cost of returning them was more than the refund itself. Bastard. Thankfully, the locksmith was able to find a pair and "donated" them to the project. Great guy.
February 2nd, 2020
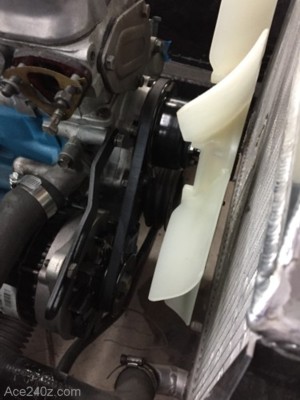 The aluminum radiator, hoses, fan, alternator and belt got installed. Sure, it's not the most exciting part of the restoration but helps move the project along a little further. The fan is slightly larger in diameter than the stock one, plus has an extra blade so it should work better. The radiator was brand-new when I bought the car.
January 29th, 2020
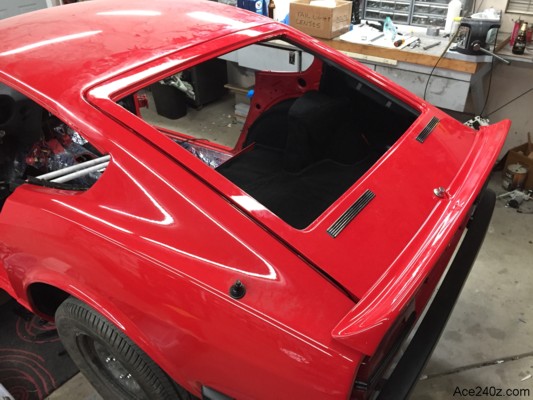 It needs some adjusting (and it's not fully assembled) but the rear hatch is back in place. The spoiler is a perfect fit. I had it painted separately in case I want to take take the spoiler off and not have a bare patch of metal left behind..
The pneumatic strut that holds the hatch up was painted and looks factory fresh. There's no key for the pushbutton, so I'll have to get one made.
It needs some adjusting (and it's not fully assembled) but the rear hatch is back in place. The spoiler is a perfect fit. I had it painted separately in case I want to take take the spoiler off and not have a bare patch of metal left behind..
The pneumatic strut that holds the hatch up was painted and looks factory fresh. There's no key for the pushbutton, so I'll have to get one made.
January 27th, 2020
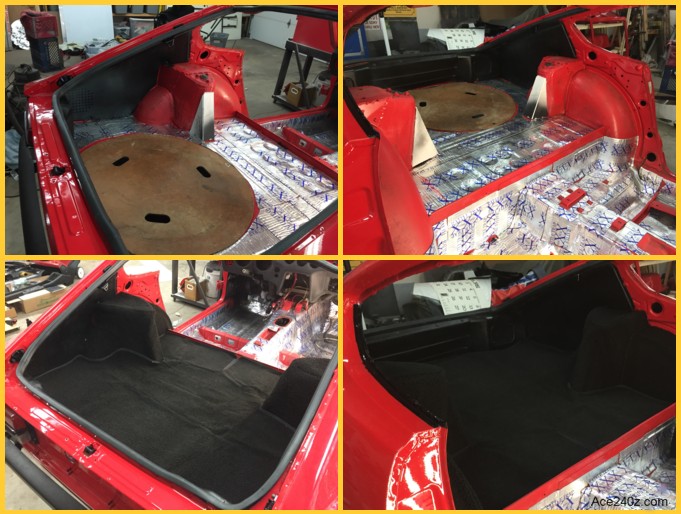 The rear half of the car is nearing completion. I replaced the diamond-print vinyl on the strut towers with carpet and I think it looks better. The bottom piece has some creases after sitting folded in a box for 4 years but they'll flatten out. It's not a professional job but the entire kit was only $250 and a couple hours of effort made it fit fairly well.
I got the hatch seal in place without making a big mess. It had to be glued in sections to keep the soft rubber from pulling out of the corners.
The rear half of the car is nearing completion. I replaced the diamond-print vinyl on the strut towers with carpet and I think it looks better. The bottom piece has some creases after sitting folded in a box for 4 years but they'll flatten out. It's not a professional job but the entire kit was only $250 and a couple hours of effort made it fit fairly well.
I got the hatch seal in place without making a big mess. It had to be glued in sections to keep the soft rubber from pulling out of the corners.
January 22nd, 2020
 At this moment, the car is 49 years old and time has taken a toll. All of the fasteners are rusty or corroded and I'm not going to put anything back together looking like that.
Every single bolt, nut, washer and sscrew gets sand blasted, cleaned, primered and painted, or simply replaced. It's a lot of boring, time-consuming stuff but it has to be done because it's too late to cut corners.
My friend Tomas came up from Santa Fe for a couple of weeks and he volunteered to do some sandblasting. It's kind-of fun watching every little bit of rust and paint and filth disappear, and I was happy to let him enjoy it. He also helped with other stuff, like the rubber seal for the rear hatch. Volunteers are encouraged to email me.
Our running joke is that bolts which can't be seen only get three coats of paint and two coats of clear.
At this moment, the car is 49 years old and time has taken a toll. All of the fasteners are rusty or corroded and I'm not going to put anything back together looking like that.
Every single bolt, nut, washer and sscrew gets sand blasted, cleaned, primered and painted, or simply replaced. It's a lot of boring, time-consuming stuff but it has to be done because it's too late to cut corners.
My friend Tomas came up from Santa Fe for a couple of weeks and he volunteered to do some sandblasting. It's kind-of fun watching every little bit of rust and paint and filth disappear, and I was happy to let him enjoy it. He also helped with other stuff, like the rubber seal for the rear hatch. Volunteers are encouraged to email me.
Our running joke is that bolts which can't be seen only get three coats of paint and two coats of clear.
January 10th, 2020
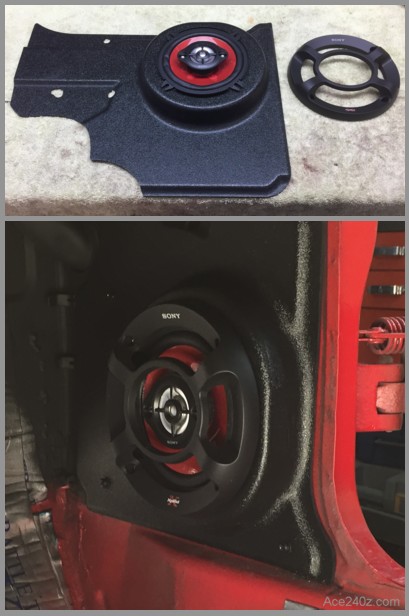 When it comes to music, most people cut holes in the door panels to mount the speakers. I found a pair of panels that hadn't been cut and I want to keep them that way. It turns out there's a good solution.
These plastic panels take the place of the cardboard ones down by your feet and have a molded bulge that's the perfect size for a 2" deep speaker. When you consider how much foot room the car has, you'll never notice a little bit is missing.
Being ever skeptical, I figured they'd need some trimming and fiddling, but they're a perfect fit and went in without any modifications aside from a couple of holes for a few screws to hold them in place. The speakers were easy to attach. It only took about half an hour from start to finish. Not bad.
I found them at Motorsport Auto and at the time of this writing they were only $95, which I consider a bargain compared to the old-fashioned alternative.
When it comes to music, most people cut holes in the door panels to mount the speakers. I found a pair of panels that hadn't been cut and I want to keep them that way. It turns out there's a good solution.
These plastic panels take the place of the cardboard ones down by your feet and have a molded bulge that's the perfect size for a 2" deep speaker. When you consider how much foot room the car has, you'll never notice a little bit is missing.
Being ever skeptical, I figured they'd need some trimming and fiddling, but they're a perfect fit and went in without any modifications aside from a couple of holes for a few screws to hold them in place. The speakers were easy to attach. It only took about half an hour from start to finish. Not bad.
I found them at Motorsport Auto and at the time of this writing they were only $95, which I consider a bargain compared to the old-fashioned alternative.
January 4th, 2020
 Money makes the world go 'round.
The original budget for this build was a mere $6000, which obviously was over-optimistic. The car itself seemed basically sound, so the plan was to clean it up, do the bodywork and paint myself, install a cheap interior, and so on, but as I'd feared the cost kept going up and up and up.
Here's an example of how such things happen. I pulled the rear suspension apart to replace the bushings but while it was on the floor I decided to add new bearings, which also meant new seals and the axle lock nuts. It needed a new clutch so the flywheel had to come off for resurfacing, and while it was apart I replaced the engine main seal, the transmission front seal and the release bearing because it was "cheaper" to do while everything was apart compared to replacing them later when it was all back together. A piece here and a piece there really starts to add up.
Years ago I built a custom cafe racer motorcycle (see it here) and have no idea how much it cost. This time I made a spreadsheet and I've been fanatical about adding everything, no matter how small. I'm pretty confident it's within $20. If you're curious, you can see a pdf of it here.
As of today, the out-of-control cost has reached a mind-boggling $19,135.49
That number only includes parts and materials that were actually used. For example, I bought a second header and some seat heaters, but they weren't installed. Some parts that came with the car were resold, which reduced my out-of-pocket costs but didn't affect the amount invested. There were tools I bought but they can be used on other projects so they didn't get included. Some odds & ends that I already had in the garage, like grease or cleaners, weren't added because they were leftovers from other projects and thus not an out-of-pocket expense. I had to rent a trailer to haul the car home, and later rent another to take it for a "certified VIN inspection" - I didn't include the cost of the trailers but did for the inspection and registration. The hosting for this website isn't free but it's not on the tally.
I estimate the final "actual cost" will be about $22k but I'll have a beautiful, iconic sports car and it'll literally be brand new.
This beauty's gonna be my daily driver and I'll love every minute of it. How do you put a price on that?
Money makes the world go 'round.
The original budget for this build was a mere $6000, which obviously was over-optimistic. The car itself seemed basically sound, so the plan was to clean it up, do the bodywork and paint myself, install a cheap interior, and so on, but as I'd feared the cost kept going up and up and up.
Here's an example of how such things happen. I pulled the rear suspension apart to replace the bushings but while it was on the floor I decided to add new bearings, which also meant new seals and the axle lock nuts. It needed a new clutch so the flywheel had to come off for resurfacing, and while it was apart I replaced the engine main seal, the transmission front seal and the release bearing because it was "cheaper" to do while everything was apart compared to replacing them later when it was all back together. A piece here and a piece there really starts to add up.
Years ago I built a custom cafe racer motorcycle (see it here) and have no idea how much it cost. This time I made a spreadsheet and I've been fanatical about adding everything, no matter how small. I'm pretty confident it's within $20. If you're curious, you can see a pdf of it here.
As of today, the out-of-control cost has reached a mind-boggling $19,135.49
That number only includes parts and materials that were actually used. For example, I bought a second header and some seat heaters, but they weren't installed. Some parts that came with the car were resold, which reduced my out-of-pocket costs but didn't affect the amount invested. There were tools I bought but they can be used on other projects so they didn't get included. Some odds & ends that I already had in the garage, like grease or cleaners, weren't added because they were leftovers from other projects and thus not an out-of-pocket expense. I had to rent a trailer to haul the car home, and later rent another to take it for a "certified VIN inspection" - I didn't include the cost of the trailers but did for the inspection and registration. The hosting for this website isn't free but it's not on the tally.
I estimate the final "actual cost" will be about $22k but I'll have a beautiful, iconic sports car and it'll literally be brand new.
This beauty's gonna be my daily driver and I'll love every minute of it. How do you put a price on that?
December 28th, 2019
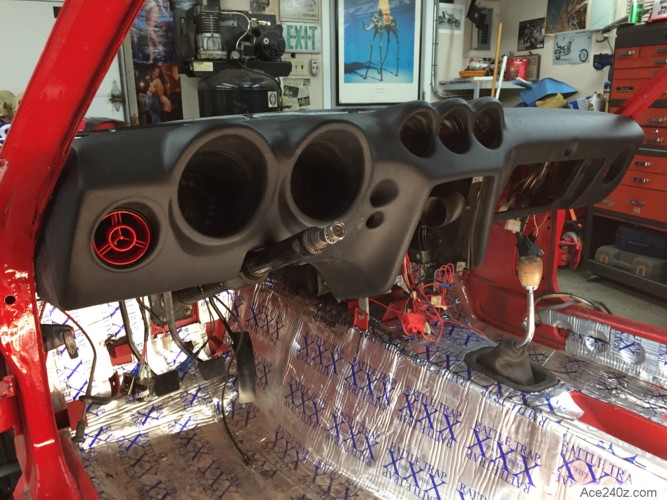 The dashboard is finally finished and installed.
When I did the new wiring, the dash was in and out of the car at least a dozen times to make sure everything fit. The guages were cleaned and I swapped out the original green bulbs for modern red. The duct hoses were patched and straightened out. The vents were cleaned and painted. I bonded a new cap over the cracked top. Underneath is the heater core and upgraded blower. The pivots for the clutch and brake pedals were greased.
There's still a lot of work remaining but at least the dash is done.
The dashboard is finally finished and installed.
When I did the new wiring, the dash was in and out of the car at least a dozen times to make sure everything fit. The guages were cleaned and I swapped out the original green bulbs for modern red. The duct hoses were patched and straightened out. The vents were cleaned and painted. I bonded a new cap over the cracked top. Underneath is the heater core and upgraded blower. The pivots for the clutch and brake pedals were greased.
There's still a lot of work remaining but at least the dash is done.
December 24th, 2019
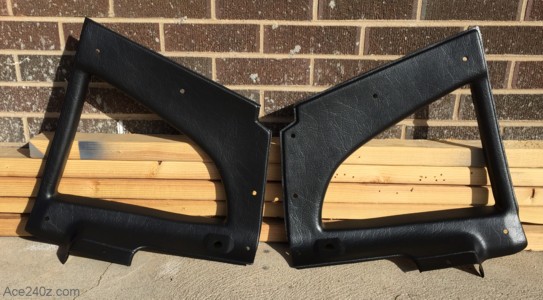 Despite my best efforts with epoxy and fiberglass and a heat gun, I couldn't repair the interior plastic for the quarter windows well enough to fit right. They looked awful. The only solution was a new reproduction set. It was a bite I hadn't expected, but that's the way it goes.
Merry Christmas to me.
Despite my best efforts with epoxy and fiberglass and a heat gun, I couldn't repair the interior plastic for the quarter windows well enough to fit right. They looked awful. The only solution was a new reproduction set. It was a bite I hadn't expected, but that's the way it goes.
Merry Christmas to me.
December 22nd, 2019
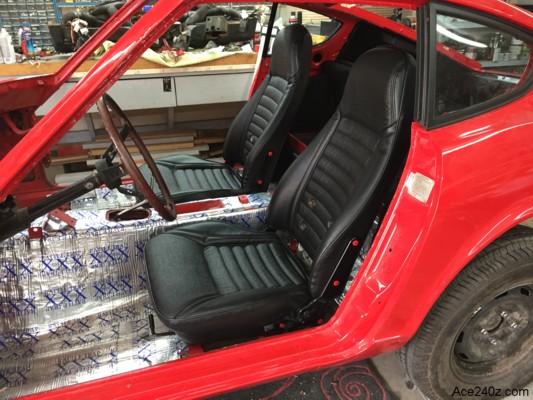 The seats that came with the car were rubbish. Some people replace theirs with racing seats, or from a Miata, but I wanted to keep mine stock.
I bought some good reproduction covers and new foam. The '70 and '71 seats have a limited amount of tilt (about 3") so I bought a pair of recliners from a later year which allows full movement forward and back. Much better.
The frames and recliners were sandblasted and painted. The bottom foam is supported by webbing which came with the covers and needed to be cut and fastened. I bought a seat heater kit but it turns out the way the seats are bolstered doesn't leave enough room.
The covers for the bottoms went on relatively easy, but I couldn't stretch the backs far enough down to pin the material in place so I reluctantly took them to an upholsterer. He said the covers are probably better quality than the originals. He also said they were a bitch to stretch and I did pretty good (for an amateur) getting them as tight as I did.
The seats that came with the car were rubbish. Some people replace theirs with racing seats, or from a Miata, but I wanted to keep mine stock.
I bought some good reproduction covers and new foam. The '70 and '71 seats have a limited amount of tilt (about 3") so I bought a pair of recliners from a later year which allows full movement forward and back. Much better.
The frames and recliners were sandblasted and painted. The bottom foam is supported by webbing which came with the covers and needed to be cut and fastened. I bought a seat heater kit but it turns out the way the seats are bolstered doesn't leave enough room.
The covers for the bottoms went on relatively easy, but I couldn't stretch the backs far enough down to pin the material in place so I reluctantly took them to an upholsterer. He said the covers are probably better quality than the originals. He also said they were a bitch to stretch and I did pretty good (for an amateur) getting them as tight as I did.
December 5th, 2019
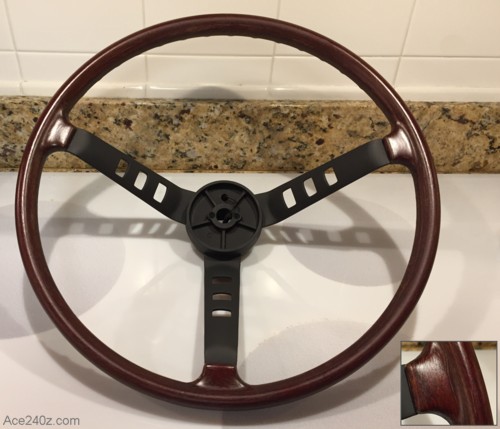 The steering wheel needed a little refreshing.
I gave the "wood" rim a scrub in the sink, then sandblasted the spokes. A few layers of flat black paint and some spar varnish made it look brand new.
It took about 2 hours of accumulated time and cost less than $20. Not bad.
The steering wheel needed a little refreshing.
I gave the "wood" rim a scrub in the sink, then sandblasted the spokes. A few layers of flat black paint and some spar varnish made it look brand new.
It took about 2 hours of accumulated time and cost less than $20. Not bad.
December 4th, 2019
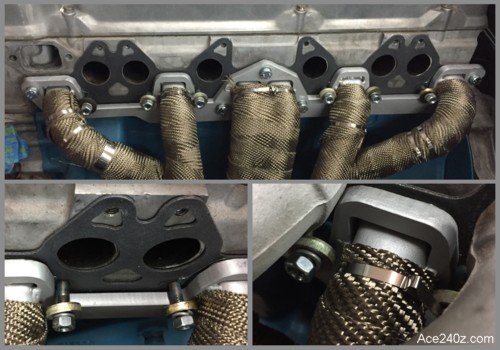 With my previous 240z, I struggled getting the intake and exhaust manifolds together. Each one bolts to the head, and between them are six studs with very fat washers that span both manifolds. It's extremely difficult to get the washers and nuts in there, but on a very old blog I learned the easy way.
Attach the exhaust manifold losely, then put the fat washers and nuts into place, also losely. Now you can slide the intake manifolds down into place and tighten everything without worrying about dropping the washers or nuts.
Of course, a couple of the nuts are tough to get at but at least they're already on the studs.
With my previous 240z, I struggled getting the intake and exhaust manifolds together. Each one bolts to the head, and between them are six studs with very fat washers that span both manifolds. It's extremely difficult to get the washers and nuts in there, but on a very old blog I learned the easy way.
Attach the exhaust manifold losely, then put the fat washers and nuts into place, also losely. Now you can slide the intake manifolds down into place and tighten everything without worrying about dropping the washers or nuts.
Of course, a couple of the nuts are tough to get at but at least they're already on the studs.
December 1st, 2019
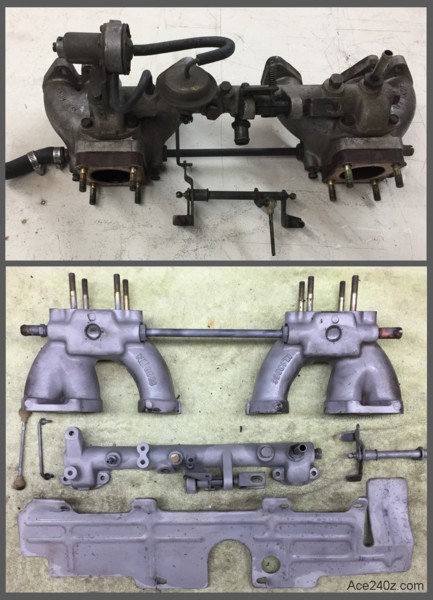 I took the intake assembly apart and sandblasted everything. What a difference.
I'm always amazed at how much stuff is available for a 48-year-old car. I found a rebuild kit for the carbs and hopefully it'll make the process (relatively) easy. I've done rebuilds before but SU carbs are a little more complicated. Cleaning and assembling them is one thing but getting them matched and synchronized is the tough part. I plan on taking the car to a dyno when it's finished and the guys there should be able to fine-tune the carbs for the best performance, or so I hope.
In between the big stuff are the little things. I sandblasted the thermostat housing, bought a new thermostat, temp sensor and gaskets. The bolts were painted black. Pretty dull stuff but it looks good and every step counts. More of the interior trim was repaired and painted. I tried gluing the rear hatch seal in place but did something wrong because it didn't stick very well. Various other parts have been cleaned and painted. The reverse switch for the transmission was installed. The alternator was bolted into place.
It seems like a never-ending list.
I took the intake assembly apart and sandblasted everything. What a difference.
I'm always amazed at how much stuff is available for a 48-year-old car. I found a rebuild kit for the carbs and hopefully it'll make the process (relatively) easy. I've done rebuilds before but SU carbs are a little more complicated. Cleaning and assembling them is one thing but getting them matched and synchronized is the tough part. I plan on taking the car to a dyno when it's finished and the guys there should be able to fine-tune the carbs for the best performance, or so I hope.
In between the big stuff are the little things. I sandblasted the thermostat housing, bought a new thermostat, temp sensor and gaskets. The bolts were painted black. Pretty dull stuff but it looks good and every step counts. More of the interior trim was repaired and painted. I tried gluing the rear hatch seal in place but did something wrong because it didn't stick very well. Various other parts have been cleaned and painted. The reverse switch for the transmission was installed. The alternator was bolted into place.
It seems like a never-ending list.
November 24th, 2019
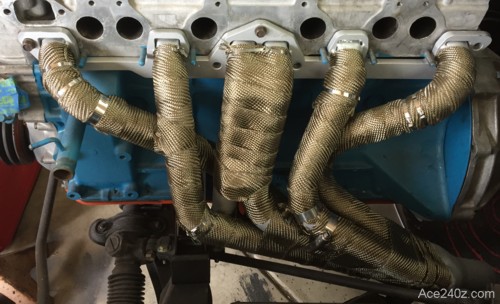 A friend came over and wrapped the header with heat tape. He's been wanting to do it for a while. It's not difficult - it just requires some time and patience.
If you look online you can find a bit of disagreement on how it should be done. Some say you need to paint the header first, while others say never. Some claim you need to soak the tape in water before wrapping it. A few people contend it's a waste of time and money.
Whether or not it increases performance, or keeps the engine bay cooler isn't really an issue because I like the way it looks. Unfortunately, once the intake manifold and carbs and air filter are installed, you won't see much of it.
A friend came over and wrapped the header with heat tape. He's been wanting to do it for a while. It's not difficult - it just requires some time and patience.
If you look online you can find a bit of disagreement on how it should be done. Some say you need to paint the header first, while others say never. Some claim you need to soak the tape in water before wrapping it. A few people contend it's a waste of time and money.
Whether or not it increases performance, or keeps the engine bay cooler isn't really an issue because I like the way it looks. Unfortunately, once the intake manifold and carbs and air filter are installed, you won't see much of it.
November 15th, 2019
After some fussing and fitting and "adjusting" the brackets with a big hammer, this is how the rear bumper turned out and I'm very pleased.
With the bumper in place I was able to install the fuel tank and vent hoses. I seriously believe it's the most difficult part of the entire car assembly. This is the third time I've installed one and I hope I never have to do it again.
Note the absence of the running lights on the fender. Nice and clean.
November 13th, 2019
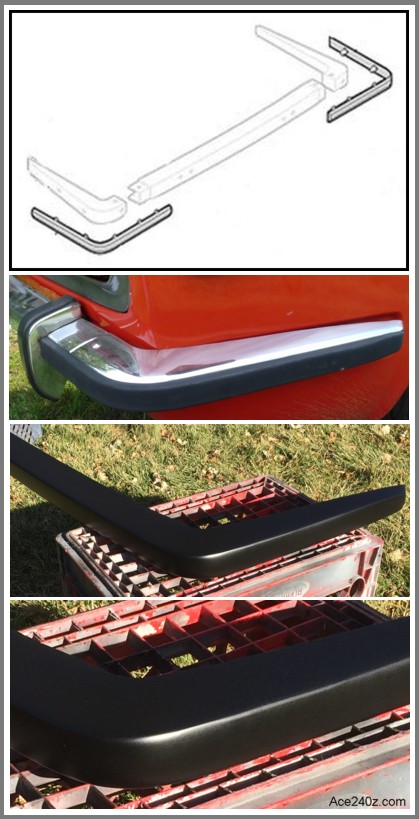 The stock 240z rear bumper is made from three pieces bolted together, along with a pair of government-mandated overriders and some rubber trim.
When they're new and the chrome is bright, they look pretty good. Definately a 70s style but I wanted a smoother, custom appearance. Getting that took some time and effort (like everything else) but well worth it.
I removed the overriders and the scraps of rubber trim, then welded the holes closed. I also welded the main pieces together. With a little grinding, some filler and several layers of satin black, they're perfect.
The bumper has to be attached to the car before the fuel tank can go in. There's a bolt holding one side of the bumper that is blocked by the fuel tank. Once the bumper gets mounted, the fuel tank can be lifted into place, which allows me to route all the vent hoses, install the carpet, pop the interior trim into place and that pretty much finishes the back half of the car.
The stock 240z rear bumper is made from three pieces bolted together, along with a pair of government-mandated overriders and some rubber trim.
When they're new and the chrome is bright, they look pretty good. Definately a 70s style but I wanted a smoother, custom appearance. Getting that took some time and effort (like everything else) but well worth it.
I removed the overriders and the scraps of rubber trim, then welded the holes closed. I also welded the main pieces together. With a little grinding, some filler and several layers of satin black, they're perfect.
The bumper has to be attached to the car before the fuel tank can go in. There's a bolt holding one side of the bumper that is blocked by the fuel tank. Once the bumper gets mounted, the fuel tank can be lifted into place, which allows me to route all the vent hoses, install the carpet, pop the interior trim into place and that pretty much finishes the back half of the car.
November 10th, 2019
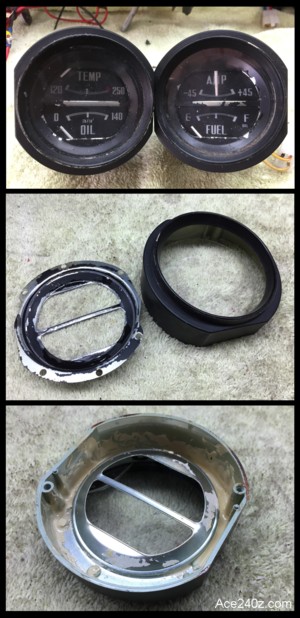 The speedometer and tach are in good shape but the small guages needed some fresh paint.
They come apart fairly easily - a couple small drops of glue hold the lens and bezel inside the cover - and now the bezel can be sanded and painted and it'll be good as new.
However... someone in the past poured glue or paint all around the inside of one. I picked at it with dental tools, tried to soften it with hot water, but nothing worked. It's ruined.
The only solution was to buy another guage. Some on eBay were $100 and up but I managed to find one for just $24. As it turned out, the gauge was for a 280z and doesn't match the others. Rat spit.
The speedometer and tach are in good shape but the small guages needed some fresh paint.
They come apart fairly easily - a couple small drops of glue hold the lens and bezel inside the cover - and now the bezel can be sanded and painted and it'll be good as new.
However... someone in the past poured glue or paint all around the inside of one. I picked at it with dental tools, tried to soften it with hot water, but nothing worked. It's ruined.
The only solution was to buy another guage. Some on eBay were $100 and up but I managed to find one for just $24. As it turned out, the gauge was for a 280z and doesn't match the others. Rat spit.
October 26th, 2019
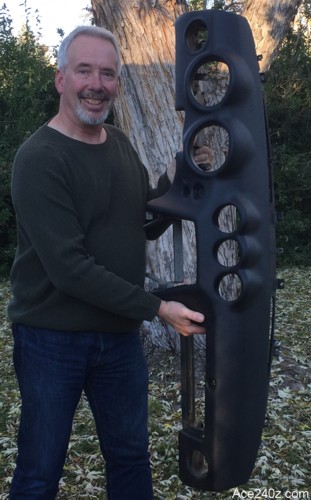 The dashboard looks brand-new. It was worth the time and effort.
The key was having the dash out and completely stripped down. I was able to sand down the high spots and give it a good scrubbing with sandpaper, then clean the whole thing down at the local spray wash. I also scuffed the inside of the plastic cover and gave it a wipe with rubbing alcohol. I wasn't taking any chances.
A friend came over and helped pull it into place, then went nuts with the clamps. The installation only took an hour but the prep was probably twice that, which is always the key to a good bond or good paint. Patience wins out.
Years ago I used a half-cap for my '72 but it wasn't great fit, mainly because I didn't do enough prep and didn't have any way to clamp it tight enough. It looked better than the original cracked dash but wasn't the best work I've done.
At the moment I'm cleaning up the guages. The wiring was done a few years ago, so everything ought to go back together pretty easily. I can't wait to see it back in the car.
I took a peek on eBay and used dashboards in "OK" condition (tiny cracks) were $400 to $500. New ones occasionally appear but they're $1000 and up. The cheapest plastic cover like mine was $122 with shipping. I think the choice is clear.
The dashboard looks brand-new. It was worth the time and effort.
The key was having the dash out and completely stripped down. I was able to sand down the high spots and give it a good scrubbing with sandpaper, then clean the whole thing down at the local spray wash. I also scuffed the inside of the plastic cover and gave it a wipe with rubbing alcohol. I wasn't taking any chances.
A friend came over and helped pull it into place, then went nuts with the clamps. The installation only took an hour but the prep was probably twice that, which is always the key to a good bond or good paint. Patience wins out.
Years ago I used a half-cap for my '72 but it wasn't great fit, mainly because I didn't do enough prep and didn't have any way to clamp it tight enough. It looked better than the original cracked dash but wasn't the best work I've done.
At the moment I'm cleaning up the guages. The wiring was done a few years ago, so everything ought to go back together pretty easily. I can't wait to see it back in the car.
I took a peek on eBay and used dashboards in "OK" condition (tiny cracks) were $400 to $500. New ones occasionally appear but they're $1000 and up. The cheapest plastic cover like mine was $122 with shipping. I think the choice is clear.
October 22nd, 2019
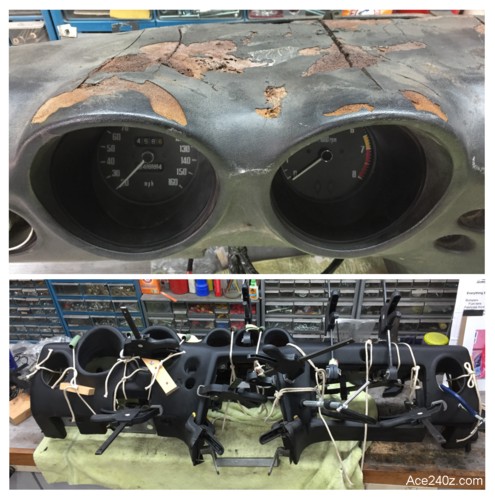 Like most cars, this dash was eaten away by 48 years of UV and hot sun. It looks horrible. A previous owner used a lot of shower caulking to glue a plastic cover over the nightmare but they did a pretty lousy job. It hung like a bad suit.
The cap I bought might not be any better quality but with two tubes of adhesive, 13 clamps and 12 tight ropes it ought to fit a lot better. I'll let it cure for a few days before pulling the clamps and stuffing it back into the car.
A few people have tried restoring the dash itself using expanding foam and textured paint but it took far more time than I wanted to spend. I think the cap will be fine and most of the people who see it will never know the difference.
Like most cars, this dash was eaten away by 48 years of UV and hot sun. It looks horrible. A previous owner used a lot of shower caulking to glue a plastic cover over the nightmare but they did a pretty lousy job. It hung like a bad suit.
The cap I bought might not be any better quality but with two tubes of adhesive, 13 clamps and 12 tight ropes it ought to fit a lot better. I'll let it cure for a few days before pulling the clamps and stuffing it back into the car.
A few people have tried restoring the dash itself using expanding foam and textured paint but it took far more time than I wanted to spend. I think the cap will be fine and most of the people who see it will never know the difference.
October 4th, 2019
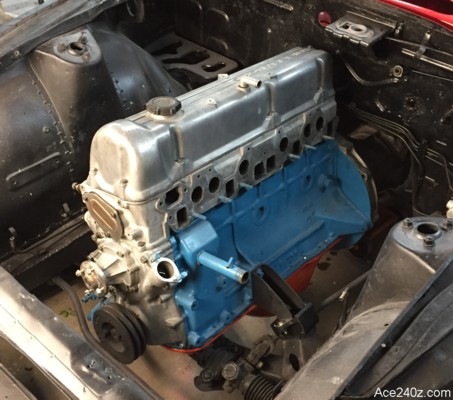 The engine is back in the car after sitting in storage for the last two years and it looks beautiful in the blacked-out bay.
The engine was recently rebuilt to stock specs. When the car is finally finished I'll take it to a local dyno to see what the actual horsepower is. Datsun claimed 160 horsepower but independent testing showed 151, which is still respectable for a 2300 pound car. I suspect here in Denver - a mile above sea level - the horsepower will be even less. Most people claim theoretical numbers but I want paperwork to prove what I have.
The engine is back in the car after sitting in storage for the last two years and it looks beautiful in the blacked-out bay.
The engine was recently rebuilt to stock specs. When the car is finally finished I'll take it to a local dyno to see what the actual horsepower is. Datsun claimed 160 horsepower but independent testing showed 151, which is still respectable for a 2300 pound car. I suspect here in Denver - a mile above sea level - the horsepower will be even less. Most people claim theoretical numbers but I want paperwork to prove what I have.
October 1st, 2019
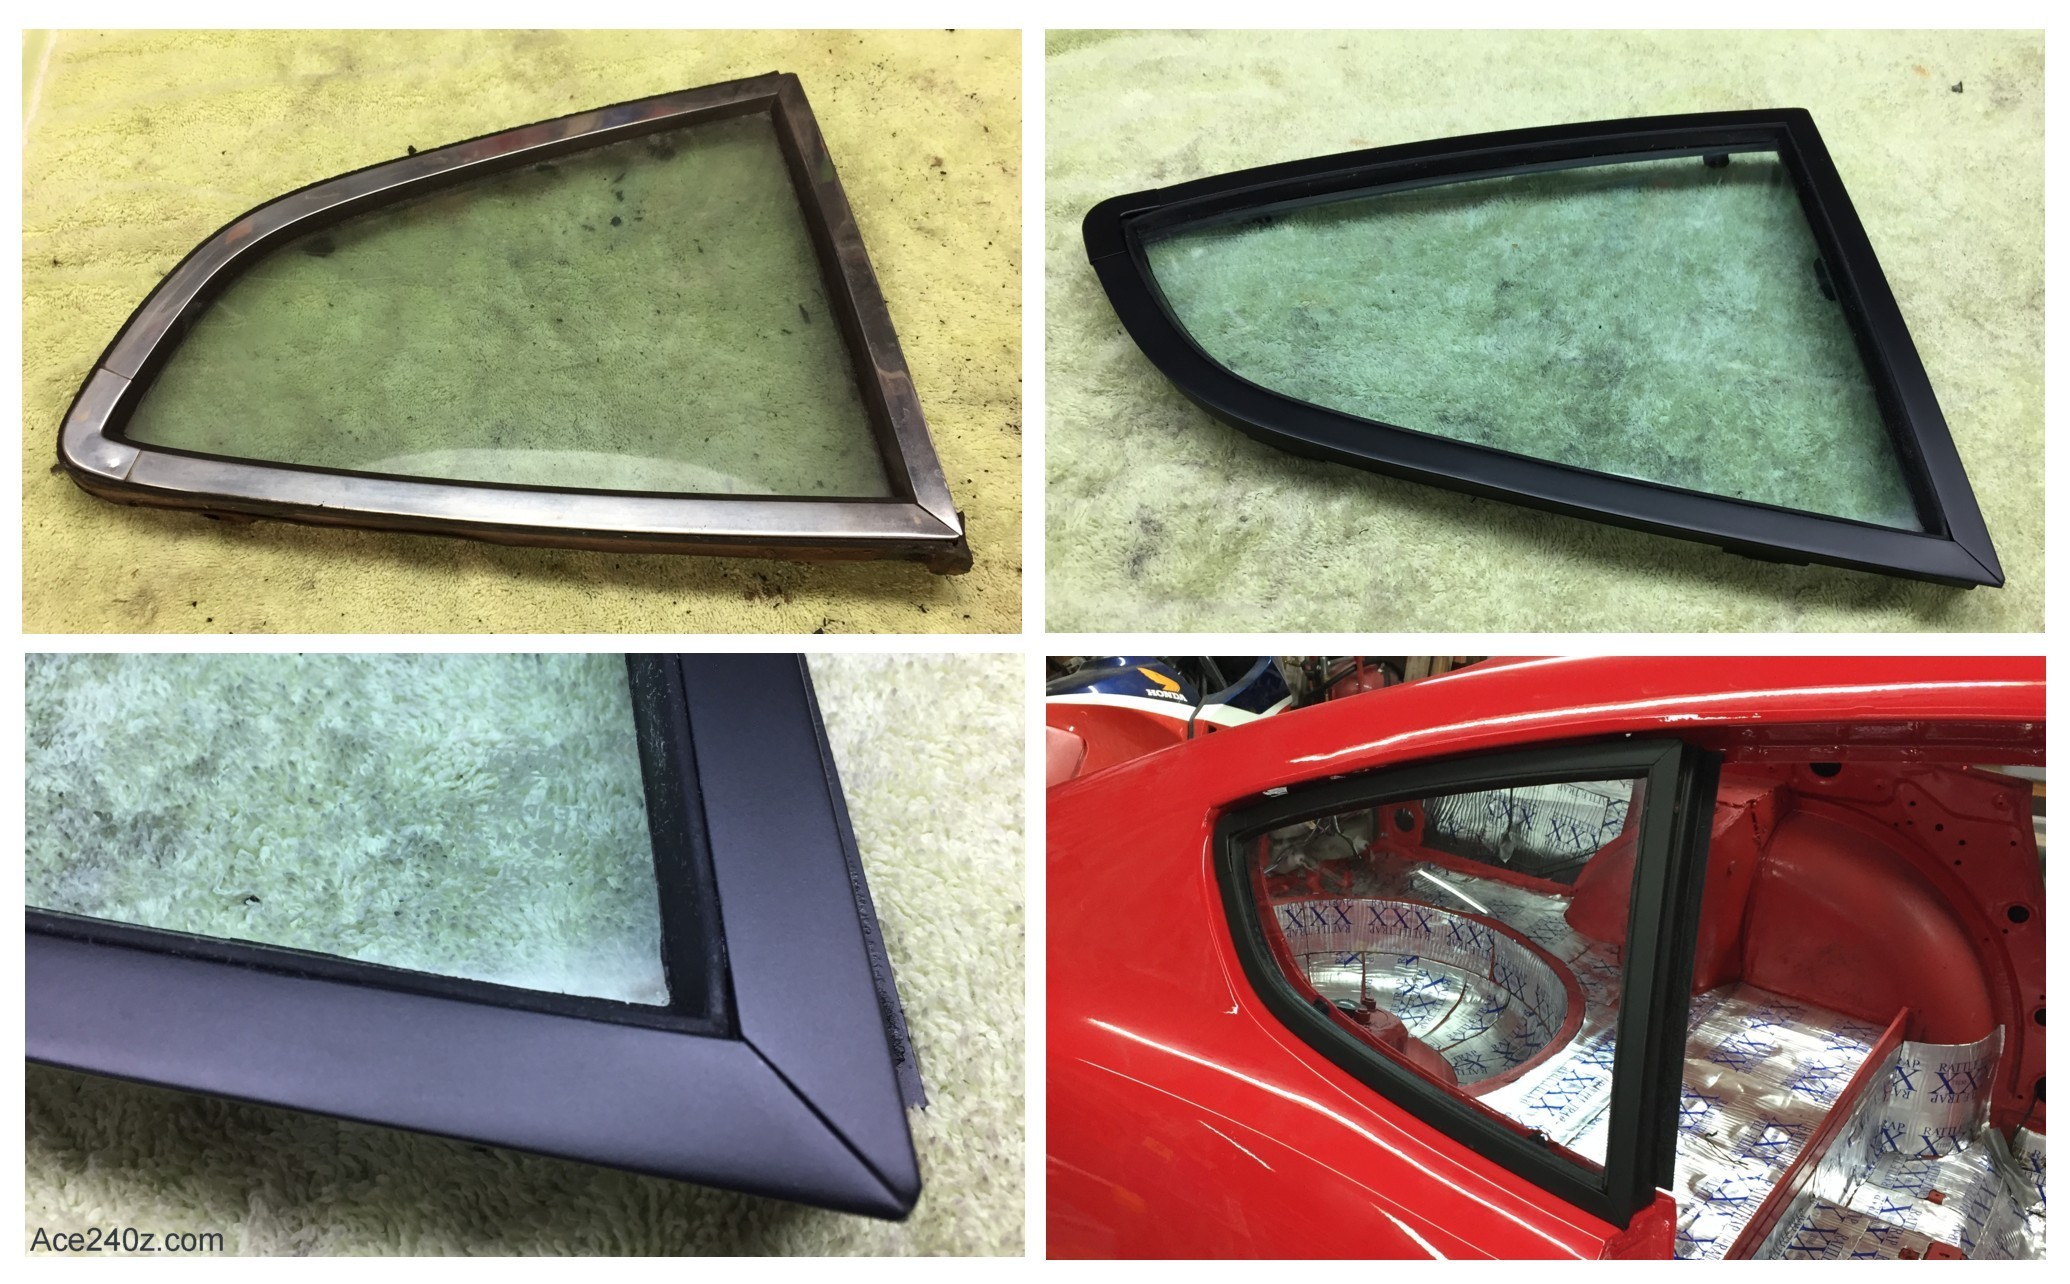 I took some time and restored the quarter windows.
The glass was fine, but the chrome was faded and the rubber seals were hard and cracked. I gently pulled the frames apart and sandblasted them, followed by several careful coats of flat black. The glass was scrubbed with window cleaner and some very fine steel wool, then polished. I bought new rubber gaskets and put everything back together. They look fantastic.
It took about 3 hours across several days and worth every minute.
Click on the pic for a larger version.
I took some time and restored the quarter windows.
The glass was fine, but the chrome was faded and the rubber seals were hard and cracked. I gently pulled the frames apart and sandblasted them, followed by several careful coats of flat black. The glass was scrubbed with window cleaner and some very fine steel wool, then polished. I bought new rubber gaskets and put everything back together. They look fantastic.
It took about 3 hours across several days and worth every minute.
Click on the pic for a larger version.
September 29th, 2019
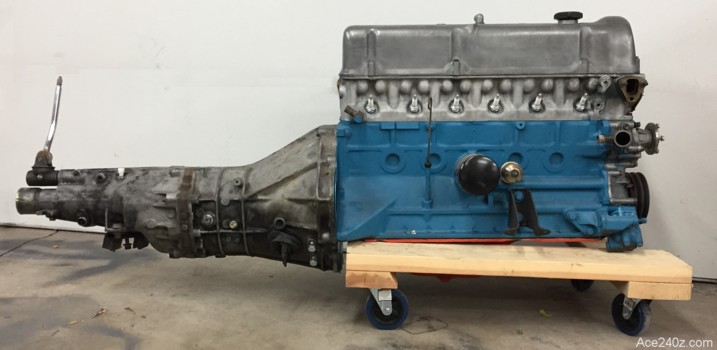 The L24 engine, 5-speed transmission, and new clutch are ready to go.
Even though I had all of the hardware bagged, things were still missing. The clutch needs six bolts but I could only find five. Four long bolts hold the engine to the transmission but I only had three. The motor mounts needed everything... and then I discovered the mounts were the wrong ones to begin with. So it goes.
Flywheels for a 240z can vary. A lighter flywheel allows the engine rev more quickly, which is great for racing, but too light can make city driving tricky. The heaviest stock flywheel is 23 lbs. From what I read, 17 or 18 lbs is a good compromise. I took mine to the grocery store and used a produce scale to weigh it: 19.5 lbs, which ought to be fine.
The L24 engine, 5-speed transmission, and new clutch are ready to go.
Even though I had all of the hardware bagged, things were still missing. The clutch needs six bolts but I could only find five. Four long bolts hold the engine to the transmission but I only had three. The motor mounts needed everything... and then I discovered the mounts were the wrong ones to begin with. So it goes.
Flywheels for a 240z can vary. A lighter flywheel allows the engine rev more quickly, which is great for racing, but too light can make city driving tricky. The heaviest stock flywheel is 23 lbs. From what I read, 17 or 18 lbs is a good compromise. I took mine to the grocery store and used a produce scale to weigh it: 19.5 lbs, which ought to be fine.
August 24th, 2019
 Got the tail lights and valances put together.
I thought I could salvage the original tail light covers but they turned out to be rubbish. The housings were in decent shape, so I give the reflectors a fresh coat of silver paint and found a good set of used lenses online. A few minutes with plastic polish made the lenses look like new.
The valances got a scrub and some wet-sanding and a few layers of satin black. The license plate is just a prop from a long-ago car because I needed something to fill the gap.
I'm happy with the results.
Got the tail lights and valances put together.
I thought I could salvage the original tail light covers but they turned out to be rubbish. The housings were in decent shape, so I give the reflectors a fresh coat of silver paint and found a good set of used lenses online. A few minutes with plastic polish made the lenses look like new.
The valances got a scrub and some wet-sanding and a few layers of satin black. The license plate is just a prop from a long-ago car because I needed something to fill the gap.
I'm happy with the results.
August 18th, 2019
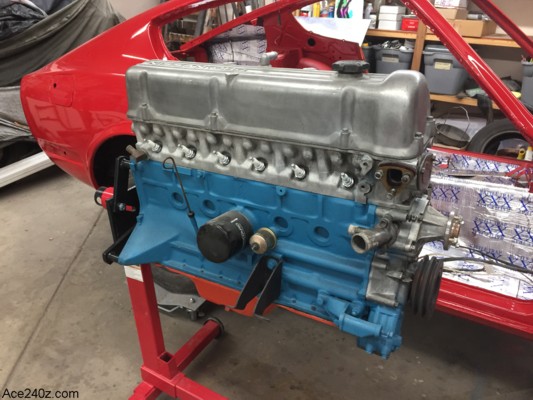 The engine is just about ready to be installed. Once the clutch is installed and the transmission bolted on, the whole thing gets lowered into place.
The rest of the engine (carbs, exhaust, supercharger, etc.) won't be assembled for a few weeks - I just want to get the heavy part in without anything else in the way.
A couple of friends did the great paint and polish job a couple of years ago. I could have bought the exact engine color for about $25 for a can, or a very similar color for $5. I chose the cheaper version and seriously doubt anyone will know the difference (or care).
The engine is just about ready to be installed. Once the clutch is installed and the transmission bolted on, the whole thing gets lowered into place.
The rest of the engine (carbs, exhaust, supercharger, etc.) won't be assembled for a few weeks - I just want to get the heavy part in without anything else in the way.
A couple of friends did the great paint and polish job a couple of years ago. I could have bought the exact engine color for about $25 for a can, or a very similar color for $5. I chose the cheaper version and seriously doubt anyone will know the difference (or care).
August 12th, 2019
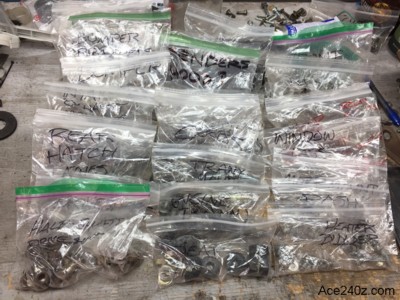 I learned years ago to keep the nuts and bolts for various things in baggies, with the name of the part (such as hood hinges, window mechanism, dashboard, etc) written on the outside. Considering some of the stuff I took apart was several years ago, I'd never remember which part went where.
Now that I'm putting the car back together, out came the bags and I'm good to go.
I learned years ago to keep the nuts and bolts for various things in baggies, with the name of the part (such as hood hinges, window mechanism, dashboard, etc) written on the outside. Considering some of the stuff I took apart was several years ago, I'd never remember which part went where.
Now that I'm putting the car back together, out came the bags and I'm good to go.
August 5th, 2019
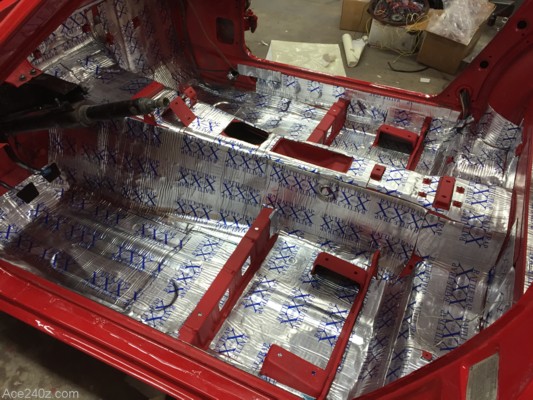 I stuck FatMat's Extreme sound deadener everywhere, even underneath the roof. It'll cut down on a lot of road noise, plus serve as insulation during winter. 75 square feet took about 14 hours to install (seriously) because of all the odd-shaped pieces you have to make.
Despite the time involved, I'm adding a second layer to the firewall, transmission tunnel and inside the doors. It's one of many "While I'm here, I should ..." decisions.
I stuck FatMat's Extreme sound deadener everywhere, even underneath the roof. It'll cut down on a lot of road noise, plus serve as insulation during winter. 75 square feet took about 14 hours to install (seriously) because of all the odd-shaped pieces you have to make.
Despite the time involved, I'm adding a second layer to the firewall, transmission tunnel and inside the doors. It's one of many "While I'm here, I should ..." decisions.
July 22nd, 2019
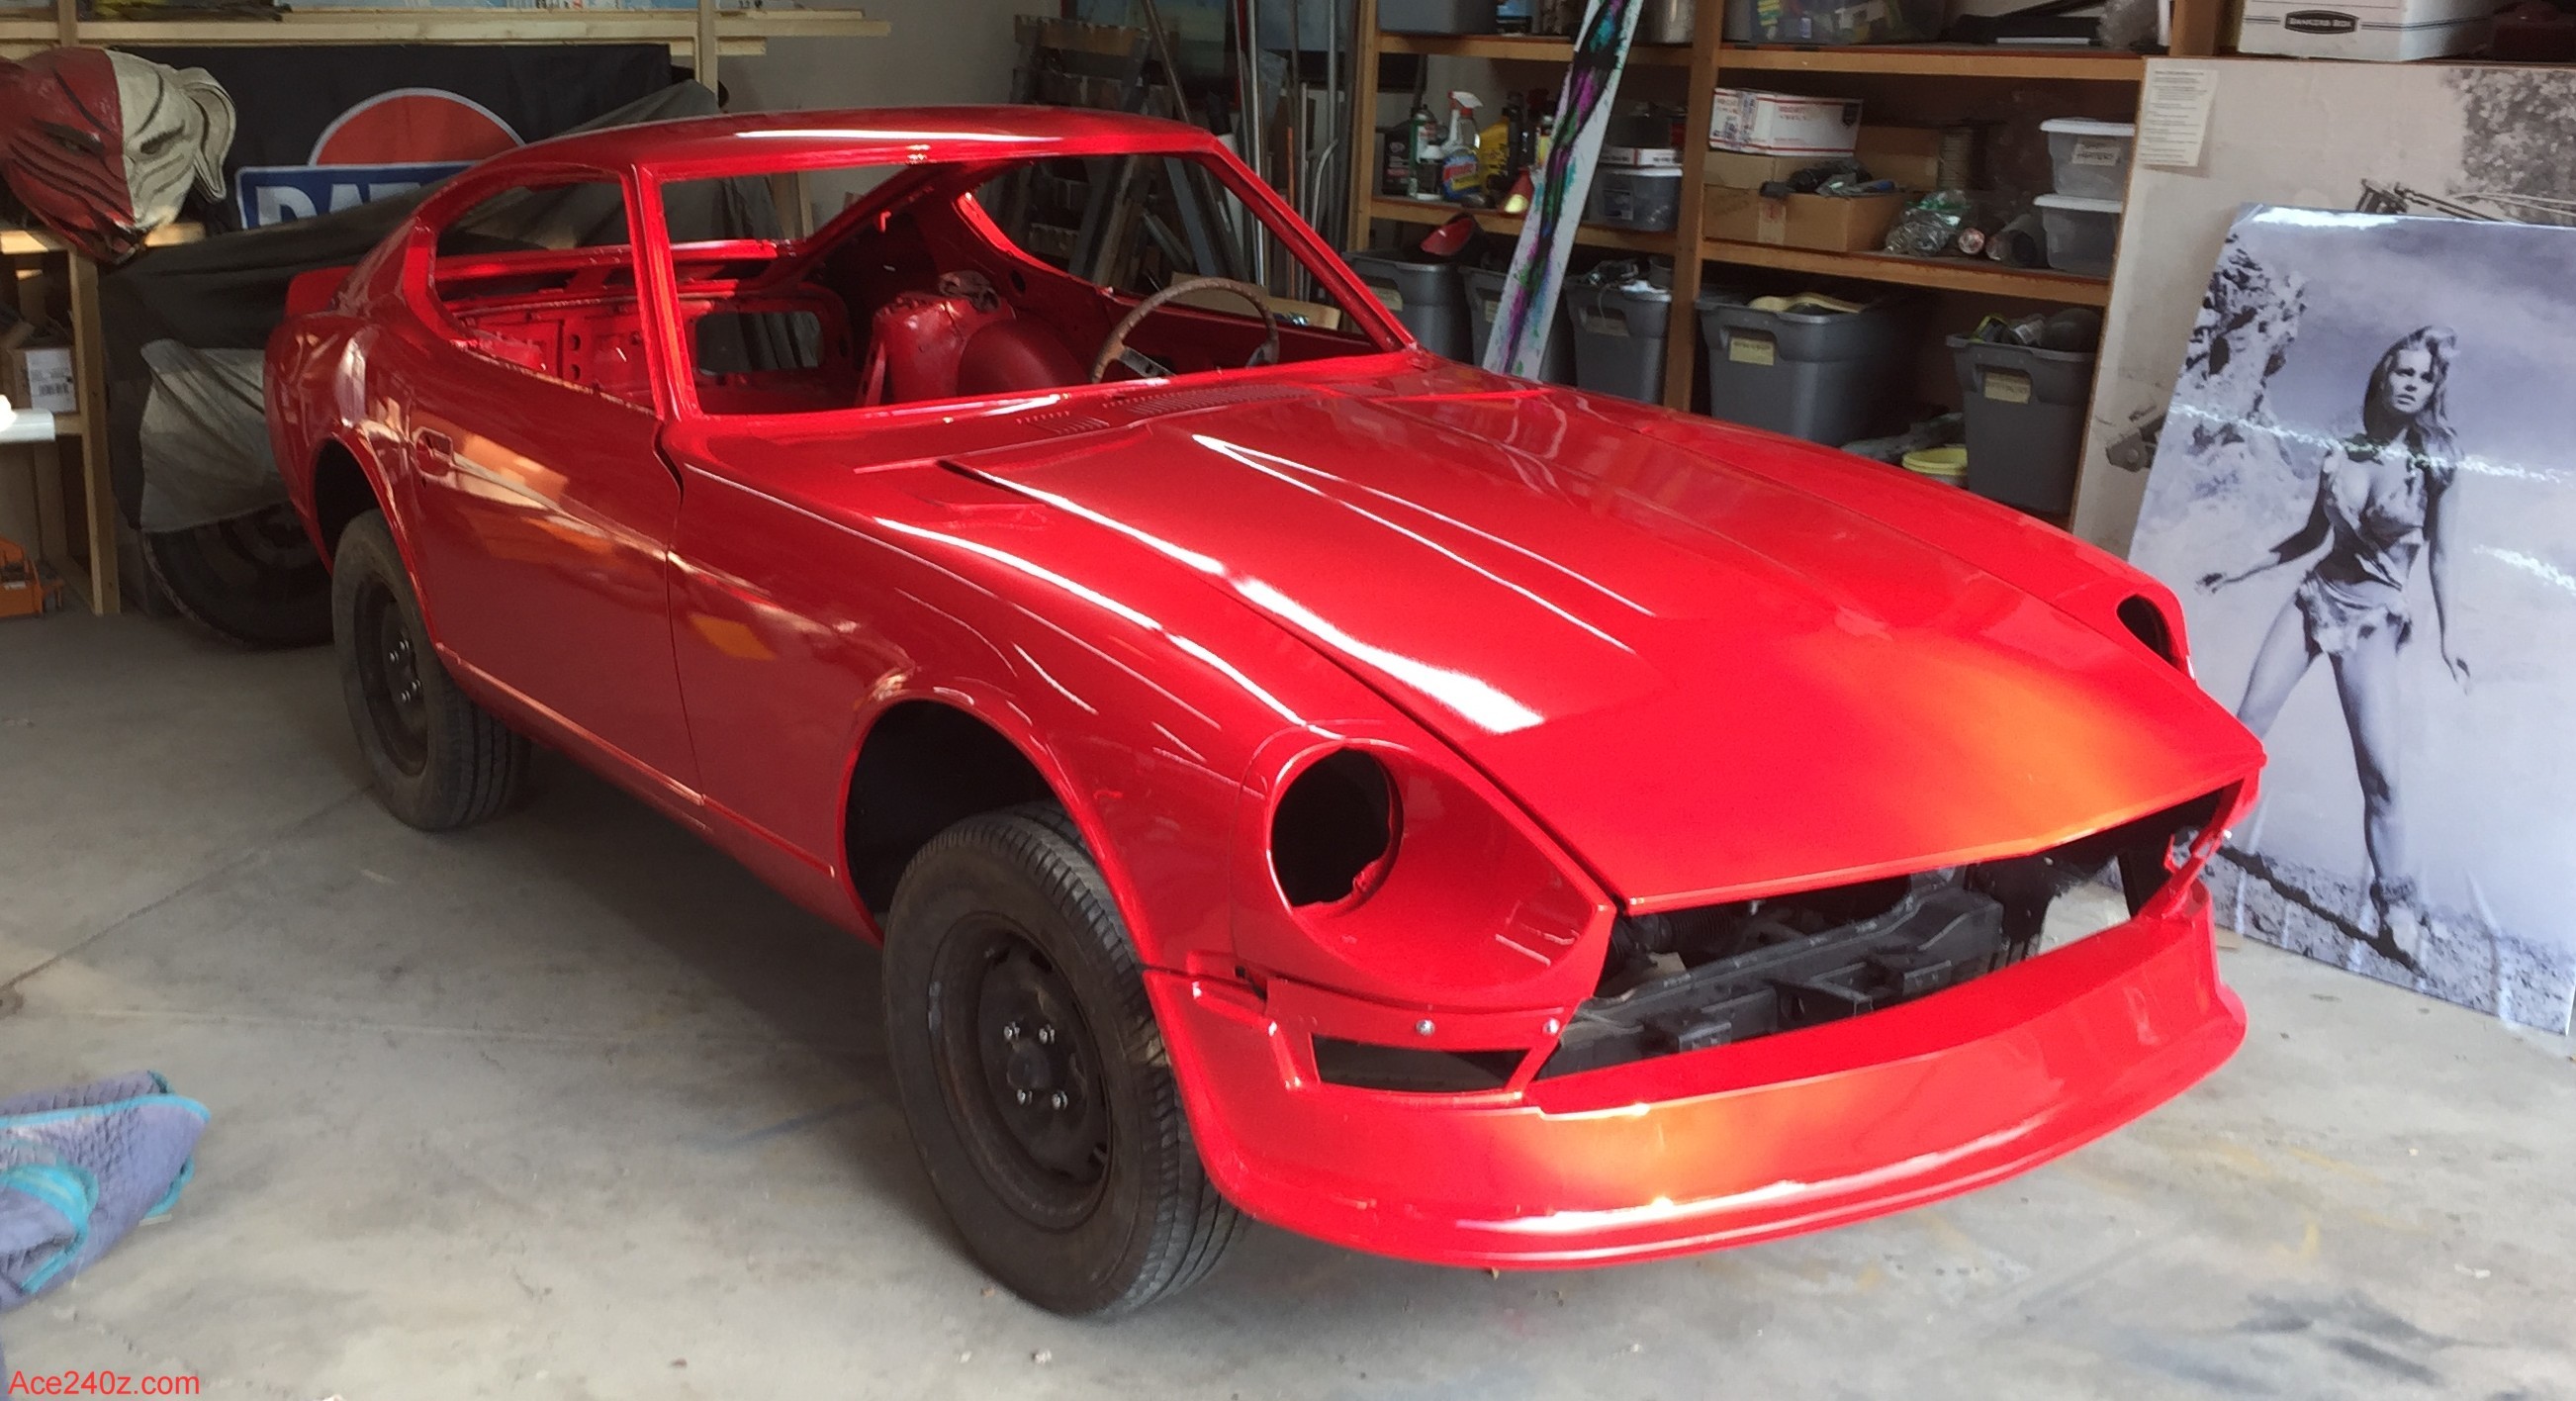 It's finally painted.
The photo doesn't do the color justice. It's the brightest red I could find. For the last few years I scanned other red cars looking for the right shade and surprisingly enough, this is Chevrolet's 2017 "Red Hot," but I call it "Arrest Me".
Chris (the paint guru) did an absolutely incredible job. It's beautiful. No dents or gouges or rust - nothing but smooth gloss. I had originally planned to paint it myself, and it might have looked OK until you got within 10 feet, but finding a professional was the right choice.
Raquel Welch is also incredible.
It's finally painted.
The photo doesn't do the color justice. It's the brightest red I could find. For the last few years I scanned other red cars looking for the right shade and surprisingly enough, this is Chevrolet's 2017 "Red Hot," but I call it "Arrest Me".
Chris (the paint guru) did an absolutely incredible job. It's beautiful. No dents or gouges or rust - nothing but smooth gloss. I had originally planned to paint it myself, and it might have looked OK until you got within 10 feet, but finding a professional was the right choice.
Raquel Welch is also incredible.
July 14th, 2019
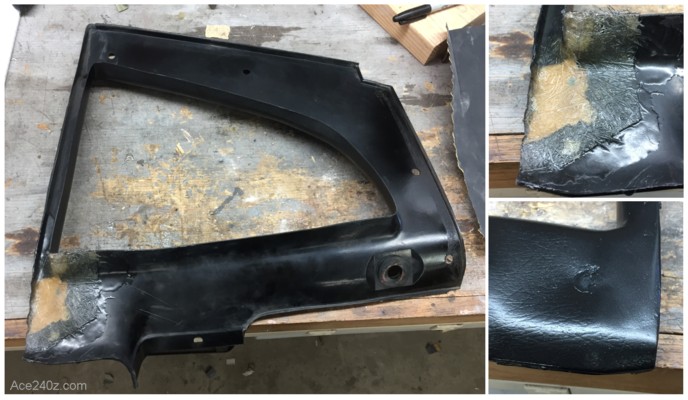 This plastic trim goes around one of the rear windows and was missing a big chunk. The plastic is thin and breaks easily. Replacements are $250. I repaired it for about $3 with some fiberglass and body filler, then did a little sanding and gave it a quick spritz of paint. The spot that looks dented is the hole for the mounting clip.
The patch isn't perfect but nobody will ever notice.
This plastic trim goes around one of the rear windows and was missing a big chunk. The plastic is thin and breaks easily. Replacements are $250. I repaired it for about $3 with some fiberglass and body filler, then did a little sanding and gave it a quick spritz of paint. The spot that looks dented is the hole for the mounting clip.
The patch isn't perfect but nobody will ever notice.
July 13th, 2019
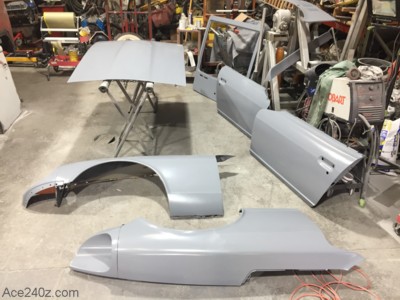 Big progress.
The removable parts have been straightened and covered with a thick layer of epoxy primer. The chassis will get the same treatment, followed by a lot of block sanding. It'll need several sand-prime-sand sessions before it's smooth enough for paint.
I got to see the paint and it's the exact shade of "arrest me" red that I wanted.
It's gonna be beautiful. I can't wait.
Big progress.
The removable parts have been straightened and covered with a thick layer of epoxy primer. The chassis will get the same treatment, followed by a lot of block sanding. It'll need several sand-prime-sand sessions before it's smooth enough for paint.
I got to see the paint and it's the exact shade of "arrest me" red that I wanted.
It's gonna be beautiful. I can't wait.
July 7th, 2019
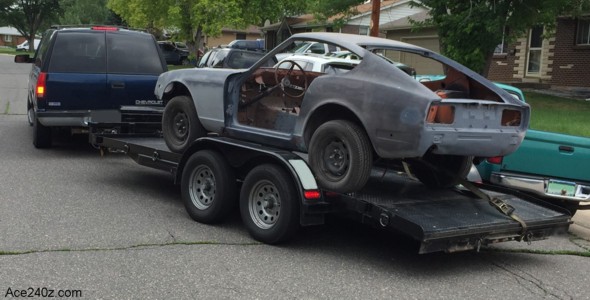 The car was finally hauled away to get painted. It'll be back in a few weeks and I can start putting it back together.
With any luck I'll be able to drive it by fall.
The car was finally hauled away to get painted. It'll be back in a few weeks and I can start putting it back together.
With any luck I'll be able to drive it by fall.
July 4th, 2019
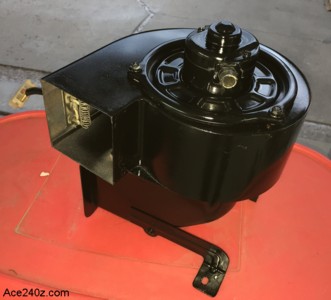 Replacing the stock heater blower/fan with one from an '88-91 Honda Civic is the easiest upgrade ever. It bolts right in without any drilling or cutting. You get more air and less noise. I found mine on eBay for $44 and gave it (and the housing) a little scrub and a couple coats of gloss black and it looks brand-new.
Another item off the checklist.
Replacing the stock heater blower/fan with one from an '88-91 Honda Civic is the easiest upgrade ever. It bolts right in without any drilling or cutting. You get more air and less noise. I found mine on eBay for $44 and gave it (and the housing) a little scrub and a couple coats of gloss black and it looks brand-new.
Another item off the checklist.
June 16th, 2019
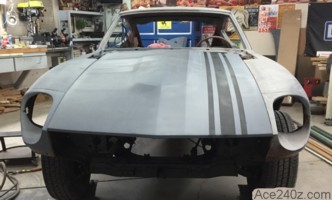 My friend Eddie came over and proceded to sand half of the car down to bare metal. He'll be back in the next couple days to sand the rest. He's been wanting to do it for quite some time. Every hour that he and I spend on the mundane stuff reduces the cost of the paint job because Chris won't have to deal with it.
My previous 204z had some rattle-can racing stripes. I want the same with my new car, so here's a quickie example.
My friend Eddie came over and proceded to sand half of the car down to bare metal. He'll be back in the next couple days to sand the rest. He's been wanting to do it for quite some time. Every hour that he and I spend on the mundane stuff reduces the cost of the paint job because Chris won't have to deal with it.
My previous 204z had some rattle-can racing stripes. I want the same with my new car, so here's a quickie example.
June 13th, 2019
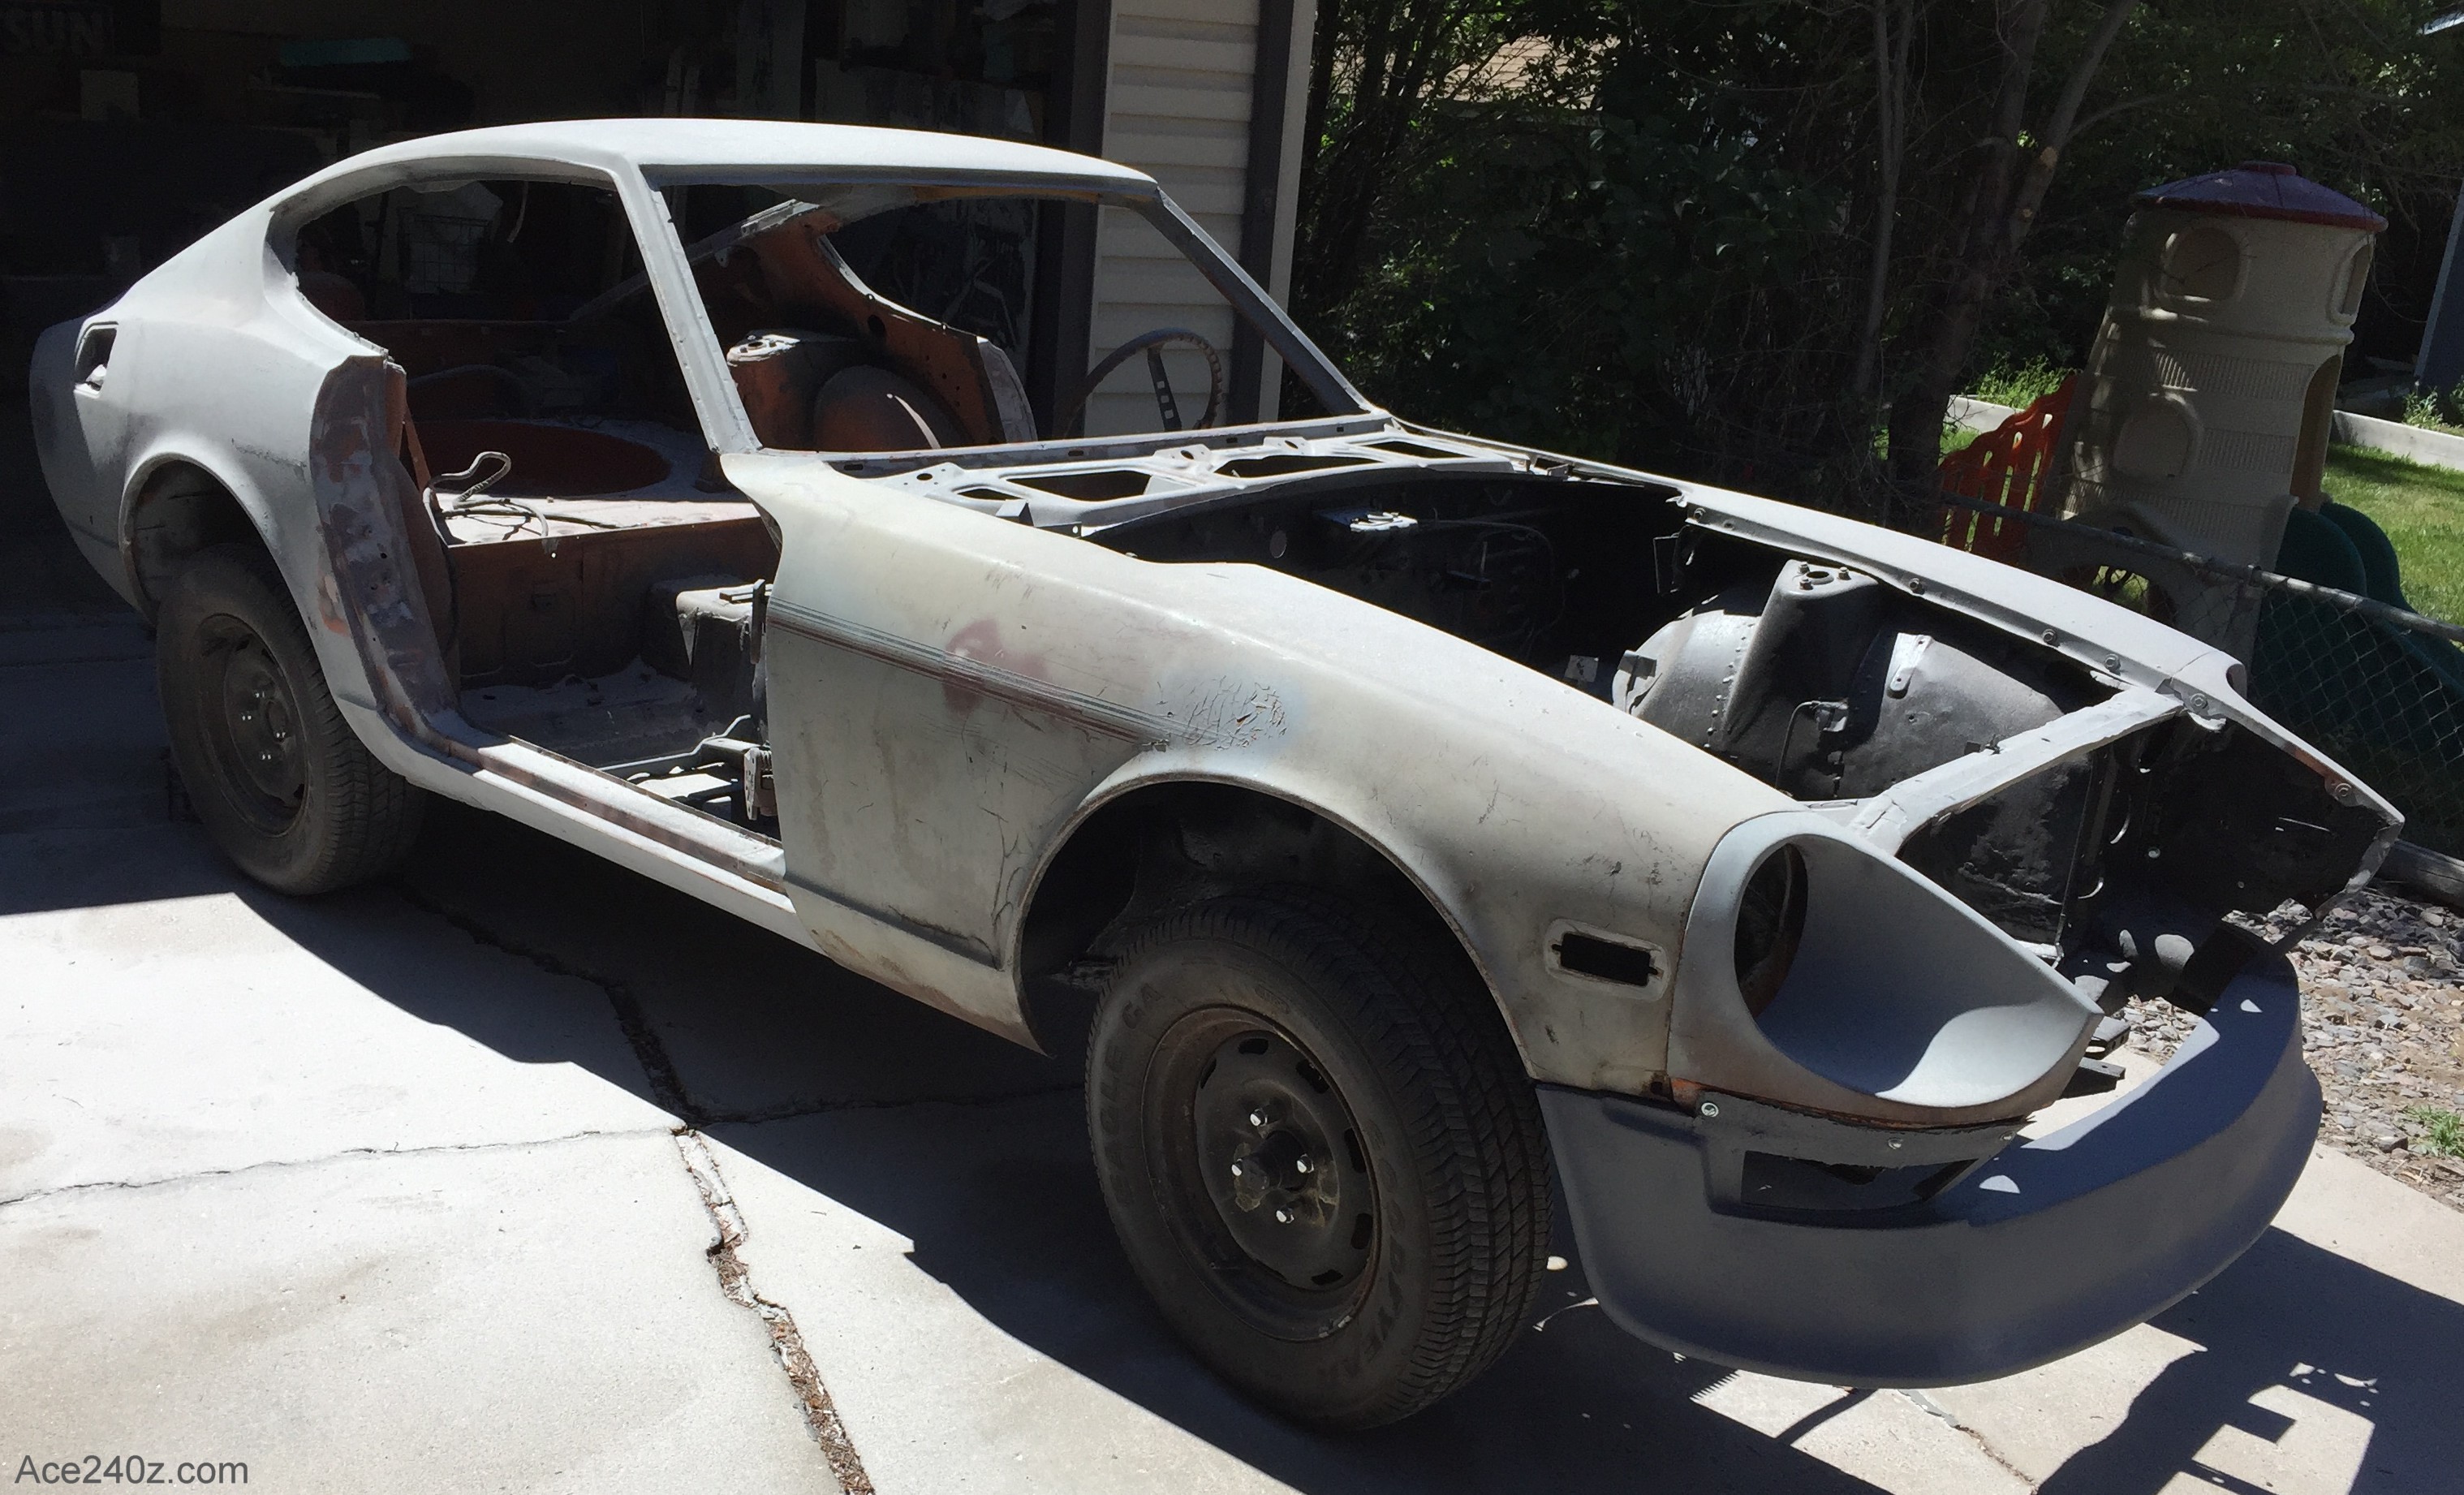 It's finally, finally, finally ready for paint.
There's nothing left to fix or sandblast - all it needs now is several coats of Chevy's "Red Hot" and a few coats of clear. I originally planned to spray it myself but I was talked into using a professional.
It's finally, finally, finally ready for paint.
There's nothing left to fix or sandblast - all it needs now is several coats of Chevy's "Red Hot" and a few coats of clear. I originally planned to spray it myself but I was talked into using a professional.
June 11th, 2019
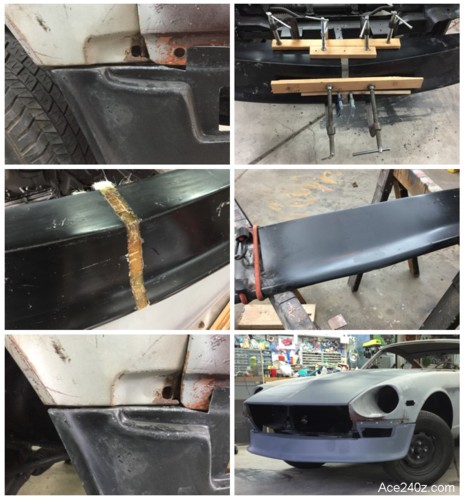 The air dam was tough. It didn't fit very well out of the box.
When this dam was created it was probably a perfect fit. They made a mold from it, but fiberglass shrinks a little when curing. They used that mold to made the actual dams, which also shrank a little. After that, someone with few scruples probably bought one and made their own mold and then sold cheap knock-offs that are way too short, which is what I ended up with.
I cut the thing in half, which let me line up the ends perfectly. I clamped the pieces together and filled the gap with fiberglass and some reinforcements. After some (admittedly crude) body filler work and a spritz of primer, it looks pretty good. I'll let the paint guru do the final smoothing.
Another step closer to paint.
The air dam was tough. It didn't fit very well out of the box.
When this dam was created it was probably a perfect fit. They made a mold from it, but fiberglass shrinks a little when curing. They used that mold to made the actual dams, which also shrank a little. After that, someone with few scruples probably bought one and made their own mold and then sold cheap knock-offs that are way too short, which is what I ended up with.
I cut the thing in half, which let me line up the ends perfectly. I clamped the pieces together and filled the gap with fiberglass and some reinforcements. After some (admittedly crude) body filler work and a spritz of primer, it looks pretty good. I'll let the paint guru do the final smoothing.
Another step closer to paint.
June 4th, 2019
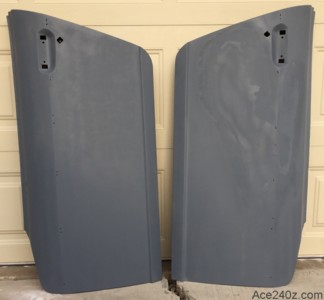 Like everything else on the car, the doors had several layers of chipped and peeling paint, but no rust.
The driver's side was surprisingly good after sandblasting, but the passenger's side has a layer of filler that defied all efforts to remove it, so I'll let my bodyshop guru decide what to do.
Like everything else on the car, the doors had several layers of chipped and peeling paint, but no rust.
The driver's side was surprisingly good after sandblasting, but the passenger's side has a layer of filler that defied all efforts to remove it, so I'll let my bodyshop guru decide what to do.
June 3rd, 2019
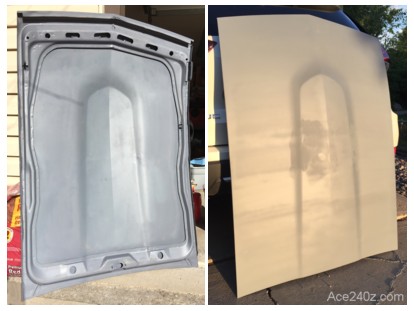 I used some professional-grade rust remover on the underside of the hood and a lot of time on top with a sander, then gave both sides a quick coat of primer. I'm pretty happy with the results. It took about 4 hours total but it looks nearly new.
There's a filler patch on the top that needs some additional feathering, but otherwise it's ready for paint.
I'm definitely not a bodywork professional. Doing gruntwork like this is boring and dusty, but it's something I can do to make a nice paint job more affordable. Next comes the doors, the rear hatch and the entire body.
I used some professional-grade rust remover on the underside of the hood and a lot of time on top with a sander, then gave both sides a quick coat of primer. I'm pretty happy with the results. It took about 4 hours total but it looks nearly new.
There's a filler patch on the top that needs some additional feathering, but otherwise it's ready for paint.
I'm definitely not a bodywork professional. Doing gruntwork like this is boring and dusty, but it's something I can do to make a nice paint job more affordable. Next comes the doors, the rear hatch and the entire body.
May 27th, 2019
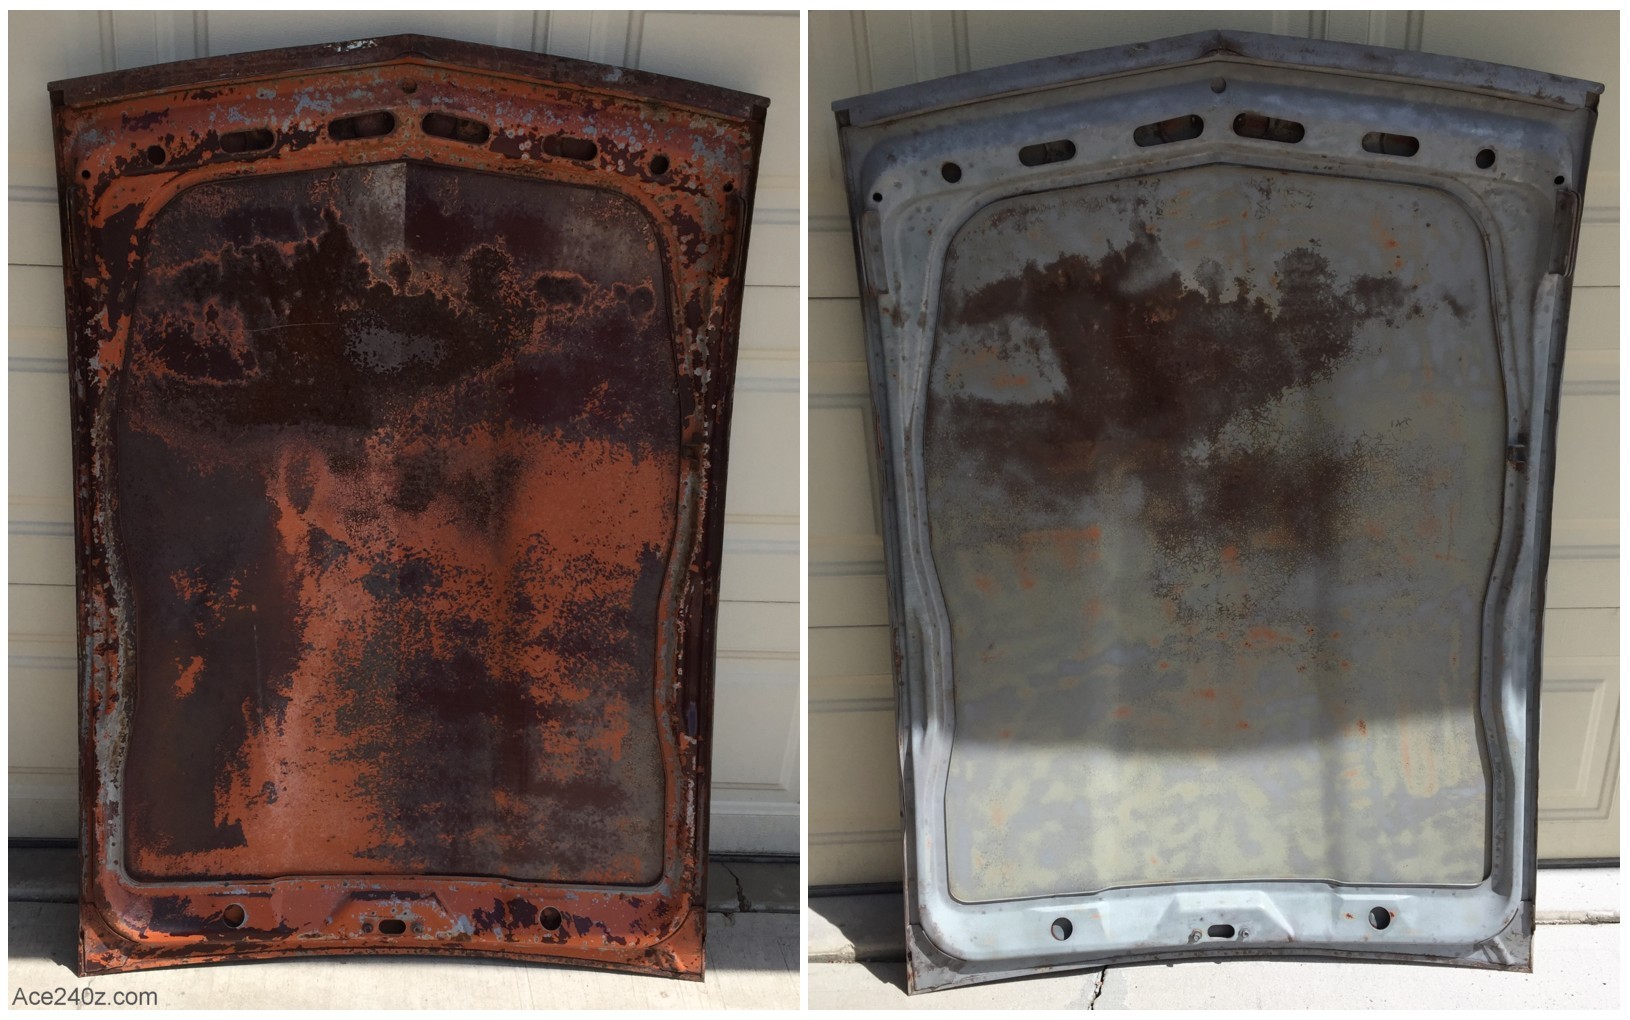 The underside of the hood was awful thanks to crappy paint that failed to protect it from rust. I spent about 20 sweaty minutes with a sandblaster to remove as much as possible. The multiple layers came off pretty easily but the surface rust is a little tougher. I'm trying a few different methods to remove the rust, such as baking soda, or salt and lemon juice, but I suspect it'll require some old fashioned sanding and elbow grease.
Click on the photo if you'd like a closer look of the before & after.
The underside of the hood was awful thanks to crappy paint that failed to protect it from rust. I spent about 20 sweaty minutes with a sandblaster to remove as much as possible. The multiple layers came off pretty easily but the surface rust is a little tougher. I'm trying a few different methods to remove the rust, such as baking soda, or salt and lemon juice, but I suspect it'll require some old fashioned sanding and elbow grease.
Click on the photo if you'd like a closer look of the before & after.
May 26th, 2019
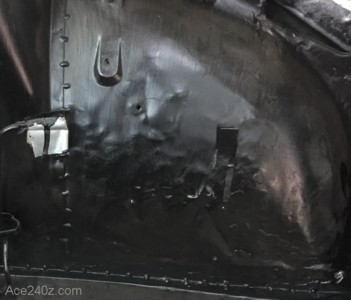 I'm trying to work harder on the car.
I finished painting the engine bay. Not the most exciting thing I've done, but it gets me another step closer to the final bodywork & paint. Most people paint it to match the exterior, but this car had been in a couple of small crashes and the sheet metal has some ripples and dings. Black helps hide the scars.
The stuff I used is called Chassis Saver and chemically it's superglue with a black tint. It bonds with the steel and seems pretty rugged. It also bonds with skin like a tattoo. Once it cures you can't scrub it off but the spots and smudges I collected today will fade away in a week or two. You can spray it, but I used a small brush. Some of the strokes can be seen, but once the shiny engine is in place, nobody's going to notice.
I'm trying to work harder on the car.
I finished painting the engine bay. Not the most exciting thing I've done, but it gets me another step closer to the final bodywork & paint. Most people paint it to match the exterior, but this car had been in a couple of small crashes and the sheet metal has some ripples and dings. Black helps hide the scars.
The stuff I used is called Chassis Saver and chemically it's superglue with a black tint. It bonds with the steel and seems pretty rugged. It also bonds with skin like a tattoo. Once it cures you can't scrub it off but the spots and smudges I collected today will fade away in a week or two. You can spray it, but I used a small brush. Some of the strokes can be seen, but once the shiny engine is in place, nobody's going to notice.
May 24th, 2019
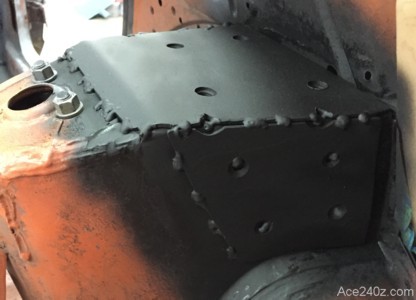 Here's how the roll bar support mounts turned out.
The welds are pretty ugly and the plates are a little crooked, but they're strong and will be hidden by carpet. I drilled a few holes in the sides to give some extra welding points with the strut towers and hopefully they'll add some strength.
The roll bar's main hoop attaches to the floor behind the seats. The mounts for those will be a "sandwich," with the bar welded to a plate on the interior, which in turn will be bolted to a large plate underneath the floor. That's how the typical aftermarket bars are attached, but I'll make mine a little more rugged. Since the roll bar itself won't be made until the rest of the car is done, I don't have to worry about the lower mounts until then,
Here's how the roll bar support mounts turned out.
The welds are pretty ugly and the plates are a little crooked, but they're strong and will be hidden by carpet. I drilled a few holes in the sides to give some extra welding points with the strut towers and hopefully they'll add some strength.
The roll bar's main hoop attaches to the floor behind the seats. The mounts for those will be a "sandwich," with the bar welded to a plate on the interior, which in turn will be bolted to a large plate underneath the floor. That's how the typical aftermarket bars are attached, but I'll make mine a little more rugged. Since the roll bar itself won't be made until the rest of the car is done, I don't have to worry about the lower mounts until then,
May 19th, 2019
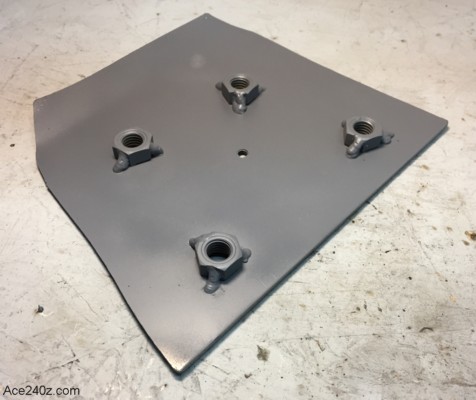 OK, I know it doesn't look like much, but making two of those seemingly simple plates took forever. They'll be used to connect the roll bar's supports to the rear strut towers. The roll bar might save my life if a texting soccer mom crashes into me, so it has to be done right.
If the car was going to be used for racing, the roll bar would have to be welded directly to the body, but I'm not racing and might want to remove it in the future, so I'm just bolting it together.
Here's what it took: First, make a template with cardboard. Drag out a plate of 1/8" steel (purchased previously) and a pair sawhorses and some clamps. Trace the outline of the pieces onto the plate. Use a Milwaukee Super-Sawzall™ (one of my favorite tools) to cut them out. Grind and deburr the edges as needed. Drill pilot holes, followed by larger holes and a small countersink. Bend the lip in the vise. Get the sandblaster ready and compressor running, then blast the plate and the weldnuts (purchased previously). Get the welder ready. Bolt the nuts in place. Weld everything. Sandblast again. Primer and paint, then clean up the mess and have a beer (or two).
Years ago I saw a sign years in a fabrication shop that read "custom work, custom prices." No wonder.
OK, I know it doesn't look like much, but making two of those seemingly simple plates took forever. They'll be used to connect the roll bar's supports to the rear strut towers. The roll bar might save my life if a texting soccer mom crashes into me, so it has to be done right.
If the car was going to be used for racing, the roll bar would have to be welded directly to the body, but I'm not racing and might want to remove it in the future, so I'm just bolting it together.
Here's what it took: First, make a template with cardboard. Drag out a plate of 1/8" steel (purchased previously) and a pair sawhorses and some clamps. Trace the outline of the pieces onto the plate. Use a Milwaukee Super-Sawzall™ (one of my favorite tools) to cut them out. Grind and deburr the edges as needed. Drill pilot holes, followed by larger holes and a small countersink. Bend the lip in the vise. Get the sandblaster ready and compressor running, then blast the plate and the weldnuts (purchased previously). Get the welder ready. Bolt the nuts in place. Weld everything. Sandblast again. Primer and paint, then clean up the mess and have a beer (or two).
Years ago I saw a sign years in a fabrication shop that read "custom work, custom prices." No wonder.
May 12th, 2019
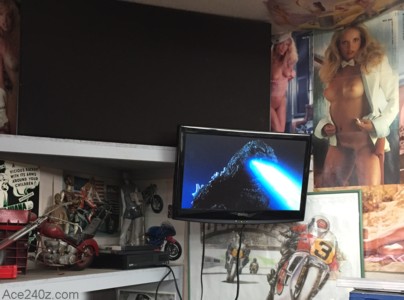 As if I need more distractions, I added a small TV to the garage.
Godzilla rules. So does Pamela Bryant.
As if I need more distractions, I added a small TV to the garage.
Godzilla rules. So does Pamela Bryant.
Cinco de Mayo, 2019
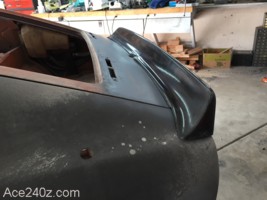 Getting the spoiler mounted was a treat. It looks great.
I finished the undercoating and got the passenger-side fender bolted in place. I also did some deep sanding and unsurprisingly some of the previous bodywork was pretty bad. I had to grind the filler down to bare metal to eliminate the cracks in the "pink lead." 47 years takes a toll.
My goal is to get the beast on the road by August 1st. Three months is a pretty tight schedule but getting it painted is only a couple weeks away so I feel motivated.
Getting the spoiler mounted was a treat. It looks great.
I finished the undercoating and got the passenger-side fender bolted in place. I also did some deep sanding and unsurprisingly some of the previous bodywork was pretty bad. I had to grind the filler down to bare metal to eliminate the cracks in the "pink lead." 47 years takes a toll.
My goal is to get the beast on the road by August 1st. Three months is a pretty tight schedule but getting it painted is only a couple weeks away so I feel motivated.
April 17th, 2019
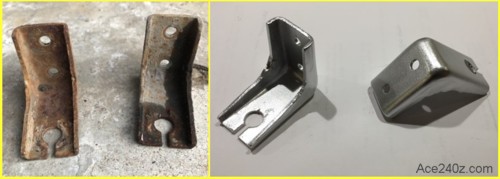 I lost the brackets that hold the parking brake cable at the hub. I'm not sure how because I found a baggie with the bolts and clips, but nothing else. An upstanding guy named Gary on the Zcar.com website was kind enough to send me a pair. Here's the before & after. The metallic silver won't last long once the car gets running, but it sure looks purty now.
As I've said so many times, it's the little things that'll drive you nuts.
I lost the brackets that hold the parking brake cable at the hub. I'm not sure how because I found a baggie with the bolts and clips, but nothing else. An upstanding guy named Gary on the Zcar.com website was kind enough to send me a pair. Here's the before & after. The metallic silver won't last long once the car gets running, but it sure looks purty now.
As I've said so many times, it's the little things that'll drive you nuts.
March 31st, 2019
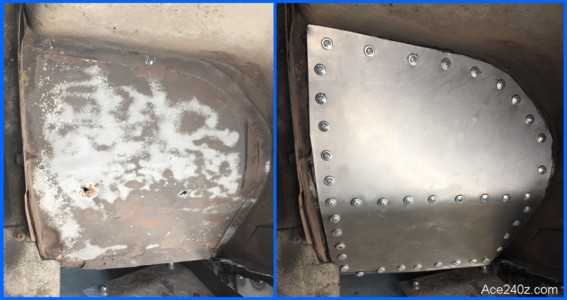 Not all patches are pretty.
This is the passenger-side footwell, viewed from inside the fender. The metal was rusty, thin, and had some pinholes. Cutting out the entire area and welding in new metal would have been ideal, but I'm running out of time (and enthusiasm) so I did this instead. I used 18ga steel, trimmed, bent, and slathered with seam sealer, then used so many screws that it looks riveted. After this pic was taken I added more seam sealer around the edges and gave the entire thing a thick layer of undercoat. Inside the floor I cut off the tips of the screws and gave each a dab of epoxy to keep them tight.
Ugly? Sure, but it's strong and will outlive me.
Not all patches are pretty.
This is the passenger-side footwell, viewed from inside the fender. The metal was rusty, thin, and had some pinholes. Cutting out the entire area and welding in new metal would have been ideal, but I'm running out of time (and enthusiasm) so I did this instead. I used 18ga steel, trimmed, bent, and slathered with seam sealer, then used so many screws that it looks riveted. After this pic was taken I added more seam sealer around the edges and gave the entire thing a thick layer of undercoat. Inside the floor I cut off the tips of the screws and gave each a dab of epoxy to keep them tight.
Ugly? Sure, but it's strong and will outlive me.
March 24th, 2019
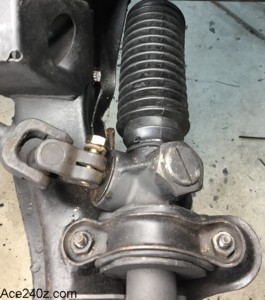 Installing the sway bar took more time than expected but it's solid. The steering rack received a thick coat of grease before the bellows were squeazed on. They fit pretty well. Aside from a wheel alignment, the front is finished.
The rear drums went back into place, and aside from connecting the parking brake cable, everything is done.
I actually have a rolling chassis again.
Installing the sway bar took more time than expected but it's solid. The steering rack received a thick coat of grease before the bellows were squeazed on. They fit pretty well. Aside from a wheel alignment, the front is finished.
The rear drums went back into place, and aside from connecting the parking brake cable, everything is done.
I actually have a rolling chassis again.
March 14th, 2019
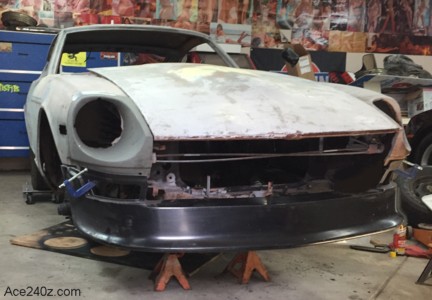 The hood, passenger-side fender, and headlight nacelle are back in place, so I test-fitted the air dam and it lines up better than hoped. I need to drill some holes and make a few brackets but I'll wait until the bumper goes back on.
Once the bumper and air dam are mounted, I can fab the custom grille.
The steering rack and column were attached. I'm waiting for new bellows to arrive before doing the tie rods. The sway bar comes next, and after that I'll be able to set it back down.
The hood, passenger-side fender, and headlight nacelle are back in place, so I test-fitted the air dam and it lines up better than hoped. I need to drill some holes and make a few brackets but I'll wait until the bumper goes back on.
Once the bumper and air dam are mounted, I can fab the custom grille.
The steering rack and column were attached. I'm waiting for new bellows to arrive before doing the tie rods. The sway bar comes next, and after that I'll be able to set it back down.
February 25th, 2019
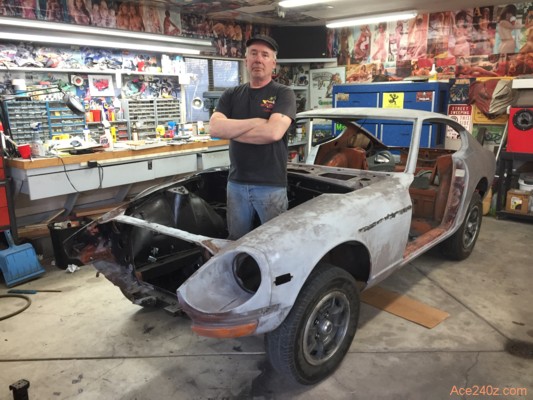 I put the front suspension back together and the car is actually sitting on its wheels for the first time in 18 months. How time flies.
Like with the rear, everything is new (or restored) and freshly painted. I used the stock rubber bushings and fastened everything with grade-8 hardware. I don't think it'll fall apart.
This car fights me every step of the way. Holes won't line up. Threads are corroded. Bolts are mismatched. Tools barely fit. It's almost as if it doesn't want to be restored.
I put the front suspension back together and the car is actually sitting on its wheels for the first time in 18 months. How time flies.
Like with the rear, everything is new (or restored) and freshly painted. I used the stock rubber bushings and fastened everything with grade-8 hardware. I don't think it'll fall apart.
This car fights me every step of the way. Holes won't line up. Threads are corroded. Bolts are mismatched. Tools barely fit. It's almost as if it doesn't want to be restored.
February 19th, 2019
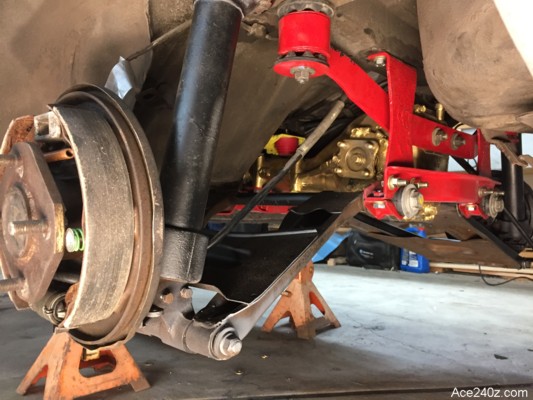 The rear suspension was finally installed. The bushings were replaced with the stock rubber ones because I don't need the ultra performance of urethane - this is going to be a daily commuter so I'll opt for a softer ride.
The wheel bearings and seals are new, as are the shoes and slave cylinders. I even remembered to fill the diff with fluid.
I used grade-8 hardware and threadlocker everywhere. I'm not taking any chances.
The rear suspension was finally installed. The bushings were replaced with the stock rubber ones because I don't need the ultra performance of urethane - this is going to be a daily commuter so I'll opt for a softer ride.
The wheel bearings and seals are new, as are the shoes and slave cylinders. I even remembered to fill the diff with fluid.
I used grade-8 hardware and threadlocker everywhere. I'm not taking any chances.
February 10th, 2019
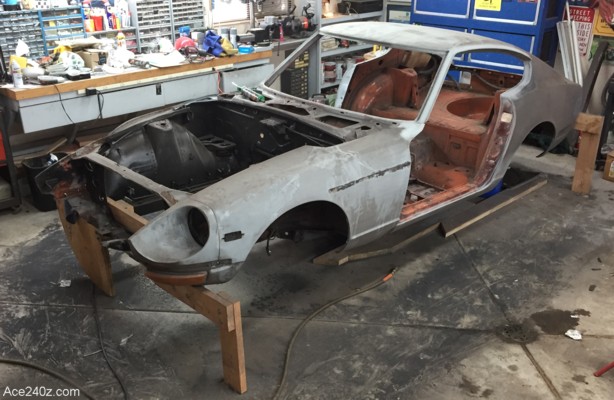 Sandblasting is a nasty, dirty process but it pretty much erases every spec of surface rust and old paint. I hung painter's plastic around the shell and managed to keep the grit from going everywhere. Hanging the plastic and vacuuming up the mess took longer than the blasting itself, which is usually the way things go.
The replacement floors are finished. I smeared seam sealer all over the welds for more rust prevention, then primered everything. It looks pretty rough but dynamat and carpet will hide the warts.
The rear suspension was cleaned and given a fresh coat of black paint and now it's ready to install. I bought grade-8 hardware to keep it nice and tight, as well as provide some peace of mind because when I originally took it apart I found a broken-off bolt that probably came from a hardware store. The new ones won't break so easily.
Sandblasting is a nasty, dirty process but it pretty much erases every spec of surface rust and old paint. I hung painter's plastic around the shell and managed to keep the grit from going everywhere. Hanging the plastic and vacuuming up the mess took longer than the blasting itself, which is usually the way things go.
The replacement floors are finished. I smeared seam sealer all over the welds for more rust prevention, then primered everything. It looks pretty rough but dynamat and carpet will hide the warts.
The rear suspension was cleaned and given a fresh coat of black paint and now it's ready to install. I bought grade-8 hardware to keep it nice and tight, as well as provide some peace of mind because when I originally took it apart I found a broken-off bolt that probably came from a hardware store. The new ones won't break so easily.
January 2nd, 2019
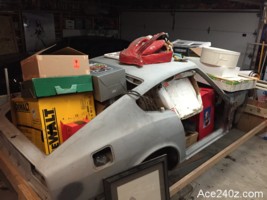 At the moment, the ugly-duckling shell is being used as a storage bin for my wife's empty Xmas tree ornament boxes. I've been distracted by building a huge storage shed (to eliminate a $164 per month locker), and a few essential other home projects, but all that's done. Once the boxes are gone I can get back to the car.
September 16th, 2018
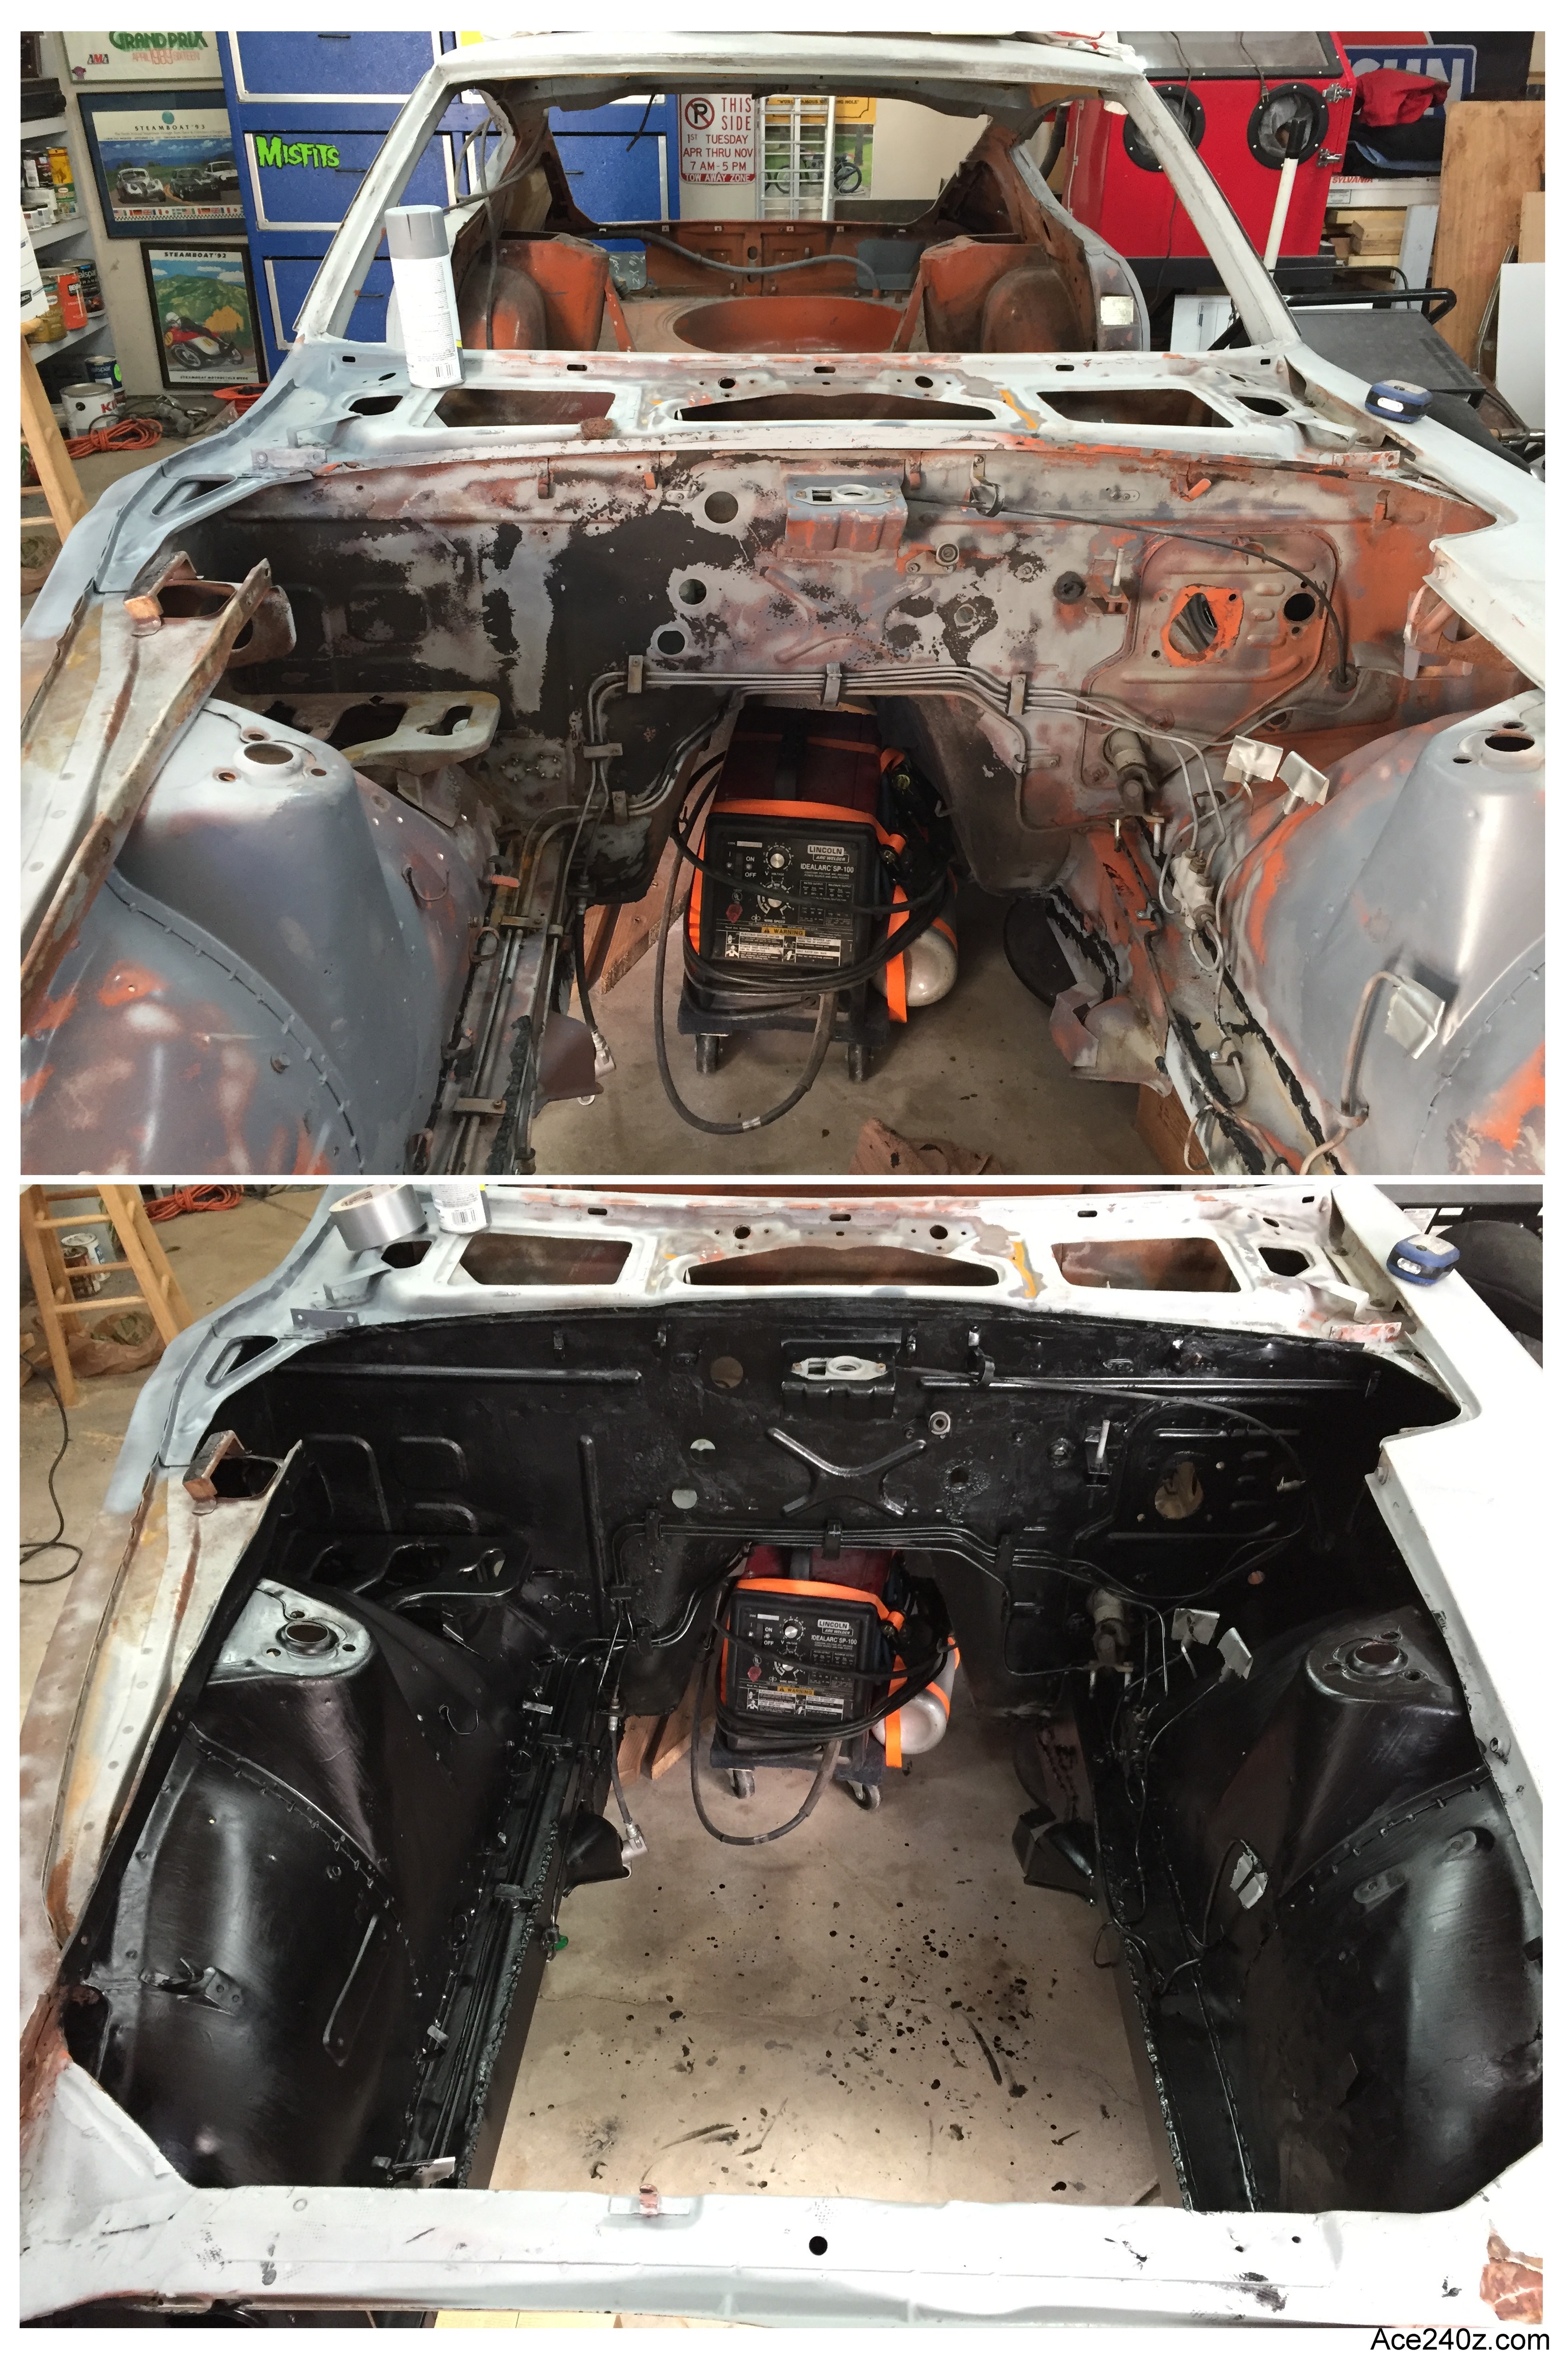 I sealed all of the welded reinforcements with automotive caulking, then painted the engine bay with Chassis Sealer. According to my bodywork guru, it works just like POR-15 but at a lower price and no mixing. I'm pleased with the results.
I only needed half a quart. I used a disposable brush and took my time. The strokes barely show. The paint is fairly thin and runs easily but covers everything with a very hard surface. On the back of the can it says "Contains Cyanoacrylates," which is the industrial name for Superglue. The label warns that once cured, the paint is "virtually impossible to remove from skin" and may remain for up to two weeks. I've got a nice smudge of it on my nose that hopefully will disappear sooner.
Wear rubber gloves and a long sleeve shirt and eye protection. Make sure you have good ventilation.
A long-ago accident on the driver's side required a fair amount of pounding to get the inner fender back into place, but the paint makes the rough repair less noticeable. The fuel and hydraulic lines also got painted and are nearly invisible. When the engine is stuffed back inside, nobody will notice the warts and wrinkles lurking around it.
Click on the pic to see a hi-res version.
I sealed all of the welded reinforcements with automotive caulking, then painted the engine bay with Chassis Sealer. According to my bodywork guru, it works just like POR-15 but at a lower price and no mixing. I'm pleased with the results.
I only needed half a quart. I used a disposable brush and took my time. The strokes barely show. The paint is fairly thin and runs easily but covers everything with a very hard surface. On the back of the can it says "Contains Cyanoacrylates," which is the industrial name for Superglue. The label warns that once cured, the paint is "virtually impossible to remove from skin" and may remain for up to two weeks. I've got a nice smudge of it on my nose that hopefully will disappear sooner.
Wear rubber gloves and a long sleeve shirt and eye protection. Make sure you have good ventilation.
A long-ago accident on the driver's side required a fair amount of pounding to get the inner fender back into place, but the paint makes the rough repair less noticeable. The fuel and hydraulic lines also got painted and are nearly invisible. When the engine is stuffed back inside, nobody will notice the warts and wrinkles lurking around it.
Click on the pic to see a hi-res version.
September 9th, 2018
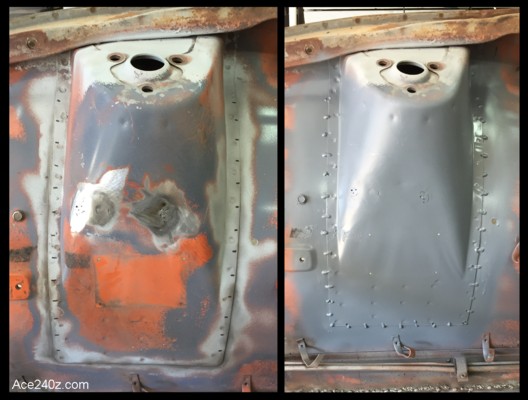 When the car was built, the strut towers were "pinch welded" to the body, which worked fine but after 47 years those little welds can be fatigued. Racers add stitch welds along the seams to add rigidity.
I don't know if it really makes a difference, but when combined with a strut brace the entire assembly should be stiffer than stock. I like the way it looks, so I gave it a try.
I also finished the underbody welding. It's hot and sweaty work, and the results aren't the prettiest I've done, but the reinforcement factor makes it worthwhile and a thick coat of seam sealer will hide the ugliest parts.
When the car was built, the strut towers were "pinch welded" to the body, which worked fine but after 47 years those little welds can be fatigued. Racers add stitch welds along the seams to add rigidity.
I don't know if it really makes a difference, but when combined with a strut brace the entire assembly should be stiffer than stock. I like the way it looks, so I gave it a try.
I also finished the underbody welding. It's hot and sweaty work, and the results aren't the prettiest I've done, but the reinforcement factor makes it worthwhile and a thick coat of seam sealer will hide the ugliest parts.
August 24, 2018
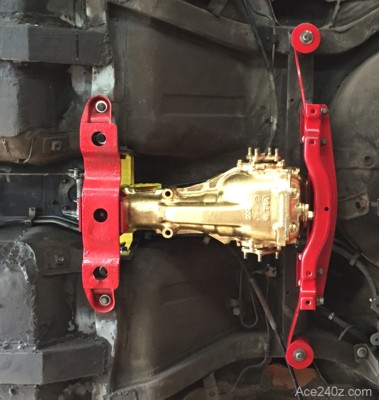
This is a major milestone - I'm actually putting parts back onto the car, which marks the end of body repairs and reinforcements. I painted the differential gold and the suspension supports red just to have some fun. It'll make me smile every time I crawl underneath.
I was able to roll the shell back down on the floor and start dismantling the amazingling successful rollover jig. Next I can bolt the suspension and wheels into place and I'll be able to roll the car around for the first time in 9 months.
As of today, the amount I've spent is $11,700, plus I budgeted another $2500 for paint, giving me a total of $14,200. I expect to spend at least $2000 more on other little bits & pieces, so by the time it's ready to drive I'll be far, far over the original budget of $7000. I haven't kept track of labor but I'd guess I've invested many hundreds of hours.
When I bought this little beast, there were daily-drivers for sale in the $7-8 thousand range. I could have been enjoying one of those for the last few years but I know there would have been repairs and upgrades along the way and by this point I would have spent about the same amount of money as I've done with this non-runner.
July 29, 2018
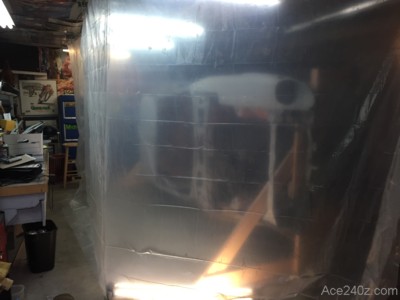 The rotator cuff surgury was a success and I'm back to work on the Z!
I hung a tent around the shell and went crazy with the sandblaster. It's nasty, filthy and sweaty work, but ultimately satisfying because all of the rust and flaking paint and filth is gone. I never could have done it with just a grinder and rotary brush.
All that's left is smearing more body sealer around the interior. Once that's done, I can tip the shell down onto the wheels and get it ready for paint.
The rotator cuff surgury was a success and I'm back to work on the Z!
I hung a tent around the shell and went crazy with the sandblaster. It's nasty, filthy and sweaty work, but ultimately satisfying because all of the rust and flaking paint and filth is gone. I never could have done it with just a grinder and rotary brush.
All that's left is smearing more body sealer around the interior. Once that's done, I can tip the shell down onto the wheels and get it ready for paint.
May 16, 2018
I underwent shoulder surgery today for a damaged rotator cuff and torn tendon (huge snowboarding crash a year ago) and it's unlikely any car progress will be made for the next couple of months, which frustrates me beyond description.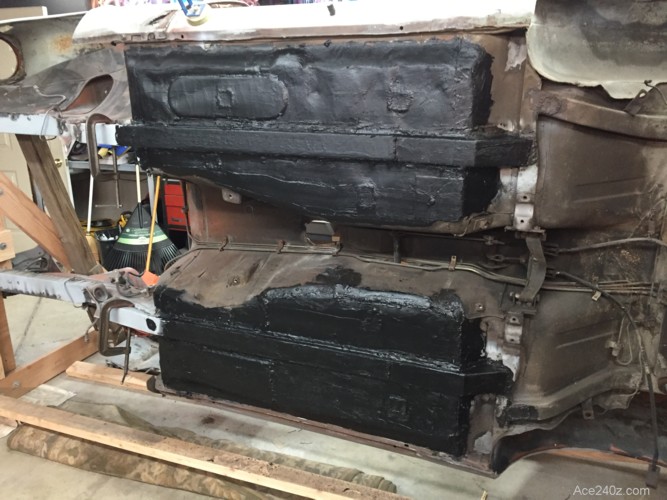
May 6, 2018
Most of the underbody welding is done.
I used some Eastwood seam sealer over the welds, inside and out. I bought three tubes but one was more than enough, so I used the others for a heavy-duty undercoat. The stuff is just like bathroom caulking, but automotive grade. It's supposed to stay flexible and can even be painted. The photo was taken about halfway thru the process - I used the sealer inside the trans tunnel and all the way back to the spare tire well. I'm not taking any chances. Let me pass along a few tips. First, get a pair of heavy-duty vinyl gloves, the kind you'd use for caustic chemicals, because if the stuff gets on your fingers it's a real bitch to clean off. Second, grind all edges and welds to remove any rough edges because they can tear the gloves. Third, don't be shy about using a thick coat because you don't want water getting inside your car. Fourth, buy a cheap caulking gun because the stuff gets on everything and the gun will be totally useless when you're done. Your garage will smell like gasoline for a few days, but it's just the sealer curing.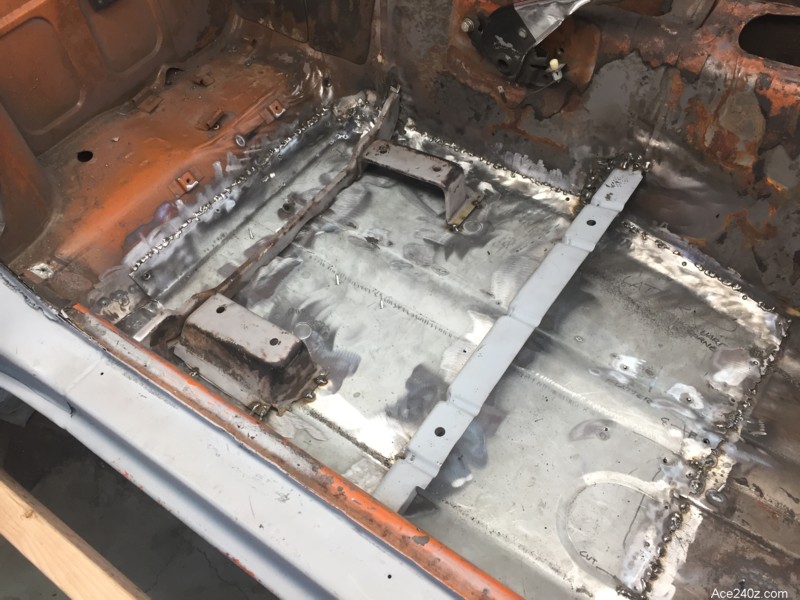
April 1, 2018
I finally got the seat mounts welded back into place.
An experienced bodyworker could have done everything you see in one day and it would have looked beautiful. For me, it took a lot of trimming and cutting and grinding and cussing but everything fits and seems to be solid. Eventually it'll get carpeted and nobody will see the ugliness lurking beneath.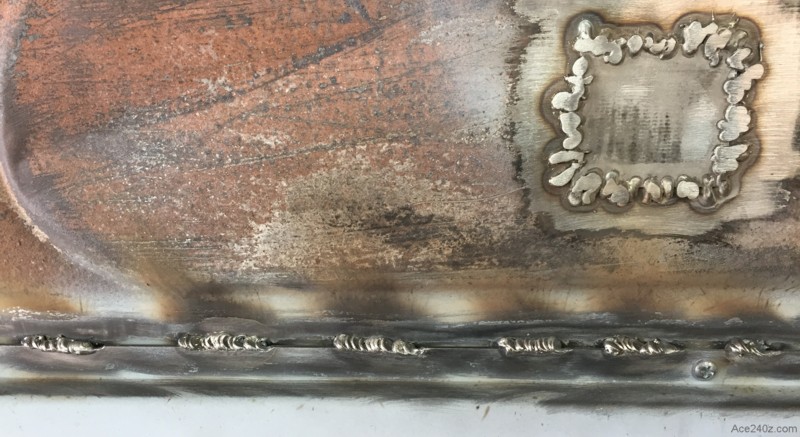
March 11, 2018
I wanted to find a mobile welder to do the floor pan and the Bad Dog reinforcements because my skills are limited and I typically ended up with ragged beads and a lot of splatter. It looked like crap.
However, with some tips and advice I was able to weld the patches, about half of the floor, made a good start on the reinforcements... and then ran out of shielding gas. Nobody sells welding supplies on a Saturday afternoon. Drag. When I learned to weld (thanks to Dr. Tom Pearson) I used argon mixed with CO2. When the bottle went dry, I switched to pure CO2 to save a few bucks but the quality of my amateur welds decreased. Today I picked up a fresh bottle of the blended gas and I bet things improve.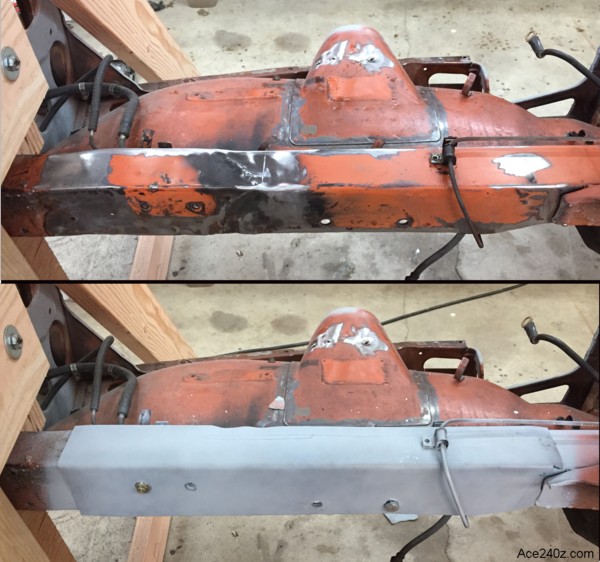
February 23rd, 2018
Hidden beneath some body filler was evidence of a long-ago crash. I'd already bought Bad Dog reinforcement plates for the sway bar mounts but the new mess called for something stronger. I did some sketching, then made a nice cad drawing and emailed it to five local shops. Three ignored me and one quoted an obscene amount and a two-week wait.
By contrast, The Metal Company in Arvada (very nice people) fabbed a pair of 12 ga. reinforcement brackets for me at a good price and a next-day turnaround. The pieces bolted right up to the crossmember and sway bar holes, and with a little bending and prying I managed to get a nearly perfect fit. When they get welded into place they'll provide a lot of rigidity, as well as hiding the gruesome damage.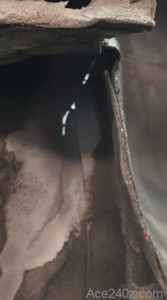
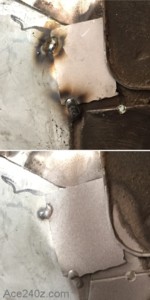
February 11th, 2018
I patched some holes and did more sandblasting. The cleaner the steel, the better the weld. A sandblaster makes short work of any rust or grime, but the grit sprays everywhere so I surrounded the car with some painters plastic and it worked pretty well.
There's an odd-shaped gap at one corner of the seat pan so I cut a little filler piece and spotwelded it, then blasted all around to get rid of the old undercoating. I found a stress crack at the base of the driver's side rear wheel well. I gave it a good blast and was able to see just how far it goes. It'll get welded together and I'll add a patch for good measure. It's the little surprises that will drive you nuts.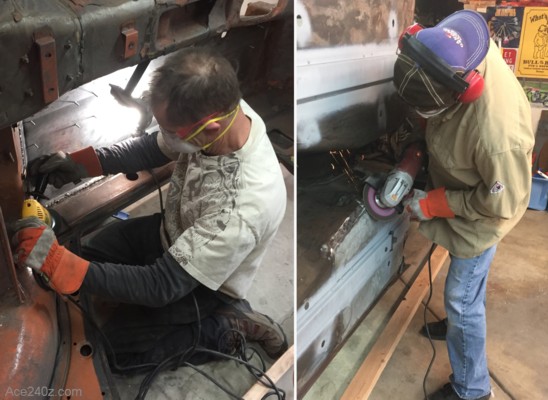
February 3rd, 2018
Some good friends came over to help get ready for welding.
It was mainly grinding and sandblasting and some hammering - not the most glamorous work - but really neccessary to ensure good welds. Everybody received safety gear, hot pizza, plenty of cold beer, and the work went fast. It's still not 100% ready, but damn close. Major thanks to Adolpho Aranda, Phil Tatro, Tomas Rodriquez, and Mac McMurray.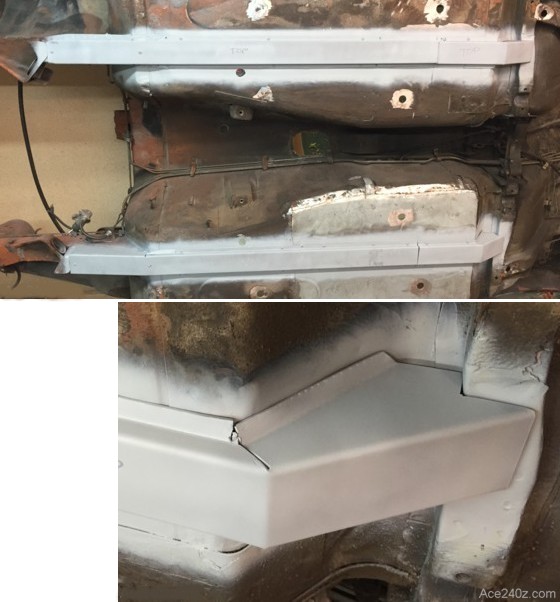
January 1st, 2018
I started off the New Year by installing the reinforcement frame rails.
The Bad Dog parts were excellent but it took about 6 hours to get the undercoat stripped away, the steel trimmed and bent, and everything attached to the body. I managed some very tight fits, so it should weld together pretty easily. There was a lot of back & forth work between car and workbench, crouching and standing, and all that provides a better workout than any fitness center. This is a significant step in the project. There's still more work to be done underneath (some patches, new braces, cracks, etc.), but the hardest part is over. All things considered, this car turned out to have very little rust. There wasn't much in the way of undercoating - you can see the original orange paint - so I suspect it spent most of its life in a warm winter state. However, it now lives in Colorado where body rot is far more likely. It's going to be a daily driver except when there's snow on the ground, so rust shouldn't be a problem. Even so, I'm using a caulk-type seam sealer and fresh undercoating. Once the underbody work is finished, it goes back on the wheels and towed to the bodyshop for several coats of bright red paint.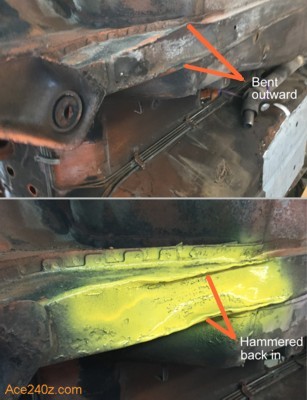
December 10, 2017
I bought a set of Bad Dog frame rails. They're made from thicker steel than stock and fit snugly over the existing rails. They start at the front suspension mounts and go all the way back to the rear mounts. Once installed, the unibody will be much stiffer. A common issue with these cars is damaged frame rails where the car is incorrectly jacked up. The rails are only 16ga and aren't strong enough to hold the weight of the car. Mine were so distorted that the Bad Dog rails wouldn't fit. The proper repair is to cut away the bent-up area and replace it with new steel. I took the easy route and pounded the shit out of them and managed to get them back to the correct width. However... the metal is weaker after being bent back and forth but with the new rails they'll be stronger than from the factory. With some careful triming and tweaking the reinforcement rails will get tacked into place. My welding skills are limited so I'll call a professional to do the rest.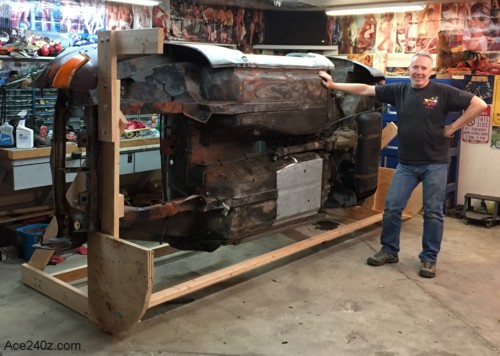
November 28, 2017
The jig worked great. Now I can finish welding the new floor pan, add the Bad Dog reinforcement rails, seal the factory "drain holes," and deal with a variety of little problems. I took advantage of the new access to remove the differential and brackets. Good thing I did because it seems the previous owner had been working on the diff and never tightened all of the bolts holding it in place. If I hadn't tipped the car over, I never would have noticed the problem until the diff fell apart, probably be at high speed.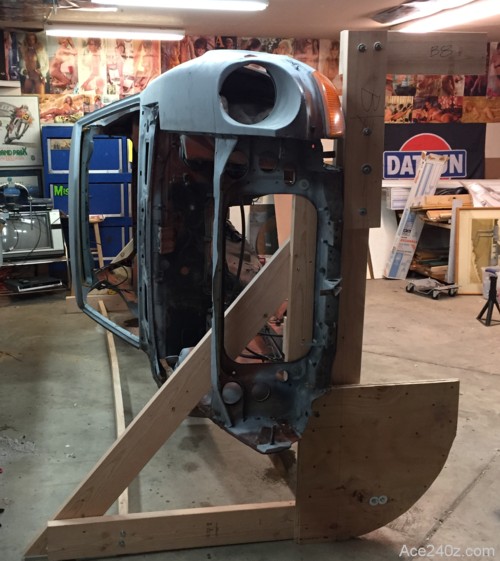
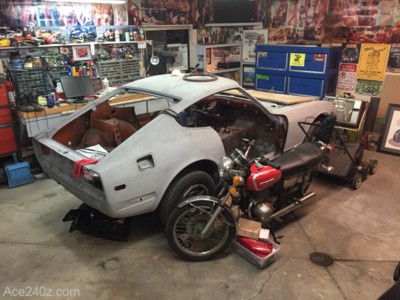
November 23rd, 2017
The hood, doors, and rear hatch have been removed. The front suspension has been rebuilt. Various underbody repairs are needed, so to make that easier I'm building a wooden rollover jig (aka a redneck rotisserie) to tip the car onto its side. Seriously. With the underbody exposed, the work should should go quickly.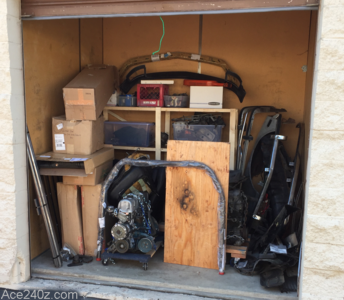
November 7th, 2017
I got tired of stumbling over parts and having to move stuff around whenever I wanted to work, so I rented a storage locker. I built some basic shelves and stuffed everything possible into it. You're looking at three engines, two transmissions, 5 seat frames, three front bumpers and two rear, and all kinds of other crap. It adds up fast. The locker is $88 a month and worth every cent.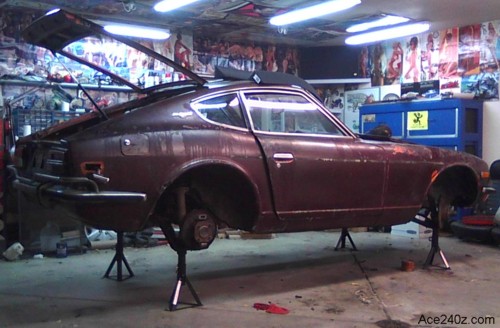 When I created this website, work on the car had already started.
Here's what it looked like. The previous owner had bought it in this condition and intended to restore it himself but after two years of sitting untouched next to his garage, it needed a new home.
The ugly burgundy paint was peeling off and there was some surface rust, but surprisingly little rot. It must have lived most of it's life in a dry climate, as evidenced by a lack of undercoating and the original paint still visible beneath the floors. There were some little dents and dings, which I'd expected, and evidence of a few crashes, which I'd also expected, but otherwise the body was in decent shape. The interior was nasty, with tattered carpet and trashed seats and an awful smell.
However, the engine ran so I bought it and hauled it home on a trailer.
It got pushed into the garage and lifted up onto jackstands and I started pulling it apart, inside and out. I tried to remove the paint with chemical strippers but the results weren't very impressive. I used a sander with an aggressive grit and it did better, but the surface was still pretty rough. The temporary solution was a couple rattle-cans of grey primer.
When I created this website, work on the car had already started.
Here's what it looked like. The previous owner had bought it in this condition and intended to restore it himself but after two years of sitting untouched next to his garage, it needed a new home.
The ugly burgundy paint was peeling off and there was some surface rust, but surprisingly little rot. It must have lived most of it's life in a dry climate, as evidenced by a lack of undercoating and the original paint still visible beneath the floors. There were some little dents and dings, which I'd expected, and evidence of a few crashes, which I'd also expected, but otherwise the body was in decent shape. The interior was nasty, with tattered carpet and trashed seats and an awful smell.
However, the engine ran so I bought it and hauled it home on a trailer.
It got pushed into the garage and lifted up onto jackstands and I started pulling it apart, inside and out. I tried to remove the paint with chemical strippers but the results weren't very impressive. I used a sander with an aggressive grit and it did better, but the surface was still pretty rough. The temporary solution was a couple rattle-cans of grey primer.