240z Tips and Tricks
When you work on enough cars, you start to learn little tricks. Here are a few of my favorites.
Lubricating a Cable
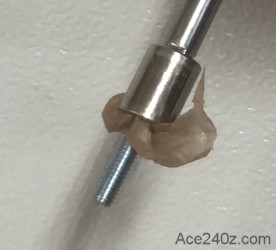
 Occasionally you need to lubricate a cable. You can try to drip some oil into the sheath but it's always a mess.
Here's the easy way. Clamp one end of the cable upright, then use some tape to make a little "funnel" at the top of the sheath and put a rag under the other end. Pour a little oil into the funnel, then let it sit for an hour. When you come back, the funnel will be empty, the rag will be a little wet, and there'll be a nice coat of oil inside the sheath.
Occasionally you need to lubricate a cable. You can try to drip some oil into the sheath but it's always a mess.
Here's the easy way. Clamp one end of the cable upright, then use some tape to make a little "funnel" at the top of the sheath and put a rag under the other end. Pour a little oil into the funnel, then let it sit for an hour. When you come back, the funnel will be empty, the rag will be a little wet, and there'll be a nice coat of oil inside the sheath.
Changing the Transmission or Differential Fluid
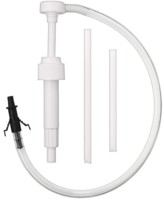 It's not difficult. Drain the old fluid and pump some nice fresh fluid inside. For the transmission, you need 2 quarts of GL-4 (which is 75w90), and 1.5 quarts of GL-5 for the differential. I'm currently using the Redline brand, but their quart bottles won't work with hand pumps like you see here. I messaged them and their reply was they have no plans to change the tops of their bottles to be like everyone else's. My suggestion is buy your fluid from a different manufacturer because I don't think the brand really matters.
With that said, there's a potential nightmare lurking. Before you drain your transmission or differential make sure you can get the filler plug out.
Not being able to pump new fluid inside will ruin your day. Supposedly you can remove the shifter and pour fluid thru the opening, but there's no way to know if you've put the right amount in. I've never tried it, so I'm not sure if it really works.
Fill the trans or diff up to the point where it just starts to dribble out the opening, screw the plug back in, and you're done.
One final warning: differential fluid smells horrible. After you dispose of the old fluid (in a responsible manner) and throw away any soaked rags, your garage might still reek for a few days so try to do the change outdoors.
It's not difficult. Drain the old fluid and pump some nice fresh fluid inside. For the transmission, you need 2 quarts of GL-4 (which is 75w90), and 1.5 quarts of GL-5 for the differential. I'm currently using the Redline brand, but their quart bottles won't work with hand pumps like you see here. I messaged them and their reply was they have no plans to change the tops of their bottles to be like everyone else's. My suggestion is buy your fluid from a different manufacturer because I don't think the brand really matters.
With that said, there's a potential nightmare lurking. Before you drain your transmission or differential make sure you can get the filler plug out.
Not being able to pump new fluid inside will ruin your day. Supposedly you can remove the shifter and pour fluid thru the opening, but there's no way to know if you've put the right amount in. I've never tried it, so I'm not sure if it really works.
Fill the trans or diff up to the point where it just starts to dribble out the opening, screw the plug back in, and you're done.
One final warning: differential fluid smells horrible. After you dispose of the old fluid (in a responsible manner) and throw away any soaked rags, your garage might still reek for a few days so try to do the change outdoors.
Bolting the Intake Manifolds and Exhaust to the Head
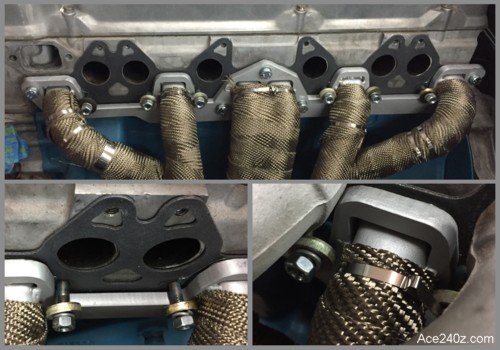 Attaching the intake and exhaust manifolds to the head can be a struggle. There are six studs for the exhaust, bolts for the heads, and some very fat washers that span all three manifolds. It's extremely difficult to get the washers and nuts in-between the pieces, but on a very old blog I learned an easy way.
Put the exhaust manifold on the studs, then put the fat washers and nuts into place very loosely. Now you can slide the intake manifolds down into place, attach it with the bolts, and tighten everything without worrying about dropping the washers or nuts.
Of course, a couple of the nuts are tough to get at with a socket or wrench, but at least they're already on the studs.
Attaching the intake and exhaust manifolds to the head can be a struggle. There are six studs for the exhaust, bolts for the heads, and some very fat washers that span all three manifolds. It's extremely difficult to get the washers and nuts in-between the pieces, but on a very old blog I learned an easy way.
Put the exhaust manifold on the studs, then put the fat washers and nuts into place very loosely. Now you can slide the intake manifolds down into place, attach it with the bolts, and tighten everything without worrying about dropping the washers or nuts.
Of course, a couple of the nuts are tough to get at with a socket or wrench, but at least they're already on the studs.
Pulling Off A Pulley
 If you're using a puller for something, it can be frustrating to keep the "fingers" in place while you turn the screw.
A large hose clamp for a dryer vent, or something similar, can hold everything together while you give it some leverage. It seemed work for someone else, so someday I'll try it myself.
If you're using a puller for something, it can be frustrating to keep the "fingers" in place while you turn the screw.
A large hose clamp for a dryer vent, or something similar, can hold everything together while you give it some leverage. It seemed work for someone else, so someday I'll try it myself.
Pulling Off A Tough Bolt
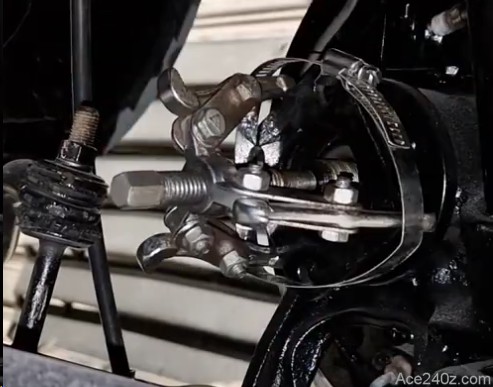
 Trying to loosen a suspension bolt but your breaker bar isn't long enough? Even with a cheater pipe? Here's an interesting solution. Use a floor jack.
This guy was trying to loosen the nut holding the stub axle. If you're lucky enough to have a compressor and an impact driver, it's not very difficult, but for everyone else it's a nightmare. He put a floor jack under the end of the breaker bar and used it's two-ton capacity, and a crowbar between the hub's lugs, to get it loose.
Of course, the end of the breaker bar might pop out of the jack's plate, or the bar itself might snap, or the bolt you're trying to remove could shear, and in any of those scenarios you might be injured, so try it at your own risk. I would.
Trying to loosen a suspension bolt but your breaker bar isn't long enough? Even with a cheater pipe? Here's an interesting solution. Use a floor jack.
This guy was trying to loosen the nut holding the stub axle. If you're lucky enough to have a compressor and an impact driver, it's not very difficult, but for everyone else it's a nightmare. He put a floor jack under the end of the breaker bar and used it's two-ton capacity, and a crowbar between the hub's lugs, to get it loose.
Of course, the end of the breaker bar might pop out of the jack's plate, or the bar itself might snap, or the bolt you're trying to remove could shear, and in any of those scenarios you might be injured, so try it at your own risk. I would.
Hold A Bolt
 If you're trying to put a bolt somewhere and it keeps slipping out of the socket, use a piece of a plastic grocery bag to hold it in place.
Clean Fouled Spark Plugs
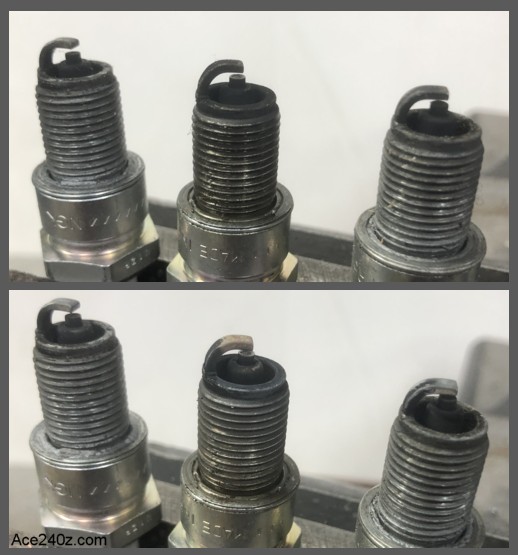 If your plugs get oil fouled don't use sandpaper to clean them because it might leave grit behind that could fall inside the cylinder. Instead, try a propane torch to burn the oil off. It's fast and easy.
Prime The Oil Pump
 If you replace the oil pump, you need to "prime" it by filling it with oil before you start the engine. If the pump is dry, it can't create enough vacuum to draw oil from the pan and push it into important places such as the crankcase and cam bearings.
The standard method is to fill the pump with oil before you install it, but I know from personal experience that it's messy and makes it difficult to get a good seal between it and the block. Fortunately, a better method exists.
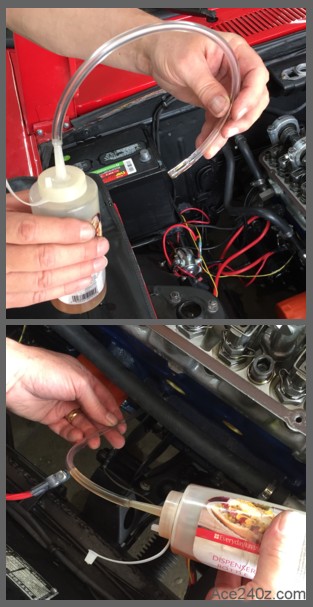
The way the oil system works is that oil is pulled from the pan via a mesh-covered pickup tube, then thru the filter and down a passage in the block that ends at the pump. In the middle of the internal passage is an opening for the oil pressure sensor and you can use that for the priming.
Remove the sensor and stick a short piece of flexible tubing into the hole. You can use a small funnel to pour oil into the tube, but I bought a cheap plastic squirt bottle (the kind for mustard or ketchup) at the local supermarket, filled it with oil and stuck it into the end of the tube.
Fill the passage with oil until it dribbles out the hole. Let it sit for a minute as the oil slowly trickles into the pump mechanism, then add a little more oil. After that you can screw the sensor back in. Adding oil to the filter before screwing it in place helps the process even further.
The pump is now primed and you avoided a mess and ensured a good seal.
If you replace the oil pump, you need to "prime" it by filling it with oil before you start the engine. If the pump is dry, it can't create enough vacuum to draw oil from the pan and push it into important places such as the crankcase and cam bearings.
The standard method is to fill the pump with oil before you install it, but I know from personal experience that it's messy and makes it difficult to get a good seal between it and the block. Fortunately, a better method exists.
The way the oil system works is that oil is pulled from the pan via a mesh-covered pickup tube, then thru the filter and down a passage in the block that ends at the pump. In the middle of the internal passage is an opening for the oil pressure sensor and you can use that for the priming.
Remove the sensor and stick a short piece of flexible tubing into the hole. You can use a small funnel to pour oil into the tube, but I bought a cheap plastic squirt bottle (the kind for mustard or ketchup) at the local supermarket, filled it with oil and stuck it into the end of the tube.
Fill the passage with oil until it dribbles out the hole. Let it sit for a minute as the oil slowly trickles into the pump mechanism, then add a little more oil. After that you can screw the sensor back in. Adding oil to the filter before screwing it in place helps the process even further.
The pump is now primed and you avoided a mess and ensured a good seal.
Door Window Glass
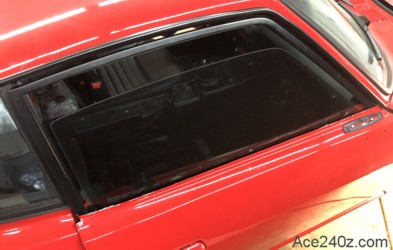 Taking the door window glass out can be a little tricky.
Putting it back in and getting it aligned can be a major pain in the ass, and I say that from unhappy experience. Hopefully this page will make it easier for you.
Click here to see how it's done.
Taking the door window glass out can be a little tricky.
Putting it back in and getting it aligned can be a major pain in the ass, and I say that from unhappy experience. Hopefully this page will make it easier for you.
Click here to see how it's done.
Sorting Thru Nuts and Bolts
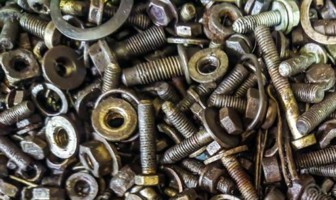 If you've been working on cars long enough you tend to have a jar or can of assorted nuts, bolts and washers. When you're looking for a certain piece, you usually have to dump the contents on your workbench to sift and sort, then pick up everything to put it back in the jar.
I found a great way to make that easier. Click here to see how.
If you've been working on cars long enough you tend to have a jar or can of assorted nuts, bolts and washers. When you're looking for a certain piece, you usually have to dump the contents on your workbench to sift and sort, then pick up everything to put it back in the jar.
I found a great way to make that easier. Click here to see how.
Easily Clean a Rusty Fuel Tank
 A 50 year old car can accumulate a lot of rust. One of those places is inside the fuel tank. The best way to clean a tank is to drain the gas, then remove the tank from the car. (See below on how to make new vent hoses on a budget.)
There are a lot of traditional methods to get rid of the rust. One is vinegar - fill the tank and let it sit overnight, but that requires nearly 15 gallons (which is pretty stinky). Another method is muriatic acid - pour some in and gently slosh it around (make sure you wear rubber gloves and eye protection) and let it sit for an hour, then carefully pour it out (and neutralize it), then wash the inside several times with water. A third method is to throw some ball bearings or hex nuts or a piece of chain inside (along with some water) and shake it vigorously for 10-15 minutes. All of those methods work to varying degrees, but there's an easier and cheaper way.
Think about chroming a bumper. It's suspended in a tank of solution and connected to the positive lead of a power source. Also inside that solution is a plate of chromium connected to the negative lead of a power supply. When the power is turned on, microscopic particles of chromium flow from the plate to the bumper. Leave the power on long enough and a nice layer of chromium covers the bumper.
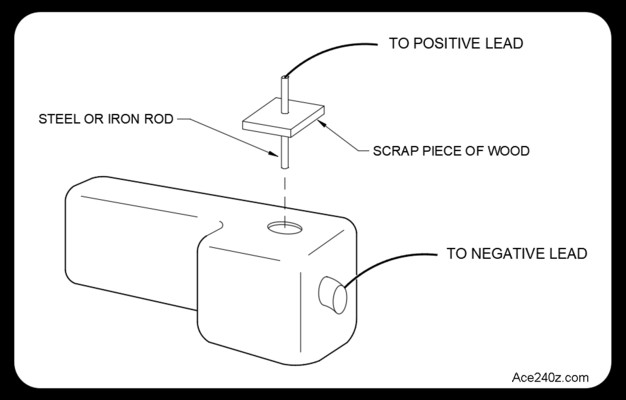
To clean a fuel tank, you reverse the process. Tilt the tank on its side and plug every hole. Completely fill the tank with a solution of water and one cup of Arm & Hammer Washing Soda (not baking powder). Suspend a steel rod or bar into the tank thru the fuel level sensor hole and (this is important) don't let the rod touch any part of the tank. Use a piece of wood as an insulator. Clean a small part of the tank (such as the filler tube) down to bare metal. Connect the negative clamp from a battery charger to that bare spot. Connect the positive clamp from the charger to the steel rod, then plug it in.
The rust on the walls of the tank will gradually break free and flow to the steel rod. It's seriously that easy. Every half hour or so turn off the charger and pull the bar out. It'll be covered with ugly gunk. Wipe it clean, drop it back into the tank and turn the power back on. Within about two hours the inside of the tank will be sparkling clean. Turn off the power, remove the rod and the clamps, then rinse the tank clean. Unlike acid, the washing soda is safe to pour down the drain. Put a little oil inside and slosh it around to coat the surfaces to prevent any rust coming back. I sprayed mine with WD-40, which worked quite well. Instead of oil you can use something like POR-15 to coat the interior and prevent it from ever rusting again.
That's it. You're done.
A 50 year old car can accumulate a lot of rust. One of those places is inside the fuel tank. The best way to clean a tank is to drain the gas, then remove the tank from the car. (See below on how to make new vent hoses on a budget.)
There are a lot of traditional methods to get rid of the rust. One is vinegar - fill the tank and let it sit overnight, but that requires nearly 15 gallons (which is pretty stinky). Another method is muriatic acid - pour some in and gently slosh it around (make sure you wear rubber gloves and eye protection) and let it sit for an hour, then carefully pour it out (and neutralize it), then wash the inside several times with water. A third method is to throw some ball bearings or hex nuts or a piece of chain inside (along with some water) and shake it vigorously for 10-15 minutes. All of those methods work to varying degrees, but there's an easier and cheaper way.
Think about chroming a bumper. It's suspended in a tank of solution and connected to the positive lead of a power source. Also inside that solution is a plate of chromium connected to the negative lead of a power supply. When the power is turned on, microscopic particles of chromium flow from the plate to the bumper. Leave the power on long enough and a nice layer of chromium covers the bumper.
To clean a fuel tank, you reverse the process. Tilt the tank on its side and plug every hole. Completely fill the tank with a solution of water and one cup of Arm & Hammer Washing Soda (not baking powder). Suspend a steel rod or bar into the tank thru the fuel level sensor hole and (this is important) don't let the rod touch any part of the tank. Use a piece of wood as an insulator. Clean a small part of the tank (such as the filler tube) down to bare metal. Connect the negative clamp from a battery charger to that bare spot. Connect the positive clamp from the charger to the steel rod, then plug it in.
The rust on the walls of the tank will gradually break free and flow to the steel rod. It's seriously that easy. Every half hour or so turn off the charger and pull the bar out. It'll be covered with ugly gunk. Wipe it clean, drop it back into the tank and turn the power back on. Within about two hours the inside of the tank will be sparkling clean. Turn off the power, remove the rod and the clamps, then rinse the tank clean. Unlike acid, the washing soda is safe to pour down the drain. Put a little oil inside and slosh it around to coat the surfaces to prevent any rust coming back. I sprayed mine with WD-40, which worked quite well. Instead of oil you can use something like POR-15 to coat the interior and prevent it from ever rusting again.
That's it. You're done.
Shifter Boot Clips
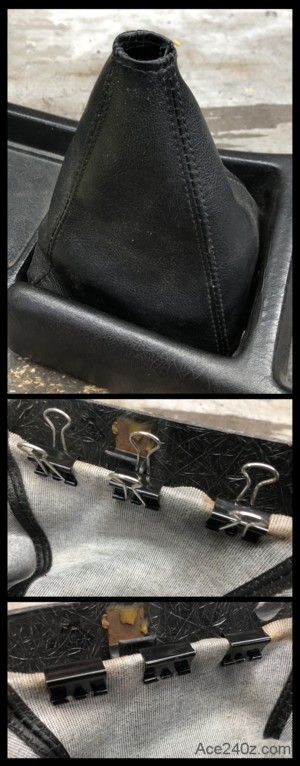 The stock shifter boot is made from vinyl and is attached to the center console from underneath, held in place by 8 "press-on" metal clips. It's a quick method for an assembly line.
If you're replacing the boot, sometimes a few of the clips are missing. If you're restoring a car that no longer has a boot, chances are there are no clips at all.
You can buy the stock-type replacements. Used ones aren't very cheap and new ones are too expensive to consider, and buying either one has to be shipped, which puts the boot replacement on hold.
However, a cheap, easy and fast solution exists. Look in your local grocery story on the aisle with school and office supplies and buy a box of spring clips that are used to hold sheets of paper together. Get the smallest size they have.
They work just as well as the stock press-on clips. When they're in place, the chrome "handles" are easy to remove and you're finished.
While you have the console off, look at the rubber weatherproof boot that seals the hole in the transmission tunnel. It keeps water and cold air from blowing up underneath the console and into the cabin. Is it torn or missing? There's a much smaller boot where the shifter connects to the transmission. It keep water and dirt out of the shifter bushings. Is it also torn or missing? If so, now's a great time to replace both. It's not something your friends will be impressed by, but it'll make a difference in the long run.
The stock shifter boot is made from vinyl and is attached to the center console from underneath, held in place by 8 "press-on" metal clips. It's a quick method for an assembly line.
If you're replacing the boot, sometimes a few of the clips are missing. If you're restoring a car that no longer has a boot, chances are there are no clips at all.
You can buy the stock-type replacements. Used ones aren't very cheap and new ones are too expensive to consider, and buying either one has to be shipped, which puts the boot replacement on hold.
However, a cheap, easy and fast solution exists. Look in your local grocery story on the aisle with school and office supplies and buy a box of spring clips that are used to hold sheets of paper together. Get the smallest size they have.
They work just as well as the stock press-on clips. When they're in place, the chrome "handles" are easy to remove and you're finished.
While you have the console off, look at the rubber weatherproof boot that seals the hole in the transmission tunnel. It keeps water and cold air from blowing up underneath the console and into the cabin. Is it torn or missing? There's a much smaller boot where the shifter connects to the transmission. It keep water and dirt out of the shifter bushings. Is it also torn or missing? If so, now's a great time to replace both. It's not something your friends will be impressed by, but it'll make a difference in the long run.
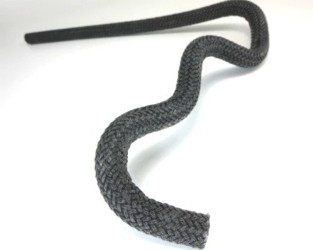
How to Straighten Hoses
 When you buy bulk hose at your local parts store, it's always curled because they have it wound on a spool. To straighten it out, use an old piece of wood and some nails to hold it in place, then use a heat gun to soften it up. You need to get it pretty hot, then let it cool and repeat the cycle a few times.
Be careful with the heat gun to prevent it from melting entirely, or worse, catching on fire.
When you buy bulk hose at your local parts store, it's always curled because they have it wound on a spool. To straighten it out, use an old piece of wood and some nails to hold it in place, then use a heat gun to soften it up. You need to get it pretty hot, then let it cool and repeat the cycle a few times.
Be careful with the heat gun to prevent it from melting entirely, or worse, catching on fire.
Fuel Tank Hoses
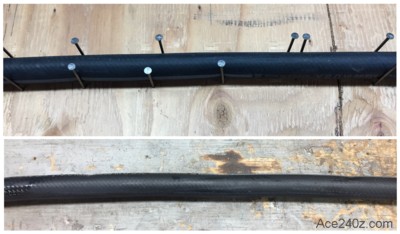
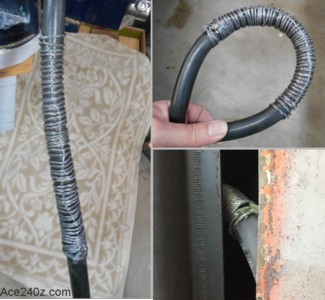 A couple of the fuel tank vent hoses are molded to specific shapes. If you try to use an ordinary hose it'll kink and close. Some people put a long spring inside the hose to keep if from collapsing. I couldn't find a spring that would fit, so I wound about 3' of woven cable on the outside. It's 1/8" diameter and you can get it at your local home improvement store. The sharp ends were covered with a few blobs of epoxy. The result is a hose that won't kink. Look at how far I was able to bend it.
A bonus is the protection. One of the hoses is slightly underneath the body and right next to the tank. With the cable wrapping there's no chance of the hose chafing or splitting.
The pair of stock molded hoses was about $100. Using bulk hose and cable was about $20.
Warning: never use coolant/heater hoses to vent gasoline. They will rot. Always use hoses made for gasoline.
A couple of the fuel tank vent hoses are molded to specific shapes. If you try to use an ordinary hose it'll kink and close. Some people put a long spring inside the hose to keep if from collapsing. I couldn't find a spring that would fit, so I wound about 3' of woven cable on the outside. It's 1/8" diameter and you can get it at your local home improvement store. The sharp ends were covered with a few blobs of epoxy. The result is a hose that won't kink. Look at how far I was able to bend it.
A bonus is the protection. One of the hoses is slightly underneath the body and right next to the tank. With the cable wrapping there's no chance of the hose chafing or splitting.
The pair of stock molded hoses was about $100. Using bulk hose and cable was about $20.
Warning: never use coolant/heater hoses to vent gasoline. They will rot. Always use hoses made for gasoline.
Brake Booster Hoses
 A pre-made brake booster hose is expensive. The cheapest I could find online was $95 but I made one that looks nearly identical (and works just as well) for a mere $15. Click here to see how.
Remove Floor Deadening With Dry Ice
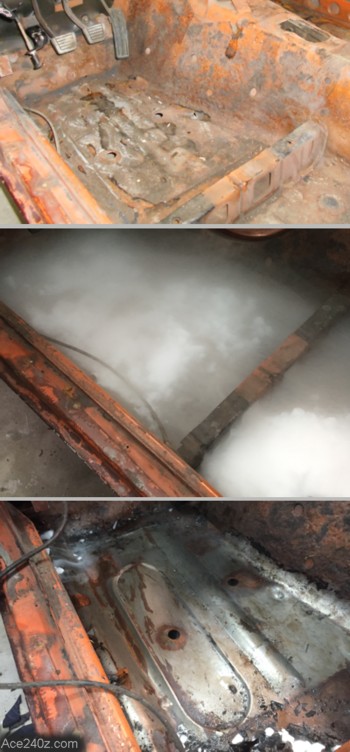 I didn't invent this method, but it's certainly worth passing along. When these cars were being built, they applied some sort of thick, rubbery insulation on the floors and transmission tunnel. Over the years it becomes rock-hard. Removing it is nasty, ugly work, typically using a heat gun and a putty knife and a lot of toil.
Buy a block of dry ice and a large bottle of rubbing alcohol. Break the ice into small chunks and dump them into a bucket. Pour the rubbing alcohol over the chunks of dry ice and stir until it forms a thick slush. Pour that slush directly on top of the insulation. Within 15-20 seconds you'll hear cracking sounds. The slush is so cold that the insulation freezes and turns brittle, and in the process it shrinks so quickly that it breaks itself into pieces and pops right off the steel floor. Bang on the insulation with a hammer to break it up even further. A putty knife can easily scrape up the little remaining pieces.
The dry ice and rubbing alcohol will evaporate, leaving clean metal behind. It takes about 10 minutes on each side.
Warning: make sure you have good ventilation because you don't want to breathe the vapors - you could suffocate from a lack of oxygen. Wear thick gloves because dry ice will burn your skin.
The sides of the transmission tunnel are a little tougher. Use the same kind of slush but pour it into a plastic bag, drape it against the side, wait 2-3 minutes and then you can break apart the insulation, but only in that area. It's slow but still better than a heat gun.
I didn't invent this method, but it's certainly worth passing along. When these cars were being built, they applied some sort of thick, rubbery insulation on the floors and transmission tunnel. Over the years it becomes rock-hard. Removing it is nasty, ugly work, typically using a heat gun and a putty knife and a lot of toil.
Buy a block of dry ice and a large bottle of rubbing alcohol. Break the ice into small chunks and dump them into a bucket. Pour the rubbing alcohol over the chunks of dry ice and stir until it forms a thick slush. Pour that slush directly on top of the insulation. Within 15-20 seconds you'll hear cracking sounds. The slush is so cold that the insulation freezes and turns brittle, and in the process it shrinks so quickly that it breaks itself into pieces and pops right off the steel floor. Bang on the insulation with a hammer to break it up even further. A putty knife can easily scrape up the little remaining pieces.
The dry ice and rubbing alcohol will evaporate, leaving clean metal behind. It takes about 10 minutes on each side.
Warning: make sure you have good ventilation because you don't want to breathe the vapors - you could suffocate from a lack of oxygen. Wear thick gloves because dry ice will burn your skin.
The sides of the transmission tunnel are a little tougher. Use the same kind of slush but pour it into a plastic bag, drape it against the side, wait 2-3 minutes and then you can break apart the insulation, but only in that area. It's slow but still better than a heat gun.
Compact Emergency Spare Tire
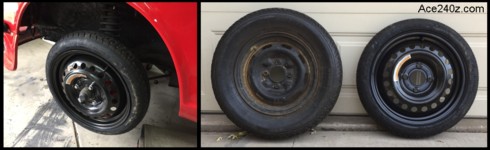 From 1972 and up, there are a pair of storage compartments behind the seats that can be used for the jack and handle. The '70 and '71 don't have them. Instead, the jack and handle were stored in a pair of plastic boxes, which these days are nearly impossible to find. I discovered the emergency spare from an '07-'12 Nissan Sentra will fit a 240z hub and leaves just enough room in the tire well for a tiny scissor jack and wrench. It's also 13 pounds lighter. I snagged this brand-new one from a salvage yard for a mere $17. What a bargain.
Removing a Broken-off Bolt
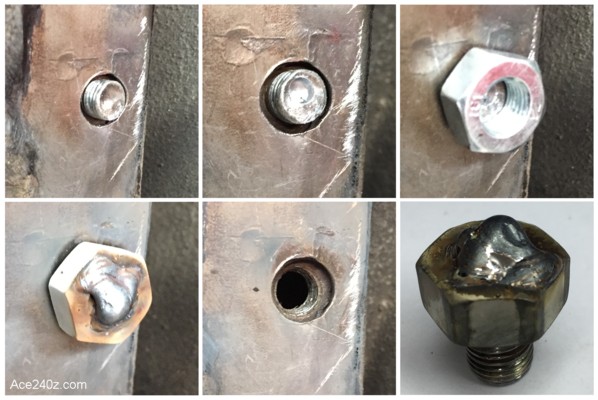 Here's gift from the previous owner: a broken-off bolt for the differential mount.
A few threads were exposed, so I drilled a hole about 1/8" deep and managed to wedge a nut over the threads, then zapped it with my welder, starting inside the hole and slowly backing out. I let it cool off, gave a few careful tugs, and out it came.
Bonus was gaining a new marker for the next time I play Monopoly.
Here's gift from the previous owner: a broken-off bolt for the differential mount.
A few threads were exposed, so I drilled a hole about 1/8" deep and managed to wedge a nut over the threads, then zapped it with my welder, starting inside the hole and slowly backing out. I let it cool off, gave a few careful tugs, and out it came.
Bonus was gaining a new marker for the next time I play Monopoly.
How to Remove a Broken-Off Tap
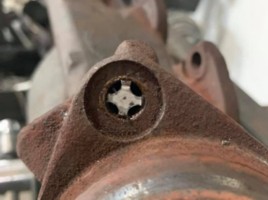 Having a tap to clean out rusty threads is great but if the tap breaks off in the hole it can be a nightmare.
Here's a clever method I found online to remove the broken part. Click on the pic to see how it's done.
Having a tap to clean out rusty threads is great but if the tap breaks off in the hole it can be a nightmare.
Here's a clever method I found online to remove the broken part. Click on the pic to see how it's done.
Brake and Clutch Pedal Pivots
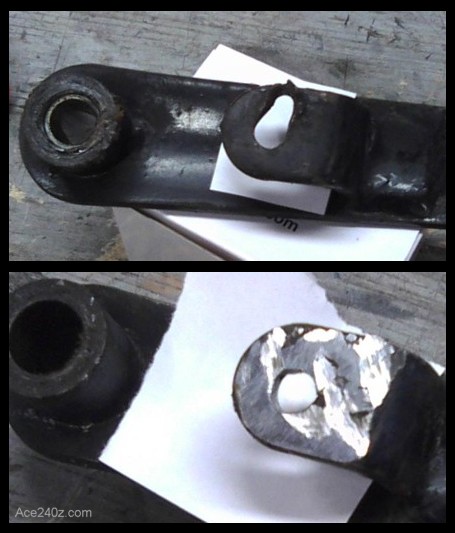 Each pedal has a little hole to connect it to the brake or clutch master cylinder. Here's what the hole on my clutch pedal looked like after 50 years of use. It was so worn that it could have snapped at any time. Imagine being at a stoplight when it broke. Suddenly you ram into the car in front of you, or worse, you lurch out in the middle of traffic. Imagine that happening with your brakes.
My solution was to remove the pedals (one bolt and a spring for each one) and weld the holes shut. If you don't have a welder, a local shop can probably do it for a few bucks. Grind the welds flat and drill new holes. Grease the holes and the bushings when you put it all back together. Ought to be good for another 50 years.
Each pedal has a little hole to connect it to the brake or clutch master cylinder. Here's what the hole on my clutch pedal looked like after 50 years of use. It was so worn that it could have snapped at any time. Imagine being at a stoplight when it broke. Suddenly you ram into the car in front of you, or worse, you lurch out in the middle of traffic. Imagine that happening with your brakes.
My solution was to remove the pedals (one bolt and a spring for each one) and weld the holes shut. If you don't have a welder, a local shop can probably do it for a few bucks. Grind the welds flat and drill new holes. Grease the holes and the bushings when you put it all back together. Ought to be good for another 50 years.
Cleaning Rusty Parts - The Cheap Method
 If you don't have a sandblaster and don't have cash for chemical rust removers, use grandma's method: vinegar. Put the parts in a small container and fill it with vinegar and let it sit overnight. It's amazing how well it can work. Vinegar is stinky but non-toxic, so when the parts are clean you can pour it down the drain. Give everything a good rinse followed by a coat of primer & paint to prevent the rust from coming back.
I bought a 16 oz bottle for just 99 cents at the supermarket.
If you don't have a sandblaster and don't have cash for chemical rust removers, use grandma's method: vinegar. Put the parts in a small container and fill it with vinegar and let it sit overnight. It's amazing how well it can work. Vinegar is stinky but non-toxic, so when the parts are clean you can pour it down the drain. Give everything a good rinse followed by a coat of primer & paint to prevent the rust from coming back.
I bought a 16 oz bottle for just 99 cents at the supermarket.
Cleaning Rusty Parts - The Faster Method
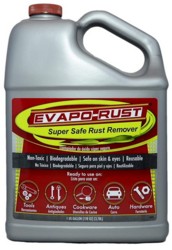 If you can't wait overnight with the vinegar method, use a chemical stripper. It costs a little more but works much faster. Evapo-Rust is pretty good and disolves nearly all rust in about 2 hours. Like vinegar, it's non-toxic, but unlike vinegar it can be poured back into the container and reused, so in the long run it might be cheaper.
There are other strippers on the market and some work even faster, but if you try to buy them at a box store they're special-order items and you'll probably have to wait several days before it arrives. I bought half a gallon of this for $10 at my local auto parts store.
If you can't wait overnight with the vinegar method, use a chemical stripper. It costs a little more but works much faster. Evapo-Rust is pretty good and disolves nearly all rust in about 2 hours. Like vinegar, it's non-toxic, but unlike vinegar it can be poured back into the container and reused, so in the long run it might be cheaper.
There are other strippers on the market and some work even faster, but if you try to buy them at a box store they're special-order items and you'll probably have to wait several days before it arrives. I bought half a gallon of this for $10 at my local auto parts store.
Painting Bolts and Washers
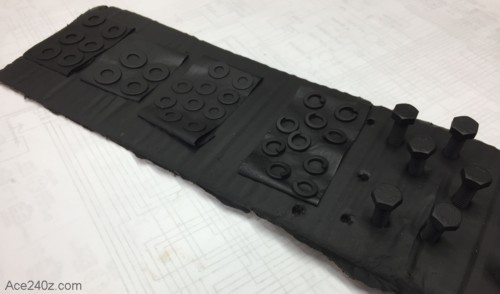 Painting dull hardware makes a big difference.
Use a piece of cardboard and poke some holes in it to hold the bolts upright. Washers tend to blow off the cardboard, so take some masking tape and make a loop with the sticky side facing out and use it to hold the washers in place.
If you're painting new hardware (like I do to make everything match), give it a good scuff with some sandpaper, then use rubbing alcohol to clean the surfaces. It makes a big difference.
Painting dull hardware makes a big difference.
Use a piece of cardboard and poke some holes in it to hold the bolts upright. Washers tend to blow off the cardboard, so take some masking tape and make a loop with the sticky side facing out and use it to hold the washers in place.
If you're painting new hardware (like I do to make everything match), give it a good scuff with some sandpaper, then use rubbing alcohol to clean the surfaces. It makes a big difference.
Making Holes in Automotive Carpet
 When you have to put a bolt thru a piece of carpet, it can be a real pain the ass. The backing is pretty thick and rugged (which it needs to be) and the pile is a nylon weave which resists cutting (which it should).
Making a hole can be pretty tough. A razor blade is awkward and requires a lot of sawing back and forth, and the result is usually ragged. A drill can make a nice hole, but the bit can snag a loop of the pile and pull the entire string out of one row before you can react, which will ruin your day.
The best solution I've seen comes from Vice Grip Garage. I did a couple of screen captures from one of Derek's videos and hopefully he won't mind (especially since I used his logo to give him full credit).
Take a piece of steel bar the same diameter as the hole you need. Use a torch to get it really, really hot, then jam it thru the carpet where the bolt will go. The hot steel burns right thru, plus it melts the pile around it, preventing it from unravelling.
I've used this trick myself and can attest it works great!
When you have to put a bolt thru a piece of carpet, it can be a real pain the ass. The backing is pretty thick and rugged (which it needs to be) and the pile is a nylon weave which resists cutting (which it should).
Making a hole can be pretty tough. A razor blade is awkward and requires a lot of sawing back and forth, and the result is usually ragged. A drill can make a nice hole, but the bit can snag a loop of the pile and pull the entire string out of one row before you can react, which will ruin your day.
The best solution I've seen comes from Vice Grip Garage. I did a couple of screen captures from one of Derek's videos and hopefully he won't mind (especially since I used his logo to give him full credit).
Take a piece of steel bar the same diameter as the hole you need. Use a torch to get it really, really hot, then jam it thru the carpet where the bolt will go. The hot steel burns right thru, plus it melts the pile around it, preventing it from unravelling.
I've used this trick myself and can attest it works great!