240z Brake Repairs
Replacing the disc brake pads are far easier than you'd expect
The front brakes on a 240z are pretty simple and the parts are relatively cheap. Replacing the pads on each side only takes about 15 minutes. If your brakes are making a grinding sound, it probably means the pads are so worn down that the steel backing plates are rubbing directly on the rotor. If so, you'll need to get the rotors resurfaced (aka "turned") to remove any grooves. If the damage is bad enough you'll need to get new rotors. This page doesn't go into the process of removing the calipers and rotors but there are videos on YouTube that show the entire thing. This page also doesn't cover how to replace the shoes in the rear brakes. It's very helpful to have a copy of the factory service manual for reference. Click here for a free pdf version. Aside from a jack to lift the car and a wrench to remove the lug nuts, the only tools you'll need are a pair of pliers, a small screwdriver, a large screwdriver and a hammer. A can of brake cleaner spray is helpful, but not required. The parts are two pairs of pads and some anti-squeal grease. Your local parts store likely has them.
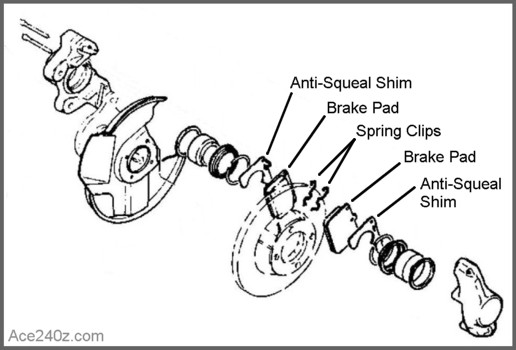 Here's an exploded-view diagram of the entire thing.
All you'll be dealing with are the pads, anti-squeal shims, spring clips, retaining clips and a pair of long pins. You don't have to remove the calipers from the car or do any bleeding.
A shop would probably charge $100 - $200. You can do it for a lot less because it's easy.
Here's an exploded-view diagram of the entire thing.
All you'll be dealing with are the pads, anti-squeal shims, spring clips, retaining clips and a pair of long pins. You don't have to remove the calipers from the car or do any bleeding.
A shop would probably charge $100 - $200. You can do it for a lot less because it's easy.
 Loosen the lug nuts. Jack the car up. Remove the wheel and slide it under the car.
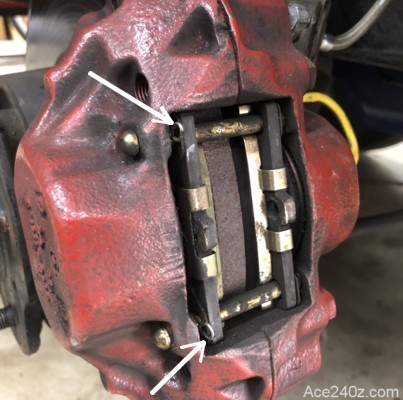
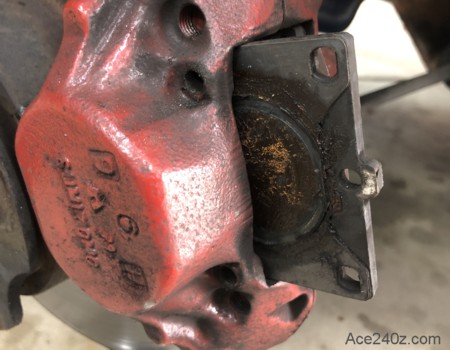
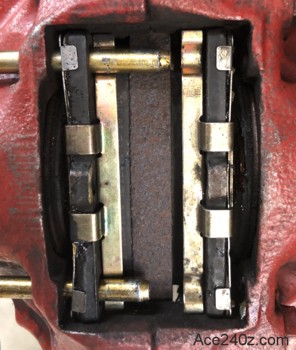
That's the area you'll be working on. Compare it to the diagram above. Pretty much all cars have the same basic design.
Start by using the pliers to remove the little retaining clips where the arrows point. Put them someplace safe because they're easy to lose.
Loosen the lug nuts. Jack the car up. Remove the wheel and slide it under the car.
That's the area you'll be working on. Compare it to the diagram above. Pretty much all cars have the same basic design.
Start by using the pliers to remove the little retaining clips where the arrows point. Put them someplace safe because they're easy to lose.
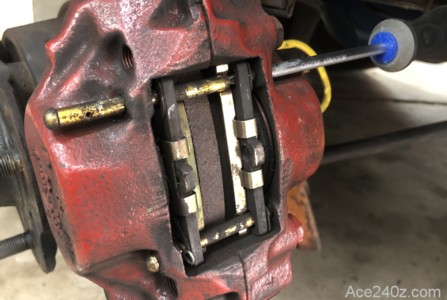 Use a small screwdriver and a hammer to tap the pins out.
When the second pin comes out, the spring clips will pop right off.
Use a small screwdriver and a hammer to tap the pins out.
When the second pin comes out, the spring clips will pop right off.
 Use the pliers to pull the pads out. It might take a little tugging and jiggling.
When the pads come out, the anti-squeal shims will come out with them. You don't see the shims here because my brakes didn't have them.
When I bought my car, it was in really rough shape. The owner told me it didn't have any brakes. Typically, that means the brakes aren't working for one reason or another. With mine, the front calipers were rusted solid and in the rear there were no parts at all - no shoes, no springs, no cylinders - nothing.
I bought remanufactured calipers and some pads but didn't know about the anti-squeal shims because there weren't any with the original calipers. I (wrongly) assumed none were needed. Ha-ha. I knew I needed anti-squeal grease so I added some between the pads and pistons. For the first 200-300 miles all was fine but eventually they started making very loud and very annoying sounds.
After looking at the factory diagram I realized I'd screwed up.
A side note about the pads: disc brakes work mainly by squeezing, not by friction. Most of the pads at the auto parts stores are low-friction because they last longer. However, if you want better stopping power, you can find versions only with more "grit", which enables you to stop more quickly. The downside is they'll wear the rotors down faster. After a few sets of those pads you'll probably have to replace the rotors because the surfaces will be too thin for safety. It's your choice.
Use the pliers to pull the pads out. It might take a little tugging and jiggling.
When the pads come out, the anti-squeal shims will come out with them. You don't see the shims here because my brakes didn't have them.
When I bought my car, it was in really rough shape. The owner told me it didn't have any brakes. Typically, that means the brakes aren't working for one reason or another. With mine, the front calipers were rusted solid and in the rear there were no parts at all - no shoes, no springs, no cylinders - nothing.
I bought remanufactured calipers and some pads but didn't know about the anti-squeal shims because there weren't any with the original calipers. I (wrongly) assumed none were needed. Ha-ha. I knew I needed anti-squeal grease so I added some between the pads and pistons. For the first 200-300 miles all was fine but eventually they started making very loud and very annoying sounds.
After looking at the factory diagram I realized I'd screwed up.
A side note about the pads: disc brakes work mainly by squeezing, not by friction. Most of the pads at the auto parts stores are low-friction because they last longer. However, if you want better stopping power, you can find versions only with more "grit", which enables you to stop more quickly. The downside is they'll wear the rotors down faster. After a few sets of those pads you'll probably have to replace the rotors because the surfaces will be too thin for safety. It's your choice.
 Nobody makes new anti-squeal shims for a Z and used ones are difficult to find. Luckily I have a local source for parts, Junkyard Jenny (see the link for her contact info on the home page) and she had a couple of sets.
Later I found that when you buy "better quality" replacement pads, the shims are included. Lesson learned.
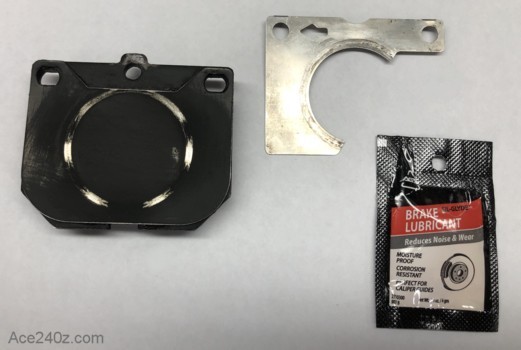
In this photo you can see the back of the pad, the shim, and a packet of anti-squeal grease. You need one packet for each side of the car. They're only a couple of bucks and are absolutely essential.
Nobody makes new anti-squeal shims for a Z and used ones are difficult to find. Luckily I have a local source for parts, Junkyard Jenny (see the link for her contact info on the home page) and she had a couple of sets.
Later I found that when you buy "better quality" replacement pads, the shims are included. Lesson learned.
In this photo you can see the back of the pad, the shim, and a packet of anti-squeal grease. You need one packet for each side of the car. They're only a couple of bucks and are absolutely essential.
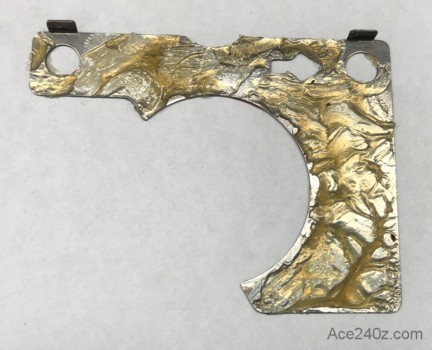 Use half of a packet for each shim on the side that presses against the back of the pad. Be generous.
Do not get any grease on the face of the pad.
If you do, clean it off with rubbing alcohol or brake cleaner spray.
Use half of a packet for each shim on the side that presses against the back of the pad. Be generous.
Do not get any grease on the face of the pad.
If you do, clean it off with rubbing alcohol or brake cleaner spray.
 Here's the anti-squeal shim on the back of the pad. The holes in the shim line up with the holes in the pad.
Take note of the arrow. That arrow needs to point to the front of the car.
Once again, do not get any grease on the face of the pad.
Here's the anti-squeal shim on the back of the pad. The holes in the shim line up with the holes in the pad.
Take note of the arrow. That arrow needs to point to the front of the car.
Once again, do not get any grease on the face of the pad.
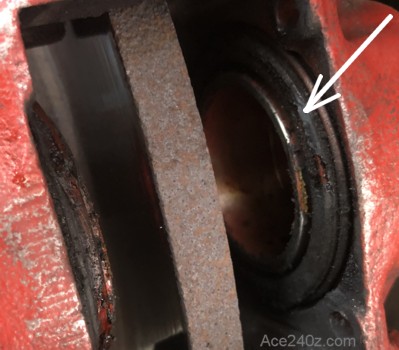 Inside the caliper is a pair of pistons. When you push on the brake pedal, these pistons push the pads against the rotor. The harder you push, the tighter they squeeze.
The new pads are thicker than the old pads, so the pistons need to be pressed back in to make room.
Inside the caliper is a pair of pistons. When you push on the brake pedal, these pistons push the pads against the rotor. The harder you push, the tighter they squeeze.
The new pads are thicker than the old pads, so the pistons need to be pressed back in to make room.
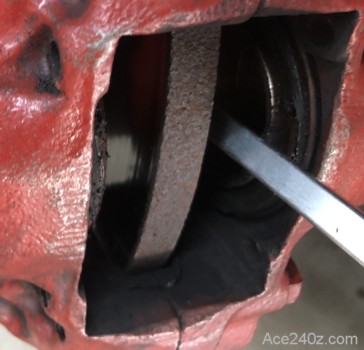 Use a large screwdriver to press one piston back, then slide the pad in.
Press the other piston back, then slide that pad in.
Use a large screwdriver to press one piston back, then slide the pad in.
Press the other piston back, then slide that pad in.
 Remember that the arrow on the shim needs to point to the front of the car.
The pads should slide in fairly easily but sometimes need a little "light encouragement" from a hammer.
Be careful to not get any grease on the rotor.
Remember that the arrow on the shim needs to point to the front of the car.
The pads should slide in fairly easily but sometimes need a little "light encouragement" from a hammer.
Be careful to not get any grease on the rotor.
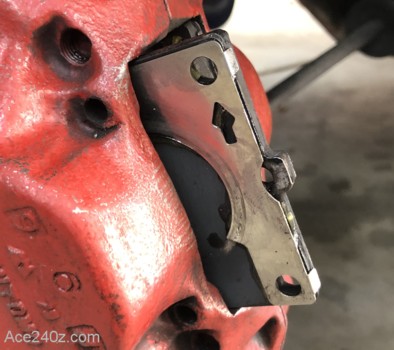
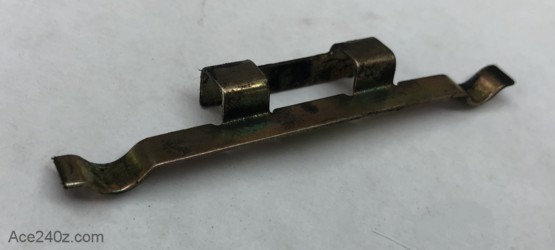 This is the spring clip. It sits on top of the pad and underneath the long pins.
It helps hold the pads in place and puts a little tension on the pins. Exactly why they're needed, I have no idea, but they must be important, otherwise Datsun wouldn't have gone to the trouble of making them.
This is the spring clip. It sits on top of the pad and underneath the long pins.
It helps hold the pads in place and puts a little tension on the pins. Exactly why they're needed, I have no idea, but they must be important, otherwise Datsun wouldn't have gone to the trouble of making them.
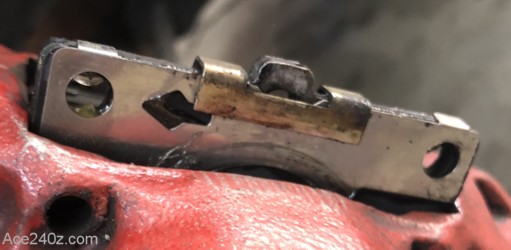 Note that part of the spring clip goes over the anti-squeal shim.
You can put these clips into place when the pads are already inside the calipers, or before you slide the pads into place, but make sure they're holding the shim.
They can be a little fiddly but not impossible.
Note that part of the spring clip goes over the anti-squeal shim.
You can put these clips into place when the pads are already inside the calipers, or before you slide the pads into place, but make sure they're holding the shim.
They can be a little fiddly but not impossible.
 Tap the long pins thru the calipers and pads. They also might need some "light encouragement" with a hammer.
Find the little retaining clips and push them back into place.
Gently pump the pedal a few times to push the pistons against the pads.
Put the wheel back on, lower the jack and tighten the lug nuts.
Now you get to do the other side, which will go more quickly.
When both sides are done, check the lug nuts a second time. I failed to do that a long time ago and it was a lesson I'll never forget.
Tap the long pins thru the calipers and pads. They also might need some "light encouragement" with a hammer.
Find the little retaining clips and push them back into place.
Gently pump the pedal a few times to push the pistons against the pads.
Put the wheel back on, lower the jack and tighten the lug nuts.
Now you get to do the other side, which will go more quickly.
When both sides are done, check the lug nuts a second time. I failed to do that a long time ago and it was a lesson I'll never forget.
 The final step is to properly "bed-in" the new pads. Until they're bedded, they won't work as well as they can.
Avoid doing it around other vehicles because those drivers will have no idea what you are up to. From a speed of about 60 mph, gently apply the brakes a couple of times to bring them up to operating temperature. This prevents you from thermally shocking the rotors and pads in the next steps.
Make a series of 6 near-stops from 60 to about 10 mph. Do it by pressing on the brakes firmly, just shy of locking-up the wheels. At the end of each slowdown, immediately accelerate back to 60 mph. Do not come to a complete stop. If you stop and sit for any length of time with your foot on the brake pedal, you'll imprint pad material onto the hot rotors, which can lead to vibration, uneven braking, and could even ruin the rotors.
After the 6th near-stop, accelerate back up to speed and cruise for a while, using the brakes as little as possible to let them cool down.
After the break-in cycle, there should be a slight blue tint and a light gray film on the rotor face. The blue tint tells you the rotor has reached break-in temperature and the gray film is pad material starting to transfer onto the rotor face. This is what you are looking for. The best braking occurs when there is an even layer of pad material deposited across the face of the rotors.
The final step is to properly "bed-in" the new pads. Until they're bedded, they won't work as well as they can.
Avoid doing it around other vehicles because those drivers will have no idea what you are up to. From a speed of about 60 mph, gently apply the brakes a couple of times to bring them up to operating temperature. This prevents you from thermally shocking the rotors and pads in the next steps.
Make a series of 6 near-stops from 60 to about 10 mph. Do it by pressing on the brakes firmly, just shy of locking-up the wheels. At the end of each slowdown, immediately accelerate back to 60 mph. Do not come to a complete stop. If you stop and sit for any length of time with your foot on the brake pedal, you'll imprint pad material onto the hot rotors, which can lead to vibration, uneven braking, and could even ruin the rotors.
After the 6th near-stop, accelerate back up to speed and cruise for a while, using the brakes as little as possible to let them cool down.
After the break-in cycle, there should be a slight blue tint and a light gray film on the rotor face. The blue tint tells you the rotor has reached break-in temperature and the gray film is pad material starting to transfer onto the rotor face. This is what you are looking for. The best braking occurs when there is an even layer of pad material deposited across the face of the rotors.
 Congratulations. You've repaired the brakes yourself, gained some new skills and saved a significant amount cash that can be used for other improvements to your car or just for some hard-earned cold beer.