Custom Rear Bumper
I like the look of smoothed and shaved bumpers, so here's how I did it.
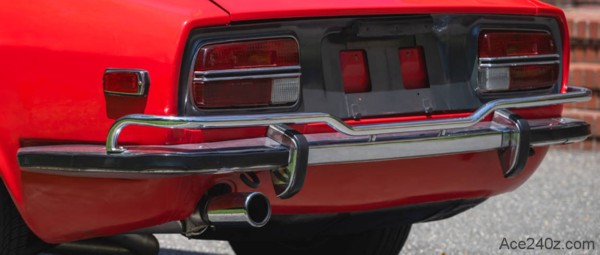 Chrome is pretty. It adds some nice bling, but if the chrome is dull and pitted and rusty, it can be an eyesore which is what 240z bumpers typically look like after 50 years. The obvious solution is buy new ones or have the existing ones replated, but it's not cheap.
For a overall sleeker look, you can remove the government-mandated overriders but it leaves some empty holes. The rubber corner trim is usually rotted, so the easy fix is to throw it away, but that leaves even more holes. You can use chrome-plated carriage bolts to fill all those, but I decided to eliminate the holes altogether. It's also made from three pieces bolted together. I never liked the look of the seams, so that had to be addressed.
Chrome is pretty. It adds some nice bling, but if the chrome is dull and pitted and rusty, it can be an eyesore which is what 240z bumpers typically look like after 50 years. The obvious solution is buy new ones or have the existing ones replated, but it's not cheap.
For a overall sleeker look, you can remove the government-mandated overriders but it leaves some empty holes. The rubber corner trim is usually rotted, so the easy fix is to throw it away, but that leaves even more holes. You can use chrome-plated carriage bolts to fill all those, but I decided to eliminate the holes altogether. It's also made from three pieces bolted together. I never liked the look of the seams, so that had to be addressed.
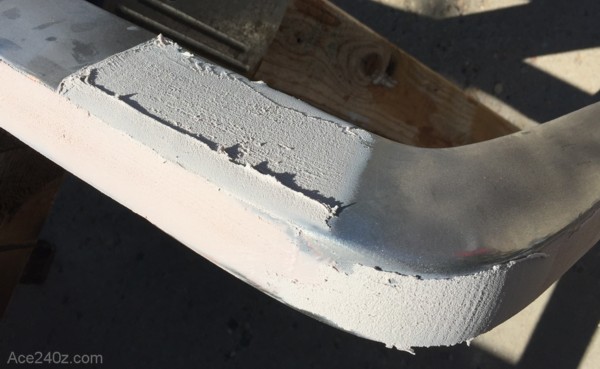 I took the bumper completely apart and used a grinder to remove the chrome (front and back) where the pieces connected, then bolted it back onto the car. With everything aligned, I tacked the pieces together, then removed the bumper and finished the welding.
For the holes I cut some little pieces of 1/8" steel to act as plugs, then used magnets to hold them in places while I gave them a quick zap with my welder.
If you don't have a welder, or access to one, you can do the prep and look on Craig's List for someone who does mobile welding.
A flap disc on a grinder flattened all of the welds.
Some body filler and block sanding made everything nice and smooth. A coat of primer, several layers of satin black and some wet sanding finished it off.
I took the bumper completely apart and used a grinder to remove the chrome (front and back) where the pieces connected, then bolted it back onto the car. With everything aligned, I tacked the pieces together, then removed the bumper and finished the welding.
For the holes I cut some little pieces of 1/8" steel to act as plugs, then used magnets to hold them in places while I gave them a quick zap with my welder.
If you don't have a welder, or access to one, you can do the prep and look on Craig's List for someone who does mobile welding.
A flap disc on a grinder flattened all of the welds.
Some body filler and block sanding made everything nice and smooth. A coat of primer, several layers of satin black and some wet sanding finished it off.
 The result is a set of bumpers that look brand-new and add a custom appearance.
It's little things like this that set a car apart from the rest.
The result is a set of bumpers that look brand-new and add a custom appearance.
It's little things like this that set a car apart from the rest.