Bodywork & Paint
It took ages to get my 240z ready for paint, but the results were worth it.
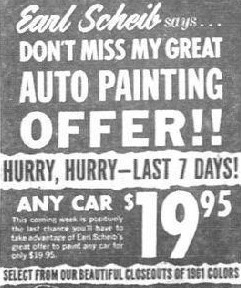 In the sixties, Earl Scheib built an auto paint empire with the promise of a beautiful job at an amazingly low price which didn't include any sanding or repairs. He would take your car, give it a quick wash, mask-off the windows and bumpers and the lights (but not the emblems or side trim) then hit it with a quick, one-coat spray. You had a choice of eight basic colors.
It looked pretty good from 20 feet away, but within a few months would start to fade and peel.
I learned as a kid that a good paint job is all about the prep, which for my car was hours and hours of labor. Old paint had to be stripped off. Rust holes had to be repaired. Dents had to be filled. The list goes on and on, but Earl Scheib proved that a crappy body with shiny paint still looks crappy. Here's some of the work that went into mine.
In the sixties, Earl Scheib built an auto paint empire with the promise of a beautiful job at an amazingly low price which didn't include any sanding or repairs. He would take your car, give it a quick wash, mask-off the windows and bumpers and the lights (but not the emblems or side trim) then hit it with a quick, one-coat spray. You had a choice of eight basic colors.
It looked pretty good from 20 feet away, but within a few months would start to fade and peel.
I learned as a kid that a good paint job is all about the prep, which for my car was hours and hours of labor. Old paint had to be stripped off. Rust holes had to be repaired. Dents had to be filled. The list goes on and on, but Earl Scheib proved that a crappy body with shiny paint still looks crappy. Here's some of the work that went into mine.
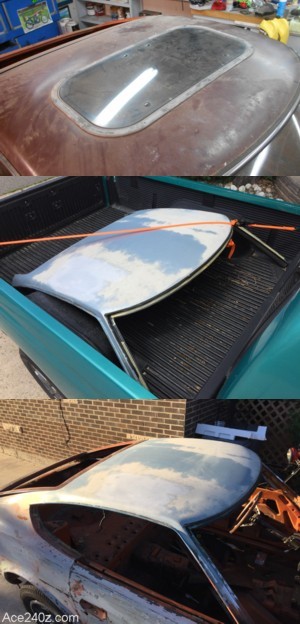 I hate the look of an aftermarket sunroof. I nearly walked away because of it.
I had to make a choice: grit my teeth and buy a replacement sunroof for $400 or replace the roof itself. The thought of looking at the sunroof every day led me to the right decision.
The replacement came from a 280z being parted out and was just $200. I found a local bodywork expert named Chris who did the swap, plus repaired a few rusted-out spots for just $800. Money well spent.
I hate the look of an aftermarket sunroof. I nearly walked away because of it.
I had to make a choice: grit my teeth and buy a replacement sunroof for $400 or replace the roof itself. The thought of looking at the sunroof every day led me to the right decision.
The replacement came from a 280z being parted out and was just $200. I found a local bodywork expert named Chris who did the swap, plus repaired a few rusted-out spots for just $800. Money well spent.
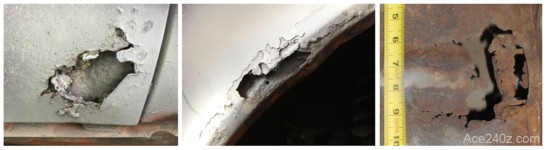 Neil Young says rust never sleeps.
Nearly every 240z has suffered from rust but mine actually had less than I'd expected. The cheap fix is to stuff chicken wire and body filler into hole, then sand it flush and give it a splash of rattle-can paint.
The right fix is to remove the entire section and replace it with new metal, which is what I did. You can actually find some pre-stamped pieces online for the areas that typically rot, which makes repairs relatively easy.
Neil Young says rust never sleeps.
Nearly every 240z has suffered from rust but mine actually had less than I'd expected. The cheap fix is to stuff chicken wire and body filler into hole, then sand it flush and give it a splash of rattle-can paint.
The right fix is to remove the entire section and replace it with new metal, which is what I did. You can actually find some pre-stamped pieces online for the areas that typically rot, which makes repairs relatively easy.
 The existing paint was beyond awful. Maybe it was an Earl Scheib job. I tried chemical removers but they sucked. It looked impressive when the paint bubbling up but you can see on the bottom pic there was a lot left behind. It wasn't cheap and wasn't quick or easy.
I ended up sanding or sandblasting pretty much everything, including the interior.
The existing paint was beyond awful. Maybe it was an Earl Scheib job. I tried chemical removers but they sucked. It looked impressive when the paint bubbling up but you can see on the bottom pic there was a lot left behind. It wasn't cheap and wasn't quick or easy.
I ended up sanding or sandblasting pretty much everything, including the interior.
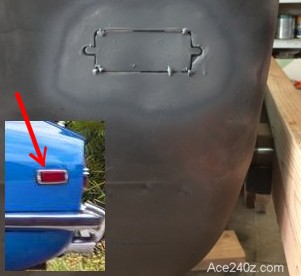 I love a smooth, clean appearance so I removed the marker lights and found some premade plates to fill the holes. I also removed the ugly side trim and even the emblems. Small changes can make a big difference.
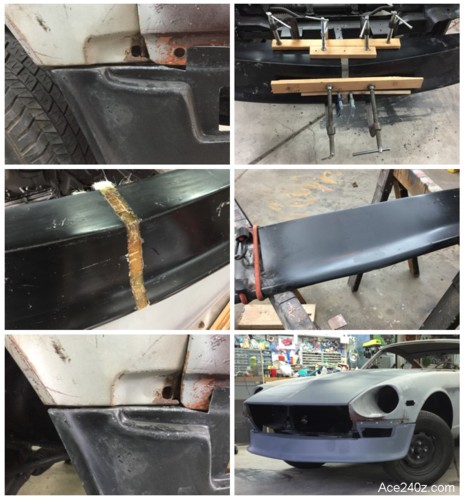 An air dam is a great modification, but this one needed some modifying of it's own.
It didn't fit very good where it met the fender, so I cut it in half and added a 1" filler piece in the center and reinforced it from behind with some pieces of wood. Now it fits (and looks) the way it should.
It's a not-uncommon problem with aftermarket parts. Most fit beautifully but some need to be modified in one way or another. Even if the dam had fit right, the surface was pitted and had to be filled and smoothed before getting painted. By contrast, the rear spoiler I bought was perfect - all it needed was a light scuff.
Fiberglass is actually pretty easy to work with. I spent more time with the clamps and getting the halves lined up than applying the fiberglass itself. It's also pretty cheap - the cost for this fix was only about $5 and a few pieces of duct tape to act as a mold.
An air dam is a great modification, but this one needed some modifying of it's own.
It didn't fit very good where it met the fender, so I cut it in half and added a 1" filler piece in the center and reinforced it from behind with some pieces of wood. Now it fits (and looks) the way it should.
It's a not-uncommon problem with aftermarket parts. Most fit beautifully but some need to be modified in one way or another. Even if the dam had fit right, the surface was pitted and had to be filled and smoothed before getting painted. By contrast, the rear spoiler I bought was perfect - all it needed was a light scuff.
Fiberglass is actually pretty easy to work with. I spent more time with the clamps and getting the halves lined up than applying the fiberglass itself. It's also pretty cheap - the cost for this fix was only about $5 and a few pieces of duct tape to act as a mold.
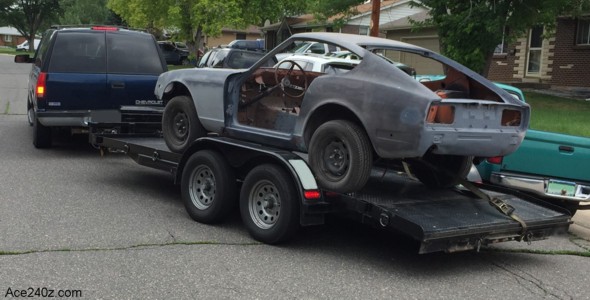 After several years of repairs and modifications and prep, the car was finally hauled away for a professional paint job from Chris, the guy who swapped the roof.
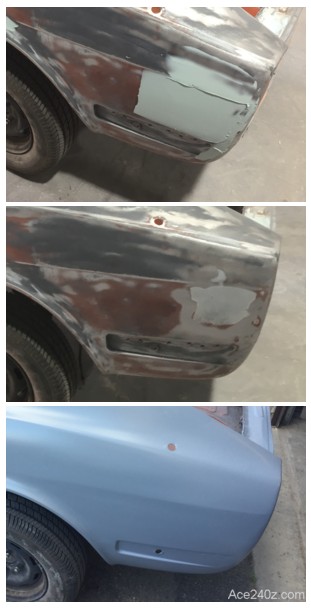 Here's an example of what it takes for a good paint job.
As I mentioned above, I wanted to eliminate the marker lights. First you clean the area around the hole down to bare metal, then make (or buy) a piece of metal to fill the hole. Slowly & carefully weld the piece into place and grind the welds down until they're flush. Next comes a big smear of filler to cover the scratches, gouges, low points, etc.
Now sand the filler to get it as smooth as possible. For a show-quality finish, you might have to fill and sand several times. Keep in mind this is just a small part of the car - every inch has to receive the same amount of attention.
It got primered, wet-sanded, primered again, wet-sanded again, and finally was given two layers of paint and topped with a clear coat.
Here's an example of what it takes for a good paint job.
As I mentioned above, I wanted to eliminate the marker lights. First you clean the area around the hole down to bare metal, then make (or buy) a piece of metal to fill the hole. Slowly & carefully weld the piece into place and grind the welds down until they're flush. Next comes a big smear of filler to cover the scratches, gouges, low points, etc.
Now sand the filler to get it as smooth as possible. For a show-quality finish, you might have to fill and sand several times. Keep in mind this is just a small part of the car - every inch has to receive the same amount of attention.
It got primered, wet-sanded, primered again, wet-sanded again, and finally was given two layers of paint and topped with a clear coat.
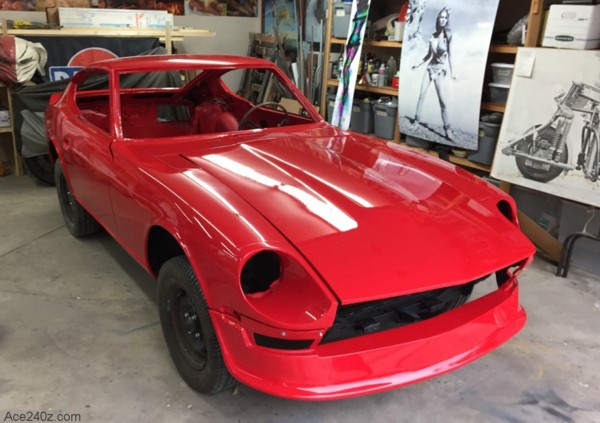 It looks exactly like I wanted.
The paint is flawless. No drips or runs, no rough patches, no scratches - nothing but gloss. It's probably better than when it came from the factory. I love it.
Of course, the car is far from finished. It'll take months to put everything back together but I'm on the home stretch with the finish line in sight. I feel more motivated than ever.
It looks exactly like I wanted.
The paint is flawless. No drips or runs, no rough patches, no scratches - nothing but gloss. It's probably better than when it came from the factory. I love it.
Of course, the car is far from finished. It'll take months to put everything back together but I'm on the home stretch with the finish line in sight. I feel more motivated than ever.