The Interior
After 50 years a car's interior is usually in tatters but with a little time and effort it can become brand-new.
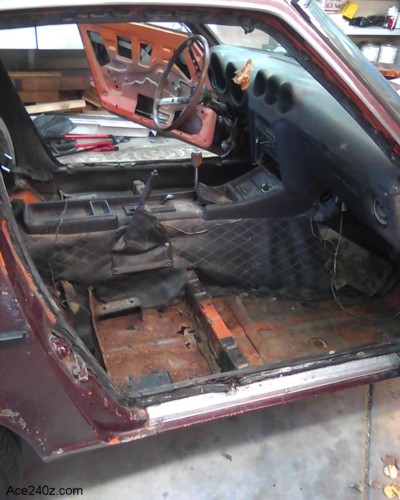 This is what the interior was like when I hauled the car home. Pretty dismal, eh? I never liked the diamond-pattern vinyl because it looks cheap. You can see a couple of rust holes thru the passenger-side floor. Wires are dangling. Big cracks on the dash. Blech.
There were no door panels, which is unfortunate because decent replacements are hard to find. There was also no headliner or trim on the A-pillars, which is just as well because they would have been hanging in tatters.
The seats were awful. Somebody had replaced the original covers with some cheap, ill-fitting versions that were split and falling apart. The foam inside was crumbling and pretty stinky. Old cars have distinctive smells. Put me blindfolded into a VW Beetle and I'll recognize it by the odor. The same is true for a Datsun. If I'd bought an already-running Z, it'd have an aroma that would bug me, but this one won't.
This is what the interior was like when I hauled the car home. Pretty dismal, eh? I never liked the diamond-pattern vinyl because it looks cheap. You can see a couple of rust holes thru the passenger-side floor. Wires are dangling. Big cracks on the dash. Blech.
There were no door panels, which is unfortunate because decent replacements are hard to find. There was also no headliner or trim on the A-pillars, which is just as well because they would have been hanging in tatters.
The seats were awful. Somebody had replaced the original covers with some cheap, ill-fitting versions that were split and falling apart. The foam inside was crumbling and pretty stinky. Old cars have distinctive smells. Put me blindfolded into a VW Beetle and I'll recognize it by the odor. The same is true for a Datsun. If I'd bought an already-running Z, it'd have an aroma that would bug me, but this one won't.
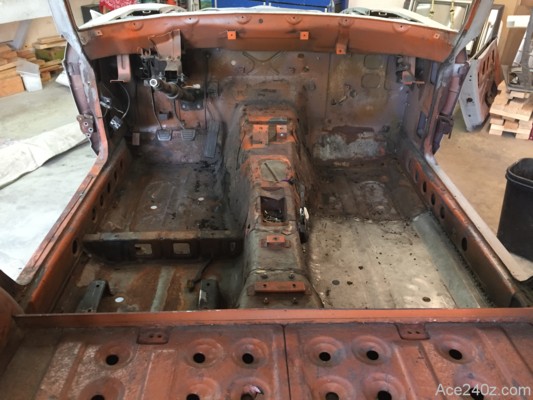 I stripped out everything, then sandblasted the entire thing. The rusted passenger-side floor was cut out and replaced. The little cracks and gaps were welded shut. Pure excitement, right?
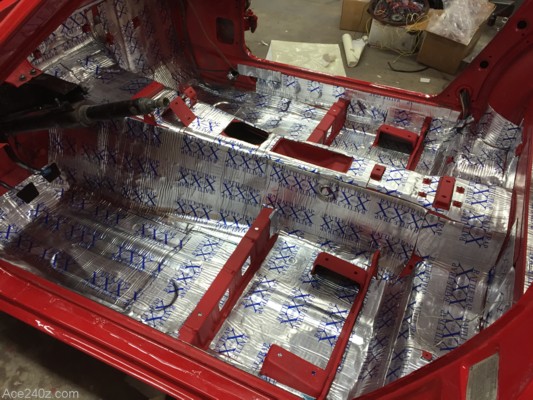 I stuck new sound deadening just about everywhere, even underneath the roof and inside the doors. It'll cut down on a lot of road noise, plus serve as thermal insulation during winter.
75 square feet from Fat Mat wasn't expensive but took hours to install because of all the odd-shaped pieces I had to make.
They said "You won't know how much you want it until it's installed." I hope they're right.
I stuck new sound deadening just about everywhere, even underneath the roof and inside the doors. It'll cut down on a lot of road noise, plus serve as thermal insulation during winter.
75 square feet from Fat Mat wasn't expensive but took hours to install because of all the odd-shaped pieces I had to make.
They said "You won't know how much you want it until it's installed." I hope they're right.
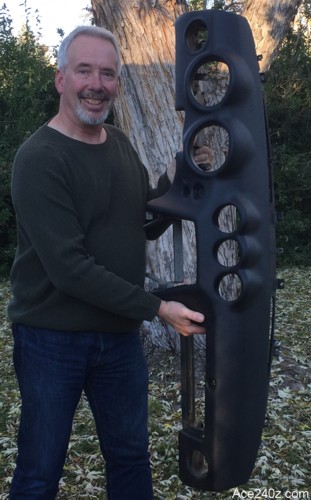 The dashboard was in awful shape, which is typical for a 50-year-old car. The vinyl gets baked by UV rays, then hardens and cracks and falls apart.
An easy solution is a cap, typically made from ABS plastic which is very resistant to UV. You can get one that just covers just the top or one that cover the entire thing. They can be installed with the dash and windshield in place, and when done right they look pretty good. Most people would never know it's a replacement. At the time this was written, the average cost was about $125, which included shipping and a tube of adhesive.
A previous owner used a top-only cap and did a lousy job. I pulled it off and discovered he'd used backroom caulking to hold it together.
I pulled it out of the car, removed the guages, peeled off the caulking, sanded down the foam and gave it a good scrubbing at the local spray wash. I used two tubes of adhesive, and with the help of a friend and a lot of clamps amd bungee cords and rope managed to get it to fit really tight. I let the adhesive cure for several days and the result is a dashboard that looks brand new.
The dashboard was in awful shape, which is typical for a 50-year-old car. The vinyl gets baked by UV rays, then hardens and cracks and falls apart.
An easy solution is a cap, typically made from ABS plastic which is very resistant to UV. You can get one that just covers just the top or one that cover the entire thing. They can be installed with the dash and windshield in place, and when done right they look pretty good. Most people would never know it's a replacement. At the time this was written, the average cost was about $125, which included shipping and a tube of adhesive.
A previous owner used a top-only cap and did a lousy job. I pulled it off and discovered he'd used backroom caulking to hold it together.
I pulled it out of the car, removed the guages, peeled off the caulking, sanded down the foam and gave it a good scrubbing at the local spray wash. I used two tubes of adhesive, and with the help of a friend and a lot of clamps amd bungee cords and rope managed to get it to fit really tight. I let the adhesive cure for several days and the result is a dashboard that looks brand new.
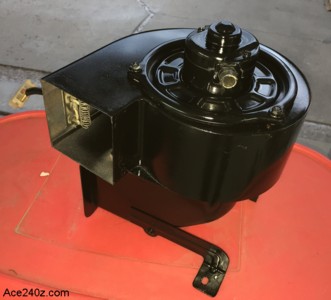 Replacing the stock heater blower with one from an '89-'91 Honda Civic is the easiest upgrade ever. It moves more air, it's quieter and uses less power. It bolts right into place. Cut the two wires off the old motor and connect them to the new one. That's it.
I bought a used one on eBay for $44 including shipping. Turns out you can buy them brand-new for less. Live and learn. I gave mine a quick coat of paint and it looks great.
Replacing the stock heater blower with one from an '89-'91 Honda Civic is the easiest upgrade ever. It moves more air, it's quieter and uses less power. It bolts right into place. Cut the two wires off the old motor and connect them to the new one. That's it.
I bought a used one on eBay for $44 including shipping. Turns out you can buy them brand-new for less. Live and learn. I gave mine a quick coat of paint and it looks great.
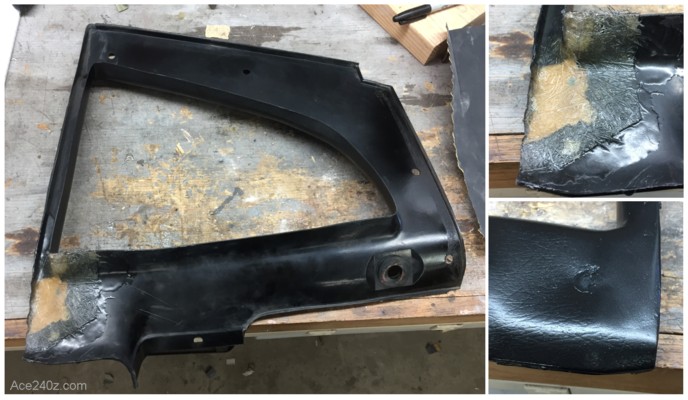 After time, the plastic trim can look pretty bad. It's thin and gets brittle. When I removed mine, several pieces cracked and broke. This piece goes around one of the rear windows and was missing a big chunk. I found replacements online but the price are rediculous. I repaired it for about $3 with some fiberglass and body filler, then did a little sanding. The spot that looks dented is the hole for the mounting clip. It's not perfect but nobody will ever notice.
I gave all of the pieces a gentle scrub and a few coats of satin black paint. They look beautiful.
After time, the plastic trim can look pretty bad. It's thin and gets brittle. When I removed mine, several pieces cracked and broke. This piece goes around one of the rear windows and was missing a big chunk. I found replacements online but the price are rediculous. I repaired it for about $3 with some fiberglass and body filler, then did a little sanding. The spot that looks dented is the hole for the mounting clip. It's not perfect but nobody will ever notice.
I gave all of the pieces a gentle scrub and a few coats of satin black paint. They look beautiful.
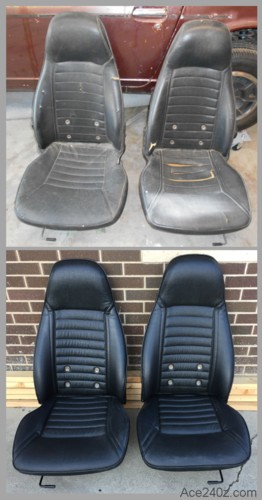 Here are the seats before and after. I bought some good reproduction covers and new foam. The '70 and '71 seats have a limited amount of tilt (about 3") so I found a pair of recliners from a later year which allows full movement forward and back. Much better.
The frames and recliners were sandblasted and painted. The bottom foam is supported by webbing which came with the covers but needed to be cut and fastened. I bought a heater kit but it turns out the way the seats are bolstered there wasn't enough room. Damn shame.
The covers for the bottoms went on (relatively) easy, but I couldn't stretch the backs far enough down to pin the material in place. I reluctantly took them to an upholsterer and now they look perfect. He said these covers are probably better quality than the originals.
Final cost was about $500.
Here are the seats before and after. I bought some good reproduction covers and new foam. The '70 and '71 seats have a limited amount of tilt (about 3") so I found a pair of recliners from a later year which allows full movement forward and back. Much better.
The frames and recliners were sandblasted and painted. The bottom foam is supported by webbing which came with the covers but needed to be cut and fastened. I bought a heater kit but it turns out the way the seats are bolstered there wasn't enough room. Damn shame.
The covers for the bottoms went on (relatively) easy, but I couldn't stretch the backs far enough down to pin the material in place. I reluctantly took them to an upholsterer and now they look perfect. He said these covers are probably better quality than the originals.
Final cost was about $500.