Wiper Motor Upgrade
The stock windshield wiper motor is notorious for being slow, but a great (and cheap) replacement exists. Here's how it's done.
 The stock windshield wiper motor is pretty slow by today's standards. Over the years the lubrication on the pivots turns into a sticky gum. The motor itself gets worn. The result is wipers that move so slowly they can barely handle a light mist.
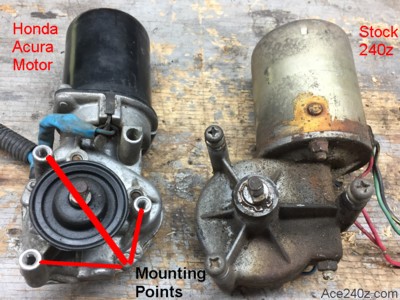
You can have the motor rebuilt (pricey) but the best solution is to replace it with a modern motor from Honda. It's a relatively easy upgrade, requiring only three new holes and a small notch on the mounting bracket, a cheap automotive relay, some wires and crimp connectors, and a little electrical tape. The motor itself doesn't have to be modified but make sure you get one with the right mounting pattern.
When the wiper assembly is out of the car, you have two options: replace just the motor or take everything apart for a good cleaning and lubrication, which is what I did.
The first choice is easier because it only takes about two hours. The wipers will work better than before and might be good enough depending on how often you drive your Z. The second choice will result in a mechanism that is virtually brand-new, but it takes a little longer.
I did the total restoration. The cost (motor, relay and some paint) was about $50 and approximately six hours of labor.
The stock windshield wiper motor is pretty slow by today's standards. Over the years the lubrication on the pivots turns into a sticky gum. The motor itself gets worn. The result is wipers that move so slowly they can barely handle a light mist.
You can have the motor rebuilt (pricey) but the best solution is to replace it with a modern motor from Honda. It's a relatively easy upgrade, requiring only three new holes and a small notch on the mounting bracket, a cheap automotive relay, some wires and crimp connectors, and a little electrical tape. The motor itself doesn't have to be modified but make sure you get one with the right mounting pattern.
When the wiper assembly is out of the car, you have two options: replace just the motor or take everything apart for a good cleaning and lubrication, which is what I did.
The first choice is easier because it only takes about two hours. The wipers will work better than before and might be good enough depending on how often you drive your Z. The second choice will result in a mechanism that is virtually brand-new, but it takes a little longer.
I did the total restoration. The cost (motor, relay and some paint) was about $50 and approximately six hours of labor.
 These are the motors that will work:
Honda Civic CX '92-'95, Del Sol S '93-'97, Del Sol SI '93-'97
Acura Integra GS '97-'01, GSR '94-'01, LS '94-'01, RS '94-'98, Special Edition '95-'96, Type-R '97-'01
You can get a remanufactured motor with a warranty at your local parts store for about $80, or half that at a salvage yard or eBay. As it turned out, I found a motor on eBay that came from an Acura and cost a few bucks less than the identical Civic units I saw.
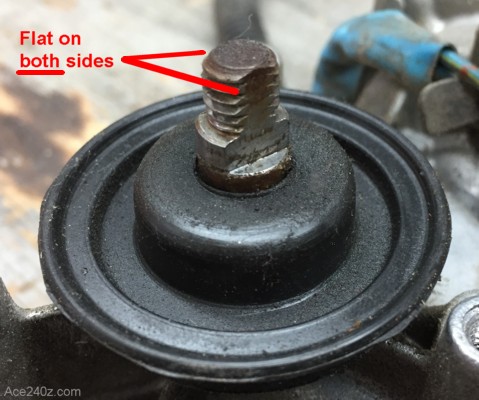
Regardless of where you get it, make sure the the mounting shaft is flat on two sides. If it doesn't have the flats, look elsewhere.
These are the motors that will work:
Honda Civic CX '92-'95, Del Sol S '93-'97, Del Sol SI '93-'97
Acura Integra GS '97-'01, GSR '94-'01, LS '94-'01, RS '94-'98, Special Edition '95-'96, Type-R '97-'01
You can get a remanufactured motor with a warranty at your local parts store for about $80, or half that at a salvage yard or eBay. As it turned out, I found a motor on eBay that came from an Acura and cost a few bucks less than the identical Civic units I saw.
Regardless of where you get it, make sure the the mounting shaft is flat on two sides. If it doesn't have the flats, look elsewhere.
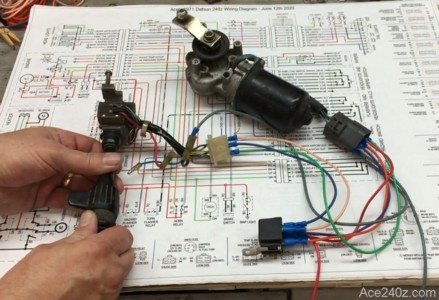 Here's the bench test using the stock 240z switch. Low speed, high speed, and the wiper blades "park".
The "park" function is important. When you turn the wipers off in a modern car, they park themselves at the bottom of the windshield. If you connect the Honda motor directly to the 240z switch, the blades won't park - you have watch for the blades to get close to the bottom, then turn the switch off and hope for the best.
Fortunately, somebody clever figured out that adding a simple relay makes the process automatic. Click on the pic to see for yourself.
Here's the bench test using the stock 240z switch. Low speed, high speed, and the wiper blades "park".
The "park" function is important. When you turn the wipers off in a modern car, they park themselves at the bottom of the windshield. If you connect the Honda motor directly to the 240z switch, the blades won't park - you have watch for the blades to get close to the bottom, then turn the switch off and hope for the best.
Fortunately, somebody clever figured out that adding a simple relay makes the process automatic. Click on the pic to see for yourself.
 Before doing anything, disconnect the battery. It's good practice any time you're doing anything electrical.
Taking the mechanism out is fairly straightforward. Unplug the motor, remove the 4 bolts that attach the mounting plate to the car, and remove 3 screws at each of the wiper arm mounts. It'll need a little wiggling and twisting.
Give everything a good cleaning. I'm lucky enough to have a sandblaster but steel wool and sandpaper can do a decent job.
For the easy route, use brake cleaner spray to flush out the old grease and grit from the bronze bushings and rotating shafts until they move freely (or as close as possible). The bushings can be pushed sideways for a deep clean. Use some penetrating oil for the shafts and let it soak in, turning the parts back and forth a few times, then give 'em more oil. Repeat as needed. They won't be perfect but a lot better than what you started with. The bushings can be greased. Be generous.
If you're going the restoration route, remove the little clips that hold the shafts in place and they can be pulled out for a good scrub. The little clips will probably get bent or twisted in the process but can be replaced with 5/16" e-clips from your local hardware store.
Before doing anything, disconnect the battery. It's good practice any time you're doing anything electrical.
Taking the mechanism out is fairly straightforward. Unplug the motor, remove the 4 bolts that attach the mounting plate to the car, and remove 3 screws at each of the wiper arm mounts. It'll need a little wiggling and twisting.
Give everything a good cleaning. I'm lucky enough to have a sandblaster but steel wool and sandpaper can do a decent job.
For the easy route, use brake cleaner spray to flush out the old grease and grit from the bronze bushings and rotating shafts until they move freely (or as close as possible). The bushings can be pushed sideways for a deep clean. Use some penetrating oil for the shafts and let it soak in, turning the parts back and forth a few times, then give 'em more oil. Repeat as needed. They won't be perfect but a lot better than what you started with. The bushings can be greased. Be generous.
If you're going the restoration route, remove the little clips that hold the shafts in place and they can be pulled out for a good scrub. The little clips will probably get bent or twisted in the process but can be replaced with 5/16" e-clips from your local hardware store.
 The motor is semi-visible thru the louvered cowl, so it got painted. I could have painted it red to match the car but I wanted it to stand out.
What a difference. It looks better than new.
The motor is semi-visible thru the louvered cowl, so it got painted. I could have painted it red to match the car but I wanted it to stand out.
What a difference. It looks better than new.
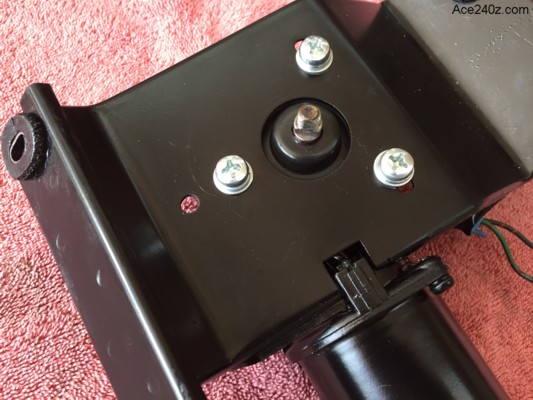 Take the new motor and lightly dab a little grease on the three mounting tabs. Lay the bracket over the motor and center the shaft in the hole (precision isn't required). Lift the backet back up and turn it over and you'll see three grease marks - that's where you drill the new holes.
With the holes done, lay the bracket over the motor again, line up the holes, then mark where the side of the bracket needs to be notched to clear part of the motor housing. A hacksaw works fine. I cut the sides of the notch, then bent the remaing "tab" back and forth until it broke off. The bracket has a slight lip and part of it needs to be trimmed back. With the cuts made, use a file to smooth the edges.
That's it for the modifications.
I painted the backet the same color as the motor and used some new screws to hold everything together. It looks like it came straight from the factory.
Take the new motor and lightly dab a little grease on the three mounting tabs. Lay the bracket over the motor and center the shaft in the hole (precision isn't required). Lift the backet back up and turn it over and you'll see three grease marks - that's where you drill the new holes.
With the holes done, lay the bracket over the motor again, line up the holes, then mark where the side of the bracket needs to be notched to clear part of the motor housing. A hacksaw works fine. I cut the sides of the notch, then bent the remaing "tab" back and forth until it broke off. The bracket has a slight lip and part of it needs to be trimmed back. With the cuts made, use a file to smooth the edges.
That's it for the modifications.
I painted the backet the same color as the motor and used some new screws to hold everything together. It looks like it came straight from the factory.
 When you reassemble the mechanism, use a couple pieces of felt to make "soft washers". The factory used them to eliminate any metal-to-metal contact between the connecting arms.
A few years back I bought a roll of neoprene with an adhesive backing on eBay to make gaskets around the rear tailights (far cheaper than reproduction pieces). I used leftover material here for the washers (they don't have to be perfectly round) and for the triangular padding that goes between the wiper arm pivots and the body.
Give the washers a good coat of grease.
When you reassemble the mechanism, use a couple pieces of felt to make "soft washers". The factory used them to eliminate any metal-to-metal contact between the connecting arms.
A few years back I bought a roll of neoprene with an adhesive backing on eBay to make gaskets around the rear tailights (far cheaper than reproduction pieces). I used leftover material here for the washers (they don't have to be perfectly round) and for the triangular padding that goes between the wiper arm pivots and the body.
Give the washers a good coat of grease.
 Here's the connection between the mechanism and the motor. It's a wierd combination of parts, supposedly to act as a "clutch" for the original motor, which had a "stop and reverse" function when you turn off the wipers. Inside is a small coil that looks like a spring but if it's broken, don't worry about it - the wipers will still work.
Like with the wiper arm shafts, I replaced the original clip with an e-ring (which wasn't installed when I took this pic).
Like everything else, give the pieces a good coat of grease. If you have the orginal rubber cover, give it a glob of grease inside. You might be able to use a plastic zip-tie to hold it to the arm. If yours is missing, don't worry about it.
Here's the connection between the mechanism and the motor. It's a wierd combination of parts, supposedly to act as a "clutch" for the original motor, which had a "stop and reverse" function when you turn off the wipers. Inside is a small coil that looks like a spring but if it's broken, don't worry about it - the wipers will still work.
Like with the wiper arm shafts, I replaced the original clip with an e-ring (which wasn't installed when I took this pic).
Like everything else, give the pieces a good coat of grease. If you have the orginal rubber cover, give it a glob of grease inside. You might be able to use a plastic zip-tie to hold it to the arm. If yours is missing, don't worry about it.
 Here are the wiper arm pivots, before and after. They won't be seen once everything goes back into place but I'll sleep better know they're protected from corrosion.
A friend and I joke that parts like this "only" get two coats of primer, three coats of paint with wet-sanding in between, followed by two coats of clear and a little hand-polishing.
Here are the wiper arm pivots, before and after. They won't be seen once everything goes back into place but I'll sleep better know they're protected from corrosion.
A friend and I joke that parts like this "only" get two coats of primer, three coats of paint with wet-sanding in between, followed by two coats of clear and a little hand-polishing.
 The only difficult part of the upgrade is the the wiring but this diagram ought to make it pretty clear. Click on it for a larger version.
I cut off the Honda plug and used crimp connectors to attach the wires directly to the relay. At the other end I used a new OEM style connector to match the existing 240z connector. You can get new connectors from Oregon Motorcycle Parts. As far as I'm concerned, they're the best source.
I soldered a few extra wires as needed (14 ga.) and used heat-shrink tubing for insulation, then wrapped everything with electrical tape. I thought about putting the relay in some sort of bag, but in the end I settled for wrapping more electrical tape around the crimps and hoping for the best.
The only difficult part of the upgrade is the the wiring but this diagram ought to make it pretty clear. Click on it for a larger version.
I cut off the Honda plug and used crimp connectors to attach the wires directly to the relay. At the other end I used a new OEM style connector to match the existing 240z connector. You can get new connectors from Oregon Motorcycle Parts. As far as I'm concerned, they're the best source.
I soldered a few extra wires as needed (14 ga.) and used heat-shrink tubing for insulation, then wrapped everything with electrical tape. I thought about putting the relay in some sort of bag, but in the end I settled for wrapping more electrical tape around the crimps and hoping for the best.
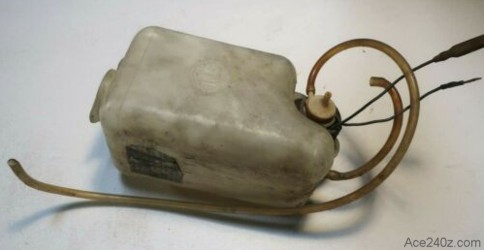 While you're poking around in that area, take a look at the washer fluid hoses. Chances are they're stiff or split and leaking. Does the pump work? Is the tank leaking or filled with crud? Are the nozzles aimed in the right directions?
You probably won't drive your Z when it's snowing, so washer fluid doesn't seem like a big deal but why take the chance? When I owned my '72. it was the only car I had and Colorado winters can be pretty slushy. This car will stay snug and dry when it snows but I still made sure the washer system works.
While you're poking around in that area, take a look at the washer fluid hoses. Chances are they're stiff or split and leaking. Does the pump work? Is the tank leaking or filled with crud? Are the nozzles aimed in the right directions?
You probably won't drive your Z when it's snowing, so washer fluid doesn't seem like a big deal but why take the chance? When I owned my '72. it was the only car I had and Colorado winters can be pretty slushy. This car will stay snug and dry when it snows but I still made sure the washer system works.
 Francisco Gutierrez has a YouTube channel called Pancho's Garage, featuring dozens of episodes showing his restoration of a 240z. The guy is amazing.
Click on his smiling face to see the episode where he does the wiper motor upgrade. After watching it, make sure you subscribe, then go back later and watch all of his videos. It's time well spent.
Francisco Gutierrez has a YouTube channel called Pancho's Garage, featuring dozens of episodes showing his restoration of a 240z. The guy is amazing.
Click on his smiling face to see the episode where he does the wiper motor upgrade. After watching it, make sure you subscribe, then go back later and watch all of his videos. It's time well spent.