240z Differential Seals and Fluids
The differential typically gets ignored, but here's how to replace the seals.
The 240z differential is a pretty robust unit. It's connected to the transmission by the driveshaft, and changes the direction of that rotation 90 degrees in order to turn the half-shafts, which are connected to the wheels. I won't go into the details of how a differential works, but it allows the rear wheels to turn at different speeds when going around a corners. The stock unit is called an "R180" and the 180 refers to the size of the ring gear, which is 180mm in diameter. The 280z version is an "R200" because the ring gear is slightly larger and able to handle more horsepower. Regardless of that, each one works the same way and has the same type of parts. Like everything on a car, stuff wears out and seals are often the first to go. The output shaft seals can be replaced with the diff in the car, but if you need to replace the cover gasket you'll need to dismantle part of the rear suspension, and if you need to replace the front seal, the whole thing has to come out. If the differential itself is causing problems, you can have it rebuilt or replace it with a used one and hope for the best. Regardless of what you do, here's a guide to replacing all of the seals and doing some simple maintenance. If you don't have a copy of the Factory Service Manual you can download one for free here. Before you start taking things apart, buy the replacement parts. There is a seal at the front of the diff (where it attaches to the driveshaft), two on the sides (where the half-shafts attach), a gasket for the rear cover, and a small plastic vent tube. You'll also need 1-1/2 quarts of 75/90 gear lube. I recommend Redline. In addition to all that, the differential mount itself might need to replaced. If you need it, you'll have one ready. If you don't, you can send it back for a refund. Here's a handy tip: If you're ever going to replace the fluid in the differential or the transmission, remove the fill plug first. If you drain the fluid but can't pump the new stuff in, it's going to be a very frustrating day. Another thing to consider is replacing the bushings at the ends of the moustache bar. They're probably rotted and falling apart. Do it now will be a lot easier than doing it later when everything is back together. I've created a procedure for that and you can get to it here. The last thing are the bushing for the lower control arms. They'll be easy to replace now.
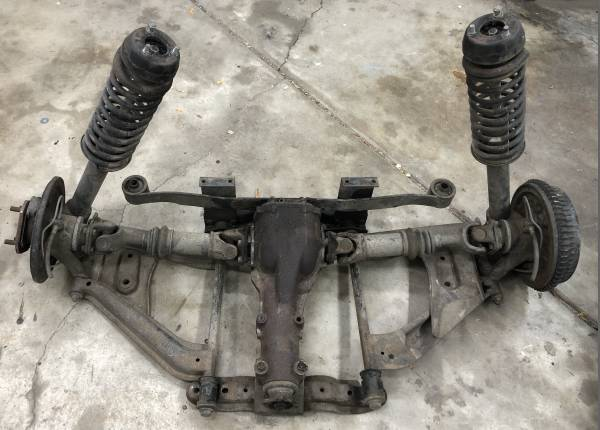 Here's what the entire rear suspension looks like and the differential is the heart.
I'm not going to go into the entire procedure for removing it from the car, so poke around online for some tips and tricks. Crawling underneath a day in advance and spraying all of the nuts and bolts with something like PB Blaster will help a lot.
The basic procedure is disconnect the drive shaft, disconnect the half-shafts, unbolt the moustache bar at the ends, unbolt the control arms, unbolt the crossmember, then use a jack to lower it down. You might have to remove the exhaust pipe, or at least push it out of the way. Whew.
Here's what the entire rear suspension looks like and the differential is the heart.
I'm not going to go into the entire procedure for removing it from the car, so poke around online for some tips and tricks. Crawling underneath a day in advance and spraying all of the nuts and bolts with something like PB Blaster will help a lot.
The basic procedure is disconnect the drive shaft, disconnect the half-shafts, unbolt the moustache bar at the ends, unbolt the control arms, unbolt the crossmember, then use a jack to lower it down. You might have to remove the exhaust pipe, or at least push it out of the way. Whew.
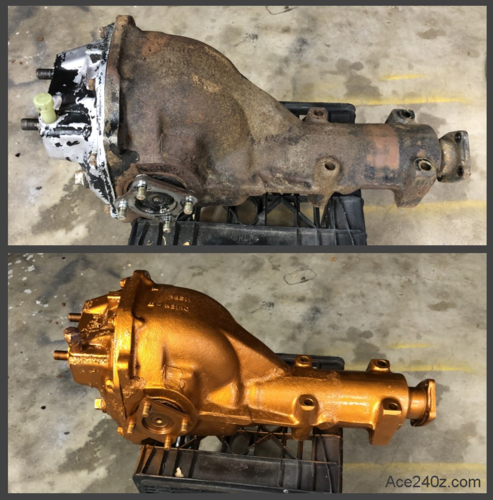 Give the case a good scrubbing with some engine degreaser and a wire brush. Taking it to your local spray wash can help.
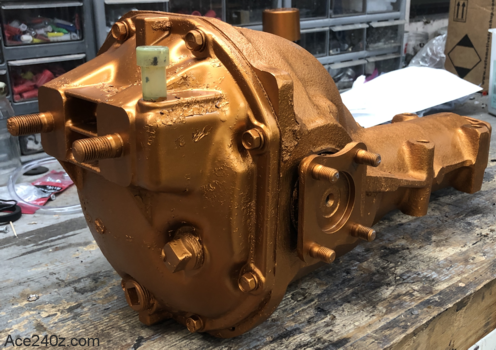
The diff presently in my car is painted gold, which made me laugh. I intended on painting this one black until I spotted a can of heat-proof bronze. As you can see a quick coat of paint really makes a difference. I really should have waited until the refresh was done but I couldn't wait.
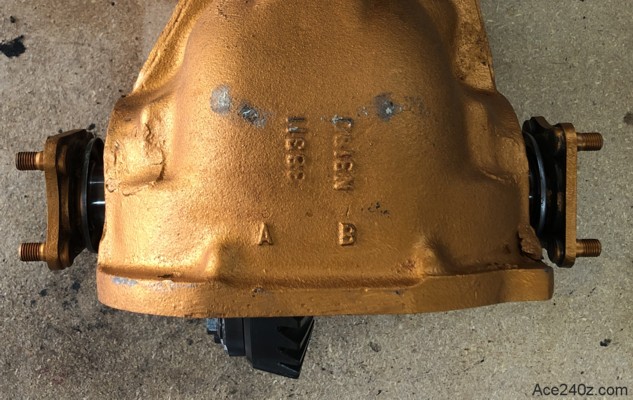
When I bought it from Junkyard Jenny, she drained the fluid and pulled off the rear cover to see how it looked. Typically the fluid has a distinctive and horrible burned smell. The fluid from this one was less stinky than expected. The ring gear and pinion look perfect. According to the number stamped on the ring gear it has a 3:53 ratio, which is typically paired with an automatic transmission. That's good from my perspective because they encounter less stress than a car with a manual and a clutch.
Even though it's in pretty good shape, I'm going to give it a quck power rinse inside and replace all of the seals. Not doing it would be pretty stupid. Imagine it springing a leak in a few months. The cost for everything, including the gear lube, was a mere $87
Give the case a good scrubbing with some engine degreaser and a wire brush. Taking it to your local spray wash can help.
The diff presently in my car is painted gold, which made me laugh. I intended on painting this one black until I spotted a can of heat-proof bronze. As you can see a quick coat of paint really makes a difference. I really should have waited until the refresh was done but I couldn't wait.
When I bought it from Junkyard Jenny, she drained the fluid and pulled off the rear cover to see how it looked. Typically the fluid has a distinctive and horrible burned smell. The fluid from this one was less stinky than expected. The ring gear and pinion look perfect. According to the number stamped on the ring gear it has a 3:53 ratio, which is typically paired with an automatic transmission. That's good from my perspective because they encounter less stress than a car with a manual and a clutch.
Even though it's in pretty good shape, I'm going to give it a quck power rinse inside and replace all of the seals. Not doing it would be pretty stupid. Imagine it springing a leak in a few months. The cost for everything, including the gear lube, was a mere $87
 I started by removing the drain plug. Not everybody has a workbench with a vise, but it sure helps. A 1/2" drive ratchet or breaker bar fits but it took some effort to get it turning. Heat from a torch would have helped.
A crescent wrench took care of the drain plug with some encouragement from a hammer.
I started by removing the drain plug. Not everybody has a workbench with a vise, but it sure helps. A 1/2" drive ratchet or breaker bar fits but it took some effort to get it turning. Heat from a torch would have helped.
A crescent wrench took care of the drain plug with some encouragement from a hammer.
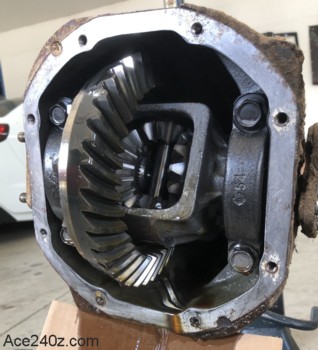 Remove the end cover and take a look at the gears. They're pretty rugged but time and abuse can lead to some obvious wear. Rotate everything back and forth. If anything looks worn or damaged, you'll need to get it serviced by a professional. If everything looks good, you can move on to the next step.
These look great.
Scrape off all of the old gasket and sealer from the case and the cover. Take your time and clean the surfaces as smooth as possible.
Use a pair of pliers to wiggle the plastic vent tube out.
Remove the end cover and take a look at the gears. They're pretty rugged but time and abuse can lead to some obvious wear. Rotate everything back and forth. If anything looks worn or damaged, you'll need to get it serviced by a professional. If everything looks good, you can move on to the next step.
These look great.
Scrape off all of the old gasket and sealer from the case and the cover. Take your time and clean the surfaces as smooth as possible.
Use a pair of pliers to wiggle the plastic vent tube out.
 Use a big screwdriver or a pry bar to remove the output shafts. Sometimes it'll take a little effort to get them loose, but the business end of this crowbar popped them right out. Some shafts have a long bolt to hold them in place. If yours has bolts, remove them.
 The seals can be pried out with a seal puller, or a screwdriver, but be very careful to not scratch the surface where it sits. Also be careful to not let any of the old gunk around it fall inside.
These weren't leaking but they sure looked awful.
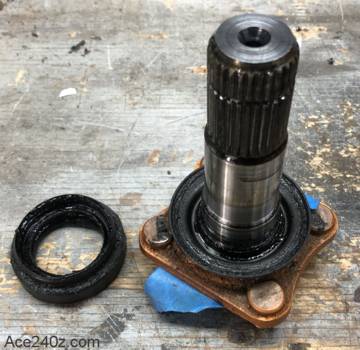
Give the shafts a good cleaning and leave the metal dust seal at the bottom of the shaft in place.
In the old days, I would have given the shafts a bath in "solvent", which is basically naptha. It does a great job of disolving oil and grease but is pretty toxic. These days I typically use dishwasing soap, which does a pretty decent job as a degreaser. I also use a generic "carb cleaner" spray, which is pretty much solvent-in-a-can.
The seals can be pried out with a seal puller, or a screwdriver, but be very careful to not scratch the surface where it sits. Also be careful to not let any of the old gunk around it fall inside.
These weren't leaking but they sure looked awful.
Give the shafts a good cleaning and leave the metal dust seal at the bottom of the shaft in place.
In the old days, I would have given the shafts a bath in "solvent", which is basically naptha. It does a great job of disolving oil and grease but is pretty toxic. These days I typically use dishwasing soap, which does a pretty decent job as a degreaser. I also use a generic "carb cleaner" spray, which is pretty much solvent-in-a-can.
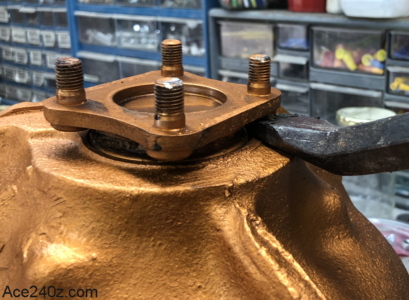
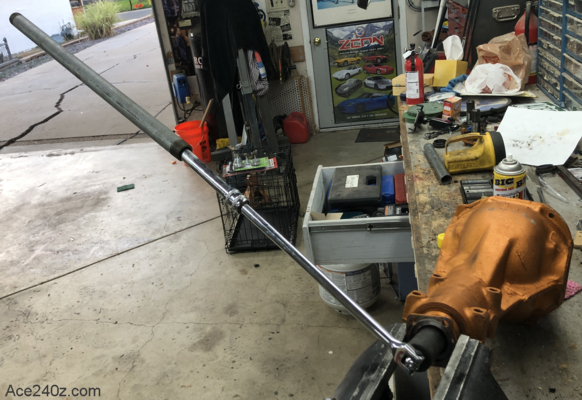 The driveshaft's "companion flange" at the front (which connects to the drave shaft) needs to be removed, which is damned difficult. I tried with a 4' breaker bar and probably half my body weight, which generated about 400 foot pounds of torque but failed to break it loose. Heating it with a torch (several times) probably would have helped.
You'll need to clamp the flange in a vise or get a husky friend to hold it down while you tug or chain it to the floor.
I ended up using an impact driver, which took a lot of chattering to get it free. Not everyone has an impact driver, so you might be able to take the diff to a nearby mechanic and ask for a few minutes of help. If they seem reluctant, offer them a six-pack as a thank-you. I speak from experience when I say that often works.
Pry the front seal out.
The driveshaft's "companion flange" at the front (which connects to the drave shaft) needs to be removed, which is damned difficult. I tried with a 4' breaker bar and probably half my body weight, which generated about 400 foot pounds of torque but failed to break it loose. Heating it with a torch (several times) probably would have helped.
You'll need to clamp the flange in a vise or get a husky friend to hold it down while you tug or chain it to the floor.
I ended up using an impact driver, which took a lot of chattering to get it free. Not everyone has an impact driver, so you might be able to take the diff to a nearby mechanic and ask for a few minutes of help. If they seem reluctant, offer them a six-pack as a thank-you. I speak from experience when I say that often works.
Pry the front seal out.
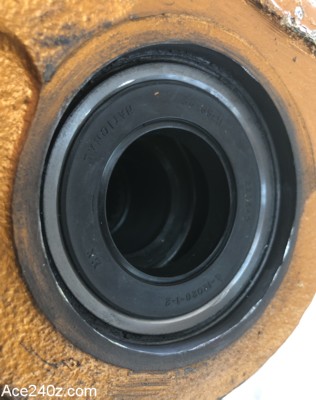 When it comes time to insert the new output shaft seals, make sure the surface of the hole is as clean as possible. Smear a thin layer of oil around the seal and it's pointed in the right direction. When you get the seal started, you can use a hammer to gently tap-tap-tape the seal in place. They sit flush as shown.
 The seal for the pinion shaft is a little more difficult. Like with the output shaft seals, put a thin smear of oil around it. Use the old seal on top of it as padding for when you hit it with the hammer. It'll take more force than the side seals, but go slow and work your way around until it sits flush.
I forgot to get a photo of the end cover after cleaning it. For the gasket, put a very thin layer of RTV sealer on the case surface and the cover surface. Put the gasket in place and tighten the bolts until the sealer barely starts to squeeze out. Let the sealer sit for about an hour to semi-cure, then torque the bolts to 14-19 ft-lbs. Put the drain plug back in snugly but not crazy tight.
 The side shafts can be pushed back in. You can feel when the splines line up. They're slightly different lengths, so test fit them to make sure both stick out about the same distance on each side.
A little "rap" with a rubber mallet or hammer will pop them in and lock them into place.
The side shafts can be pushed back in. You can feel when the splines line up. They're slightly different lengths, so test fit them to make sure both stick out about the same distance on each side.
A little "rap" with a rubber mallet or hammer will pop them in and lock them into place.
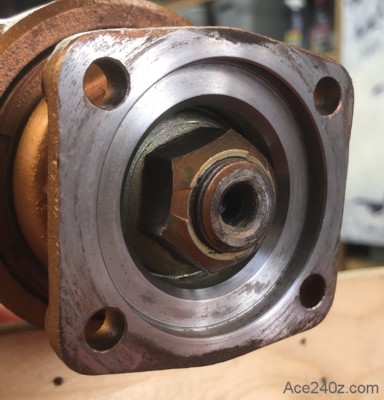 The driveshaft companion flange can be reinserted. Lightly tap it in until you feel the splines make contact, turn it back and forth a few times to make sure the splines are aligned, then tap it inward until the threaded shaft appears. Put a few drops of Loctite on the threads, then torque the nut down to 140 ft-lbs. You'll need to have it clamped in a vise or get a friend (or two) to hold it while you tighten.
You definitely do not want this to come loose.
The driveshaft companion flange can be reinserted. Lightly tap it in until you feel the splines make contact, turn it back and forth a few times to make sure the splines are aligned, then tap it inward until the threaded shaft appears. Put a few drops of Loctite on the threads, then torque the nut down to 140 ft-lbs. You'll need to have it clamped in a vise or get a friend (or two) to hold it while you tighten.
You definitely do not want this to come loose.
 Gently tap the plastic vent in place.
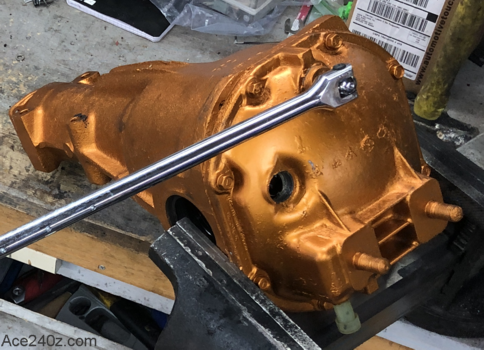
With everything assembled, now's the time to give it a fresh coat of paint. You don't have to, but it'll look nicer.
Pour gear lube into the filler hole until it just starts to dribble out. The official amount is 1.35 quarts but the "just starts to dribble out" method is close enough. Put the plug back in snugly.
Gently tap the plastic vent in place.
With everything assembled, now's the time to give it a fresh coat of paint. You don't have to, but it'll look nicer.
Pour gear lube into the filler hole until it just starts to dribble out. The official amount is 1.35 quarts but the "just starts to dribble out" method is close enough. Put the plug back in snugly.
Reinstalling the differential is basically the same way it came out, but in reverse. Make sure all of the connections are tight. Really tight. Loctite is your friend. If all has gone well, you won't have to worry about leaks or noise or changing the fluid for a long, long time.